Think of the light in your garage as the friendly glow that greets you every time you pull in. It’s supposed to illuminate your path and help you easily find your way. But over time, light sockets can wear out or become damaged, leaving you in the dark—literally. If you’re using a Chamberlain, LiftMaster, or any type of garage door opener, knowing how to replace that light socket is a handy skill that ensures you won’t be left searching for that light switch in the shadows.
Let’s dive deeper into what you need to know, starting with why a functioning light socket is vital for your garage door opener.
Why A Functional Light Socket Matters
You might be wondering, “Why does the light socket even matter?” Well, think about it: when you pull into your garage, having a bright light makes all the difference. It keeps you safe by illuminating obstacles and helping you avoid accidents. Plus, it adds a touch of convenience when you’re trying to find items in your garage.
A working light socket is also essential for the overall functionality of your garage door opener system. Many units rely on the light to signal their status. Is the light blinking? That might mean something’s wrong with your garage door opener. So, if your light socket is faulty, it can create confusion during troubleshooting.
Ultimately, a well-lit garage can elevate your space from just storage to a smart and organized area. Let’s get into how you can swap out that socket and restore the glow!
Identifying The Type Of Light Socket You Need
Before diving into replacing the light socket, take a moment to identify what kind you’re dealing with. Typically, garage door openers use a standard medium base socket, similar to what you would find in a regular lamp. However, some might require a specific type due to the design or model of the opener.
Here are a few common types:
- Medium Base Socket: This is the standard socket used in many garage door openers.
- Baquette Socket: Less common, this might appear in specialty models.
- LED-integrated Socket: Some newer models come with LED light sockets built directly into the fixture.
Now, you might be thinking, “How do I figure out which one I have?” One quick method is to check your owner’s manual. If you can’t find it, pull the bulb and take it with you to your local hardware store, where you can match it up.
Gathering Your Tools and Materials
Before you start the replacement process, you’ll need to gather a few essential tools and materials. Having everything on hand makes the job smoother and quicker. Here’s what you’ll need:
- New Light Socket: Make sure it matches the type of socket you’re replacing.
- Screwdriver: A Phillips head screwdriver will likely do the trick.
- Wire Cutters/Strippers: Essential for handling any wiring.
- Electrical Tape: Important for insulating any exposed wires.
- Safety Glasses: Always good to protect your eyes when working with electrical components.
As you gather your tools, it’s a good time to remind yourself to approach this project with care. Electrical work can seem intimidating, but being prepared makes all the difference.
Preparing To Replace The Light Socket
Your first step in replacing the light socket is to ensure safety. Start by unplugging your garage door opener from the wall socket. If it’s hardwired, locate the circuit breaker that supplies power to your garage and turn it off. You don’t want any surprises when tinkering with electrical components.
Next, you should clear the area around the garage door opener. This makes the process easier and keeps you safe from tripping over items. If possible, place a ladder or stool nearby so you can easily reach the opener light assembly.
Once you have your workspace prepped and safe, check the current state of the light bulb. In most cases, removing the bulb will reveal how to disassemble the light socket.
Removing The Old Light Socket
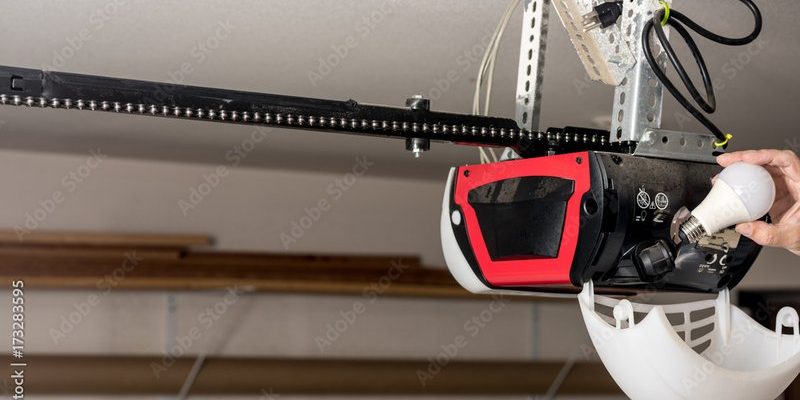
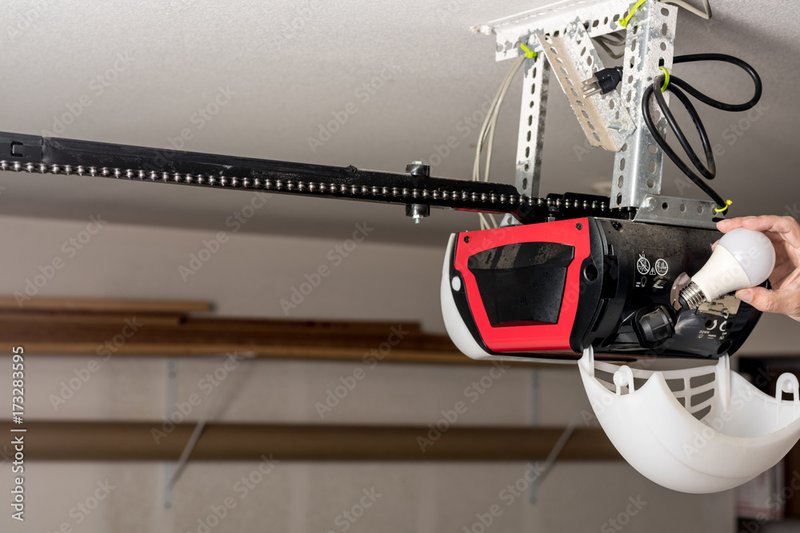
Now that you’re all set, it’s time to dive into replacing that old socket. First off, you’ll need to locate the cover for the light assembly. Most covers will be secured with screws, so grab that screwdriver you gathered earlier and remove them.
Once the cover is off, take a close look at how the old socket is attached. Typically, you’ll find a few wires connected to it. Take a moment to make notes. You can even snap a picture to refer back to later for reconnection—trust me, it can save you some hassle.
Gently disconnect the wires from the old socket. You’ll usually find two wires: one black (the hot wire) and one white (the neutral wire). If the wires are tightly connected, use your wire cutters or strippers to carefully detach them.
Lastly, remove any screws or clips that hold the socket in place. Pull it out gently, being careful not to damage any surrounding components.
Installing The New Light Socket
With the old socket removed, you’re ready to install the new one. Start by connecting the wires to your new socket. Attach the black wire to the brass terminal and the white wire to the silver terminal. The order is crucial, as incorrect wiring can cause your opener to malfunction.
After connecting the wires, secure the new socket in place using screws or clips, depending on what your model requires. Again, it’s wise to double-check that every connection is firm and precise to avoid future issues.
Once the socket is secure and the connections are made, you can replace the light cover. Be careful when tightening screws—too much pressure can crack the cover.
Testing Your New Light Socket
Next comes the moment of truth! It’s time to power up your garage door opener and test the new socket. If you unplugged it, plug it back into the wall outlet or flip the circuit breaker back on.
Once the power is restored, try turning on the garage door opener. If the light shines bright, congratulations—you’ve successfully replaced the light socket! If not, double-check your connections and ensure everything is secure. You may need a friend to come assist if you’re troubleshooting—sometimes, an extra set of eyes makes all the difference.
Common Problems and Troubleshooting
Even with careful installation, you might run into some hiccups. Here are some common issues that can arise after replacing a light socket:
- Light Doesn’t Turn On: Double-check your connections; the wires may not be securely attached.
- Socket Overheating: This could indicate a wiring issue. Turn off the power and inspect the connections.
- Blinking Light: This often signals an error with the garage door opener system rather than the bulb or socket itself.
If you’re stuck, refer to your owner’s manual. It can provide specific troubleshooting tips for your model. Remember, it’s always better to be safe than sorry when it comes to electrical work.
Alternative Options: Switching To LED Bulbs
As you’re revamping your light setup, you might want to consider switching to LED bulbs. LED bulbs last significantly longer and use less energy compared to traditional incandescent bulbs. They aren’t just eco-friendly—they can also save you some bucks on your electricity bill.
When installing an LED bulb, ensure it’s compatible with your garage door opener. Some models are sensitive to the type of bulb used, especially when it comes to dimming features. If you choose to go this route, it’s wise to read the specifications to find the perfect match.
Wrapping It Up: A Well-Lit Garage Awaits!
Replacing a light socket in your garage door opener can be a straightforward process once you break it down into manageable steps. With the right tools, a little confidence, and a good understanding of your opener, you’ll have your garage shining bright in no time.
Lighting isn’t just about brightness; it’s about safety, usability, and creating an inviting space. By taking the time to replace that socket, you’re investing in an environment where you feel comfortable and confident. So grab your tools and get to work—the newly luminescent garage awaits you!