The wall button is designed for convenience. Picture it as your garage’s welcoming committee—it greets you when you arrive and helps you leave without a hassle. Now that we’ve set the scene, let’s explore *how to use the Skylink wall button* in detail. We’ll cover everything from installation to troubleshooting common issues, ensuring you feel confident every time you roll into your driveway.
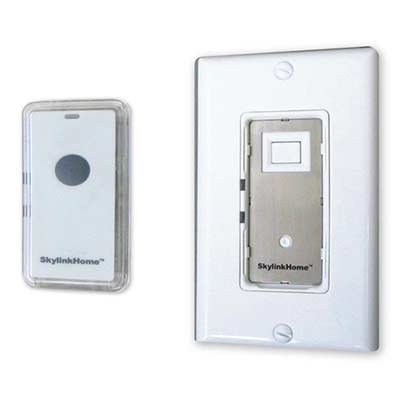
What’s Included with Your Skylink Wall Button?
When you first unbox your Skylink wall button, there’s usually more than just the button itself. Here’s what you can expect:
- The Wall Button: This is the star of the show. A simple device with a button to operate your garage door.
- Mounting Hardware: Most kits come with screws and brackets so you can install the button easily.
- Quick Start Guide: This handy booklet walks you through the process of setup and usage.
Having all these parts makes the setup seamless. You have everything you need to get started, and it’s designed for even the most tech-challenged among us. Honestly, you don’t need to be an electrician to install this wall button; most people can do it in under 30 minutes!
Installing the Skylink Wall Button
So, where do you start with the installation? First, pick a location that’s convenient but out of reach of pets or small children. Ideally, the button should be near the garage entrance but not too close to the door itself, where it might get accidentally pressed.
To install, follow these steps:
1. Mark the Spot: Use a pencil to outline where you want the wall button to go.
2. Drill Holes: Depending on your wall type, you may need to drill a couple of pilot holes.
3. Attach the Button: Use the provided screws and mounting brackets to secure the button in place.
4. Connect Wires (if required): Some models may need wiring to the opener, but many are wireless.
5. Test It Out: Once everything is installed, give that button a push! You should hear the door respond immediately.
If you’re not comfortable with tools or wiring, don’t hesitate to ask a friend for help or hire a professional. It’s better to be safe than sorry!
Pairing the Wall Button with Your Garage Door Opener
Now that you have the Skylink wall button installed, you must pair it with your garage door opener. This step is crucial—think of it as introducing new friends at a party; they need to know each other to work together effectively.
Here’s a simple method to get them connected:
1. Locate the Learn Button: This button is usually found on the back or side of your garage door opener.
2. Press the Learn Button: It will usually blink to indicate it’s in pairing mode.
3. Activate the Wall Button: Press and hold the button on the wall for a few seconds until you see the opener respond. You might hear a click or notice the lights flash.
4. Test It Again: Press the wall button and see if the garage door opens and closes smoothly. If it does, congrats—you’ve successfully paired the devices!
If it doesn’t work, don’t worry. You might need to reset and repeat these steps. Here’s the thing: syncing devices can sometimes be finicky, especially if there’s interference.
Using the Skylink Wall Button
Using the wall button is straightforward, but a few tips can enhance your experience. Here’s how it works:
– Opening Your Garage Door: Simply press the button. You’ll hear the motor engage, and the door should begin to open smoothly.
– Closing Your Garage Door: If you’re inside the garage, press the button again to close it. Some models feature a safety mechanism to prevent the door from closing if something’s in its path.
– Manual Release: In case of power failure, you’ll want to familiarize yourself with the manual disengage mechanism. This usually involves pulling a cord to free the door from the opener.
Always keep the garage door path clear to avoid accidents. Regular checks ensure the button works perfectly, and the door responds instantly.
Troubleshooting Common Issues
Even with the best equipment, hiccups can happen. Here are a few common issues you might encounter with your Skylink wall button, along with simple fixes.
1. The Button Doesn’t Work:
– Ensure the battery is functioning if it’s a battery-operated model.
– Check the connections if wired; make sure they’re snug and secure.
2. Garage Door Won’t Respond:
– Double-check if the button is properly paired with the opener.
– Inspect for any obstructions or issues with the garage door’s mechanics themselves.
3. The Light Doesn’t Illuminate:
– If your wall button has an LED light, it should illuminate when pressed. If it doesn’t, replace the battery or check the wiring.
Remember, *patience is key.* If you can’t solve the issue quickly, consult the manual or reach out to Skylink support.
Benefits of Using a Wall Button vs. Remotes
You might be deliberating between using a wall button or a remote control for your Skylink system. While both have their perks, here are some reasons you might lean towards the wall button:
– Accessibility: Having the button mounted means you can access it easily—no fumbling through bags or pockets when your hands are full.
– Reliability: Wall buttons are less likely to get lost or run out of batteries compared to handheld remotes.
– Convenience: If you do a lot of coming and going, having a wall button at the entry point can save time.
Of course, some might prefer the versatility of remotes, especially for larger homes with multiple entry points. But if you’re looking for a straightforward, reliable solution for your garage door, the wall button is hard to beat.
Final Thoughts on Your Skylink Wall Button
Embracing the Skylink wall button can streamline your garage experience, making it easier to come and go without fumbling or worrying about equipment malfunctions. With easy installation and straightforward use, it’s a user-friendly addition to any garage setup.
By now, you should feel empowered to install, use, and troubleshoot your Skylink wall button confidently. Remember to keep everything clear and maintained, and if issues arise, don’t hesitate to refer back to this guide. Happy opening!