If you’ve got a Genie or LiftMaster opener, for example, and it seems stuck or won’t respond to the remote, those old, unreliable mounting brackets could be the culprit. In this guide, we’ll walk through practical steps you can take to troubleshoot your garage door opener while considering the impact of those less-than-stellar mounting brackets. You’ll be a garage door detective in no time!
Understanding Your Garage Door Opener
Let’s start by getting to know your garage door opener. Most systems consist of a motor that controls the door’s movement, a remote, and supporting hardware. The remote sends signals to the opener to open or close the door, but what if that signal gets lost? It’s possible that your mounting brackets are to blame. They play a crucial role in stabilizing and supporting the opener. If they’re worn or misaligned, you might face some serious issues.
Garage door openers come in different types, including chain-driven, belt-driven, and screw-driven models. Each has its quirks and benefits. For instance, chain-driven openers are typically more affordable but can be noisier than their belt-driven counterparts. Regardless of the type, junk mounting brackets can weaken the whole system, making your troubleshooting journey a bit more complicated. Understanding how these elements work together can help you pinpoint problems more effectively.
Identifying Signs of Trouble
You might be wondering how to identify issues stemming from junk mounting brackets. Common signs include unusual noises when opening or closing the door and inconsistent movement. If your door hesitates or reverses when it shouldn’t, that’s another red flag. With a little detective work, you can often trace these issues back to the mounting setup.
Look for physical signs of wear as well. Does the opener sit unevenly? Are the brackets cracked or rusted? It’s not unlike discovering a loose piece in a jigsaw puzzle—the whole picture just won’t come together without that key piece in place. Additionally, examine the door itself. Look for dents or warping, as this can also interfere with smooth operation. Keeping an eye on these factors can make a world of difference in troubleshooting.
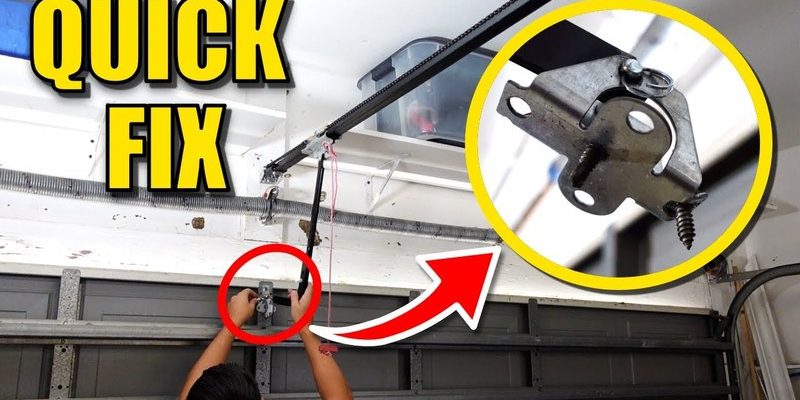
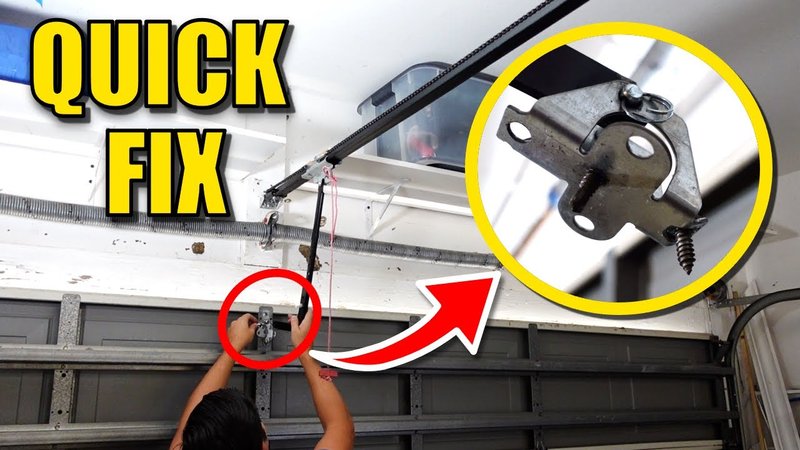
Checking the Mounting Brackets
Now that we’ve identified the signs of trouble, it’s time to investigate those mounting brackets. First, you’ll want to ensure your opener is safely powered off. This isn’t the time to test your luck with live wires! Once you’re safe, closely inspect each bracket. Are they securely fastened to the wall and ceiling? If they’re loose, it could cause misalignment and add stress to the entire system.
You might also want to check if the brackets are level. A well-installed bracket should sit flat against its surface. Using a level tool can help you determine this. If they’re not level, consider adjusting them or replacing them altogether. Sometimes, investing in sturdy, reliable mounting brackets can save you from a lot of headaches down the road.
Resetting Your Garage Door Opener
If your garage door opener isn’t responding, a simple reset can sometimes do the trick. Different models have various reset mechanisms, but the general idea is similar for most. Here’s how to do it:
1. Locate the reset button: This is often found on the motor unit—look for a red button or one that’s slightly recessed.
2. Press it: Depending on your model, you might need to hold it for a few seconds.
3. Reconnect the remote: After resetting, you may need to reprogram your remote to sync with the opener again.
Resetting can help clear minor glitches or errors. It’s kind of like giving your opener a quick nap; sometimes, it just needs a moment to recharge! After resetting, test it to see if it operates smoothly.
Synchronizing Your Remote to the Opener
Lost connection between your remote and the garage door opener? Synchronizing them might be your solution. Often, this process is straightforward and helps restore functionality.
1. Prepare the opener: Turn on the light or base unit of the opener.
2. Press the learn button: This button is typically located on the motor unit.
3. Activate the remote: Press the button on your remote that you want to sync.
Once you’ve done this, your remote should communicate effectively with the opener. It’s almost like having a friendship where both parties need to stay in touch! If it doesn’t connect, try repeating the steps.
Testing Safety Sensors
Safety sensors are essential for modern garage door openers. They prevent the door from closing if something is in the way. If these sensors are malfunctioning due to misalignment or junk mounting brackets, your door might refuse to close.
To test the sensors:
1. Inspect alignment: Ensure both sensors point directly at each other. A few inches off can cause issues.
2. Look for obstructions: Check if there’s anything blocking the sensors’ path. A cobweb or debris could easily interfere with their function.
3. Test operation: Try closing the door while something is in the way. The door should reverse if the sensors are operational.
If the sensors are working but the problem persists, you may need to replace them. Like a protective shield, these sensors are crucial for the safety of your home and loved ones.
Upgrading or Replacing Brackets
If you find that your current mounting brackets are junk, don’t hesitate to consider replacing them. It’s sometimes the easiest way to resolve ongoing issues. Investing in stronger, more reliable brackets could save you money and trouble long-term.
When shopping for replacements, look for materials like heavy-duty steel. They’re more durable and can withstand the strain of your garage door opener working day in and day out. Plus, installation is often straightforward—many come with clear instructions. Generally, it’s a matter of removing the old brackets and securely fastening the new ones.
Troubleshooting a garage door opener with junk mounting brackets may feel overwhelming, but with a little patience and following these steps, you can tackle it with confidence. From checking the mounting brackets to resetting the opener and ensuring everything is properly synced, each step is vital for maintaining smooth operation.
Your garage door is an important part of your home, offering convenience and security. By keeping a watchful eye and taking proactive steps, you can ensure that it runs like a dream. Remember, sometimes it’s the small things that make a big difference. So, take the time to listen to your garage door—it just might tell you what it needs!