
Understanding and troubleshooting this issue is simpler than it sounds. Garage door openers, like those from Chamberlain or LiftMaster, are designed to be user-friendly. Still, spring tension can be tricky. So, let’s break down what spring tension is, how to recognize when it’s off, and some steps you can take to troubleshoot and fix it.
What Is Spring Tension?
Spring tension refers to the tautness of the springs in your garage door system, which are usually either torsion or extension springs. Torsion springs are mounted horizontally above the door, while extension springs are located on either side of the door. These springs work to lift the weight of the door, allowing it to open and close smoothly.
When everything’s in balance, a correctly tensioned spring helps your garage door feel light as a feather. But if the tension is off—either too tight or too loose—it can cause some serious problems, like the door being unable to open or close fully. This situation can leave your garage inaccessible and, frankly, a little frustrating.
You might be wondering how to tell if your garage door springs are in poor condition. Here are a couple of signs: if you notice your door not opening smoothly or making strange noises like rattling or squeaking, it’s time to take a closer look.
Why Does Spring Tension Matter?
Let’s dive a bit deeper into why proper spring tension is so critical. When your garage door springs are too tight, you risk putting added strain on your garage door opener, which may lead to mechanical failure over time. On the flip side, if the springs are too loose, your door may fall unexpectedly, which creates a safety hazard.
Imagine trying to lift a heavy box while wearing weight-lifting gloves. If the gloves are too tight (the springs are too tight), it’s hard to get the grip you need. But if they’re too loose, you can’t hold onto the box properly, and it might slip right out of your hands! That’s a little like what happens with your garage door if the springs aren’t balanced.
Common Symptoms of Improper Spring Tension
Recognizing the signs of improper spring tension is the first step in troubleshooting your garage door opener. Here are some indicators that you might be dealing with this issue:
- The Door Seems Heavy: If you have to put in extra effort to lift your garage door, the springs may be too tight.
- Door Doesn’t Open or Close Smoothly: A jerky or uneven movement usually signals spring tension problems.
- Unusual Noises: Listen for creaks, squeaks, or bangs—these sounds can indicate something is off with your springs.
- Door Falls Quickly: If your door hits the ground unexpectedly, the springs may be too loose.
If any of these situations sound familiar, it’s time to dig deeper into your garage door system.
Safety First: Precautions to Take
Before you start troubleshooting, safety should be your number one concern. Garage door springs are under a lot of tension; mishandling them can lead to serious injury. Always follow these precautions:
- Disconnect the Power: Before you touch anything, unplug your garage door opener to avoid accidental activation.
- Wear Safety Gear: Consider using gloves and safety glasses to protect your hands and eyes.
- Have a Helper: It’s always a good idea to have someone with you, especially if you’re lifting heavy components.
Taking these simple steps can make a significant difference in ensuring your safety while you work on your garage door opener.
How to Check Spring Tension
Now that you’re prepped for safety, you’ll want to check the tension on your springs. Here’s how you can do that:
1. Visual Inspection: Look for any visible signs of wear or damage. Is there rust or fraying? Do the coils look uneven or spaced in a way that seems wrong?
2. Lift the Door Manually: Disconnect the opener by pulling the release cord (often a red cord) and try lifting the door manually. If it feels heavy or you struggle, your springs may be too tight.
3. Observe the Door Movement: Watch how the door operates. Does it move smoothly, or does it seem to hesitate at any point? Any unusual movements indicate improper spring tension.
If you notice any issues during your inspection, it’s time to dive into adjustment or replacement options.
Adjusting Spring Tension
If you find that the spring tension is off, here’s how to adjust it carefully. First, ensure you have the right tools: a ladder, adjustable wrench, and locking pliers.
For torsion springs:
1. Loosen the set screws: Use your adjustable wrench to loosen the screws on the spring’s winding cone.
2. Use a winding rod: Insert a winding rod into the hole in the cone, and turn clockwise to increase tension or counterclockwise to decrease tension.
3. Adjust in small increments: Make small adjustments, checking the door’s movement frequently. Keep an eye on how easily the door lifts.
For extension springs:
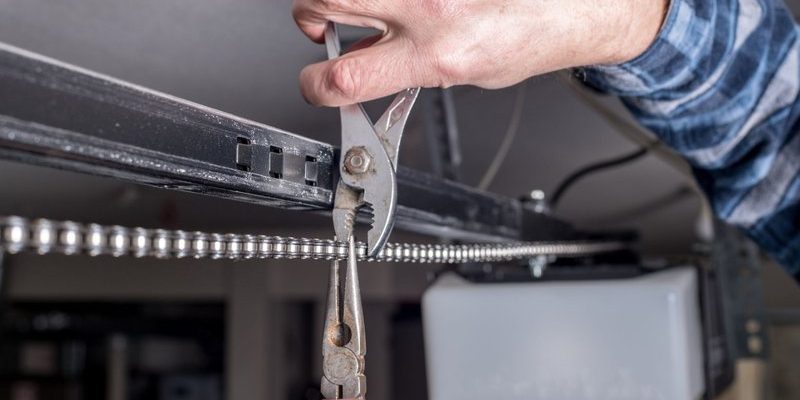
1. Loosen the hardware: Begin by loosening the brackets where the spring is secured.
2. Add or remove links: For a tighter spring, add a link to the chain. For a looser spring, remove a link as needed.
3. Re-tighten everything: Ensure that all brackets and hardware are secure before testing your door.
Remember, adjusting springs can be risky. If at any point you feel uneasy, don’t hesitate to call a professional.
When to Replace Spring Tension
Sometimes, after all the troubleshooting, you may find your springs are beyond repair, especially if they show signs of substantial wear or damage. If your springs have snapped or you notice any significant rusting or deformity, it’s probably time for a replacement.
Replacing springs can be a little more complicated and may vary based on whether you have extension or torsion springs, but here’s a general guideline:
1. Ensure the Power is Off: Always make sure to disconnect the opener before starting.
2. Remove the Old Springs: Carefully unbolt the old springs from their positions and remove them.
3. Install New Springs: Follow the manufacturer’s instructions to install the new springs, ensuring they’re appropriately positioned and securely attached.
If you’re uncertain about this process, always seek professional help. There’s no shame in calling in the experts, especially when safety is at stake!
Testing Your Garage Door Opener
Once you’ve made adjustments or installed new springs, it’s time to test your garage door opener. Here’s how you can do it effectively:
1. Reconnect the opener: Plug it back into the wall and ensure everything is secure.
2. Test the remote: Use your garage door opener remote to see if the door operates smoothly now.
3. Observe the door behavior: Check if the door opens and closes effortlessly. If it does, congratulations—you’ve tackled the issue!
If things still seem off after all your hard work, it might be time to consult a professional. Sometimes, other components, like your garage door opener motor, could also be causing trouble.
Preventive Measures for the Future
Once you’ve resolved the spring tension issue, it’s worthwhile to take steps to prevent future problems. Here are a few tips:
- Regular Inspections: Schedule routine checks every few months to ensure the springs and all components are in good condition.
- Lubrication: Lubricate moving parts to help prevent wear and tear.
- Professional Maintenance: Sometimes, it’s worth it to have a professional perform a yearly maintenance check.
Taking these preventive measures can help you avoid significant repairs and keep your garage door functioning smoothly for years to come.
Navigating issues with your garage door opener can feel a bit daunting, particularly when it comes to proper spring tension. But by familiarizing yourself with the signs, prevention, and solutions, you’ll find it’s not as intimidating as it seems.
Remember, the goal here is to keep things running smoothly—just like any well-oiled machine. With a little effort and attention, your garage door can go from a stubborn boulder to an easy lift with the press of a button again. And if all else fails, know that there are skilled professionals ready to help. Keeping your garage door in working order is not just about convenience—it’s about safety too.