Testing your Genie safety sensors is a straightforward process, but it’s essential to know what you’re doing. Think of it as checking the blood pressure of your garage door system. Just like a doctor makes sure you’re healthy, regularly testing your safety sensors ensures that your garage door can operate safely and effectively. So, if you’re ready to dive into the world of safety sensors and find out how to keep your Genie opener running smoothly, let’s get started.
Understanding Genie Safety Sensors
Before we jump into testing, it’s good to know what safety sensors are and how they work. In a nutshell, these sensors are two small devices placed near the bottom of your garage door tracks. They emit a beam of infrared light and “talk” to each other. If that beam gets interrupted—say by a pet, child, or even a garden hose—the door automatically stops and reverses. This feature is critical in preventing accidents.
Genie safety sensors are designed to be intuitive. You might not even notice them until something goes wrong. When they function properly, they ensure that your garage door operates smoothly and safely, providing peace of mind every time you come and go. However, like any technology, they can encounter issues. That’s why it’s vital to test them regularly and know what to do if they’re not working.
Gathering the Right Tools for Testing
Alright, before you start testing, let’s grab the necessary tools. Here’s what you need:
- Flathead Screwdriver: This will help you access parts of the sensor if needed.
- Tissue or Cloth: You’ll want to clean the sensor lenses if there’s any dirt or debris.
- Multimeter (optional): This can be useful if you suspect a more technical issue.
- Flashlight: In case you need some extra light to see what you’re working with.
Being prepared can save you from unnecessary frustration later on. Make sure you have all these tools handy, and a little patience goes a long way too!
How to Locate Your Genie Safety Sensors
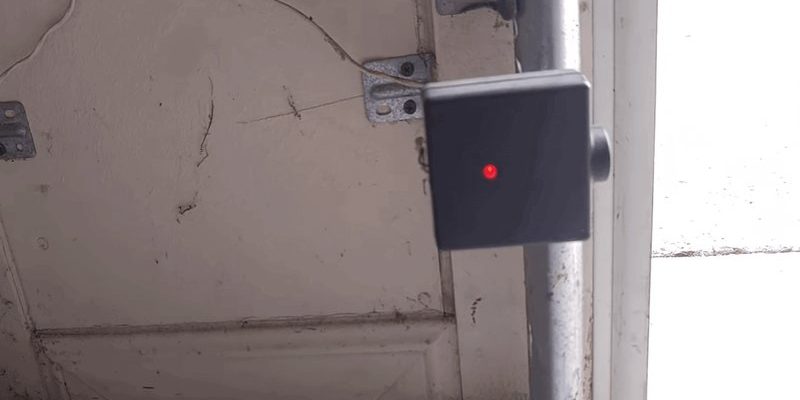
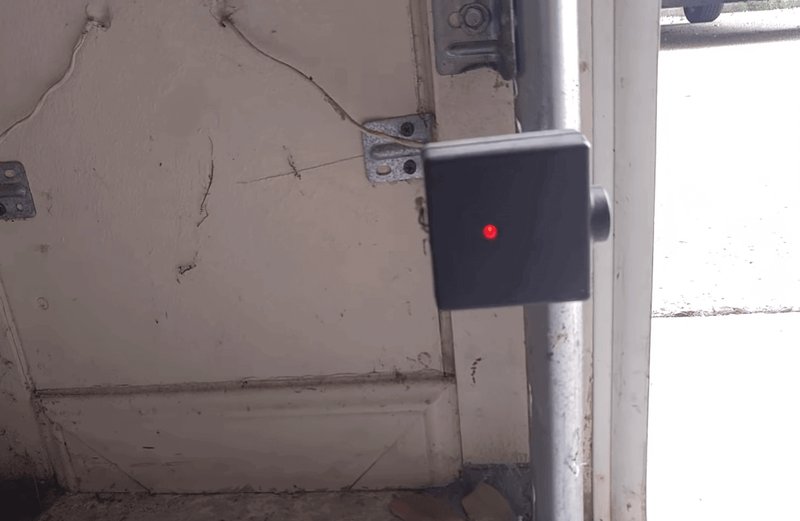
Finding your safety sensors is pretty straightforward, but it helps to know exactly where to look. They’re usually installed on either side of the garage door frame, mounted about 6 inches above the ground. If you glance down, you should see them staring back at you!
These sensors might be black or gray and often have a small LED light that indicates whether they’re functioning properly. To ensure the sensors are aligned, check if the lights on both sensors are lit. If one light is blinking or off, it may indicate a misalignment or obstruction.
Take a moment to get familiar with their location. Recognizing where they are makes the testing process much smoother.
Steps to Test Your Genie Safety Sensors
Now that you have your tools and know where your sensors are, let’s dive into testing them. Here’s how you can go about it:
1. Inspect the Sensors: Start by checking if the sensor lenses are clean. Dust, cobwebs, or dirt can disrupt the infrared beam. Wipe them gently with your cloth or tissue.
2. Check for Obstructions: Make sure nothing is blocking the path of the beam. This includes any items on the ground or even plants that might have grown too close to the sensors.
3. Test the Alignment: Look for the LED indicator lights on each sensor. If one is blinking while the other is solid, it usually means the sensors are misaligned. Loosen the screws on the sensor bracket and adjust the alignment, then recheck the lights.
4. Perform a Function Test: Once you’ve ensured the lenses are clean and the sensors are aligned, it’s time for a real test. Close the garage door manually and place an object (like a cardboard box) in its path. The door should reverse automatically when it hits the object. If it doesn’t, you may have a more significant problem to troubleshoot.
By following these steps, you can confidently check if your Genie safety sensors are functioning as they should. Remember, keeping them well-maintained contributes significantly to your overall safety.
Troubleshooting Common Issues
Sometimes, even after following the above steps, you might encounter issues. Here are a few common problems you could face and how to fix them:
Sensor Alignment Problems: If the sensor lights are behaving erratically, misalignment is often the issue. Loosen the brackets, readjust, and make sure they are facing each other directly.
Blocked Sensors: Even small objects, like a leaf or pebble, can interfere with the sensors. Regularly check for and clear away any debris.
Faulty Wiring: If the lights aren’t coming on at all, it might be a wiring issue. Inspect the wires for any damage or loose connections, and replace as necessary.
Power Issues: Ensure your garage door opener is plugged in and that the outlet is functioning. Sometimes, a simple reset can help too. Unplug the opener for about a minute, then plug it back in.
Each of these issues can typically be resolved quickly. If you’re still running into trouble after troubleshooting, it might be time to consult a professional or consider replacement sensors.
When to Call a Professional
Sometimes, DIY testing and troubleshooting don’t cut it. If you’ve gone through all the steps, and the sensors still aren’t working, calling a professional may be your best bet. Here are some signs it’s time to make that call:
- Both sensors are not lit, and you’ve checked power and wiring.
- The issues persist even after you’ve cleaned and realigned the sensors.
- You notice any visible damage to the sensors or wiring.
Sometimes, these small components can malfunction due to age or wear and tear. A qualified technician can help diagnose and replace any faulty parts, ensuring your garage door operates as intended.
Why Regular Testing is Important
You might be wondering, “Is all this hassle really necessary?” Absolutely! Regularly testing your Genie safety sensors can save you from potential accidents and costly repairs down the road. Here’s a quick breakdown of why testing matters:
1. Safety First: The primary role of safety sensors is to protect. Regular testing ensures they’re functioning correctly and can stop the door from closing on something (or someone) unexpectedly.
2. Property Protection: A malfunctioning garage door could damage your car, belongings, or even your home structure. Ensuring the sensors work properly helps avoid unnecessary repair costs.
3. Peace of Mind: Knowing that your garage door is safe allows you to focus on other things in your life. It’s one less worry you have to think about, and that’s always a good thing.
By taking a few minutes each month to test your sensors, you’re proactively keeping your family and property safe. It’s a small investment in time that pays off in big ways.
Testing your Genie safety sensors doesn’t have to be complicated or intimidating. With a few simple steps, you can ensure that they’re working effectively, keeping everyone safe. Remember to gather the necessary tools, watch for obstructions, and regularly check for wear and tear.
If you run into trouble, don’t hesitate to troubleshoot or call in a professional. Ultimately, staying on top of your safety sensor maintenance is a smart approach to ensure your garage door operates smoothly, keeping your home safe and secure.
By making testing a regular part of your garage door maintenance routine, you can sleep easy, knowing you’ve done your part in preventing accidents. So go ahead, take that moment to check, and enjoy the peace of mind that comes with a safe and secure garage setup.