Testing the circuit board might seem daunting, especially if you’re not a tech whiz. But trust me, it’s more manageable than it sounds. We’re going to walk through what you need to know about testing the circuit board in your Craftsman garage door opener. From tools you need to the step-by-step testing process, you’ll feel empowered to solve this issue yourself. Let’s dive in!
Understanding the Craftsman Circuit Board
The circuit board in your Craftsman garage door opener is like a tiny city with lots of roads and traffic signals. It controls how the electrical signals move, directing the opener to respond to your commands. Understanding what this board does can help you troubleshoot issues effectively.
Here’s the deal: if the circuit board is malfunctioning, you might face a range of problems. It could be anything from the opener not responding to the remote, to problems with the safety sensors. You might hear clicking sounds, but the door doesn’t budge. Or perhaps the lights blink erratically, signaling something is off. Knowing these signs is crucial for pinpointing the problem.
Let’s not forget the importance of recognizing your specific Craftsman model. Each one may have nuances, so consulting your manual can be invaluable. This little booklet often contains diagrams of the circuit board, which can help you find what you need during testing. It’s like having a map when exploring a new city—you might steer clear of detours along the way.
Gathering the Right Tools
Before we jump into the testing process, let’s gather the right tools. Think of testing your Craftsman circuit board as preparing for a small science experiment; having everything you need on hand makes it easier and more effective.
Here’s what you should have ready:
- A multimeter: This nifty tool measures voltage, current, and resistance. You’ll use it to check if the circuit board is receiving power.
- A screwdriver: You’ll need this to remove the cover of your garage door opener.
- A flashlight: Good lighting is invaluable to make sure you don’t miss anything while inspecting the board.
- Safety gloves: Just in case! Safety should always be a priority.
Once you’ve got your tools set, take a moment to familiarize yourself with them. Open your multimeter and understand its functions. This equipment will be crucial as we move forward in testing the Craftsman circuit board.
Safety First: Precautions to Take
Before you start tinkering with your garage door opener’s circuit board, let’s talk safety. Just because you’re not an electrician doesn’t mean safety measures don’t apply. In fact, it’s even more important to be careful when handling electrical components.
Here are some basic precautions to keep in mind:
1. Disconnect Power: Ensure you unplug the garage door opener before you start. It’s like turning off the lights when you enter a room—you wouldn’t want to trip over something in the dark!
2. Work in a Dry Area: Water and electricity don’t mix. Make sure your workspace is dry—no spills or puddles around the opener.
3. Avoid Loose Clothing: Baggy clothes can get caught in moving parts. Wear snug-fitting clothing and tie back long hair.
4. Use Insulated Tools: If you have insulated tools, use them! They add an extra layer of protection while working with electrical components.
By taking these simple steps, you jump-start the testing process with a solid foundation of safety.
Visual Inspection of the Circuit Board
Now that you’ve pulled on your safety gloves and gathered tools, it’s time to pop off the cover and take a closer look at the circuit board. Think of this as conducting a health check-up—it’s all about assessing what you see.
Start by examining the board for any physical signs of damage. Look for:
– Burnt Marks: If you see dark spots or burns, that’s a red flag. It indicates that something has overheated and needs replacing.
– Loose Wires: Wiggle the wires gently to see if any are loose or disconnected. A loose connection can lead to power issues.
– Corrosion: If you spot any signs of corrosion or rust, you might need to clean it or replace the affected parts. Corroded connections can disrupt the signals your circuit board needs to send.
Taking the time to visually inspect the circuit board could save you a ton of headaches later on. If you notice anything concerning, jot it down for later reference!
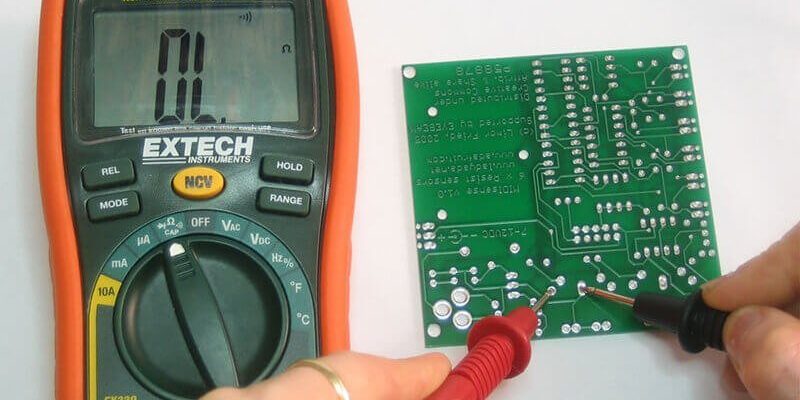
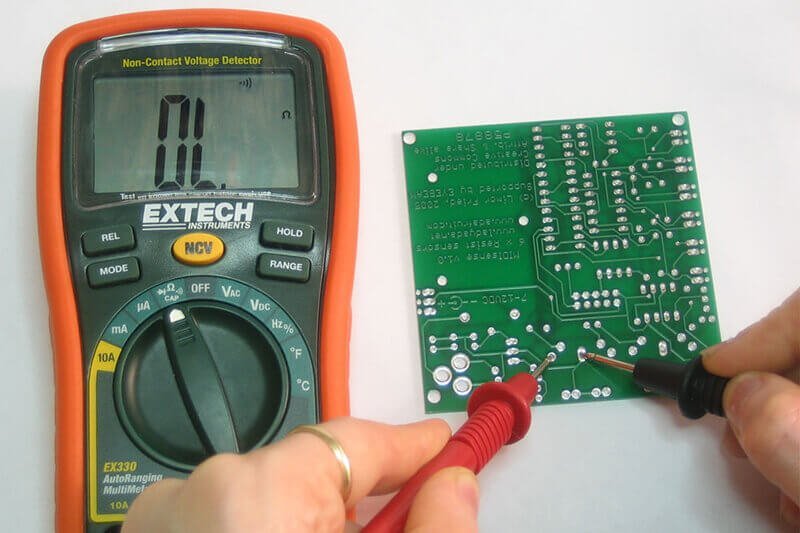
Testing for Power with a Multimeter
This is where your multimeter comes in and it’s time to channel your inner scientist! Testing for power in your Craftsman circuit board can feel intimidating, but once you break it down step by step, it becomes much more manageable.
1. Set Up Your Multimeter: Start by turning your multimeter to the voltage setting (often marked as “V”). Set it to the AC voltage range since garage door openers typically use AC current.
2. Check for Voltage Supply: Reconnect the power to your garage door opener. Take a moment to make sure it is safely plugged in without touching any wires directly. Next, place the multimeter’s probes—one on the circuit board’s power input terminal and the other on a grounded metal part.
3. Read the Display: Look at the reading on your multimeter. You should see a voltage reading that’s close to what’s specified for that model (typically around 12-24 volts). If you get no reading, or it’s far below that, you might have a problem with the power supply or the circuit board itself.
If you get good readings, that’s a positive sign! If it’s low or absent, we’ll need to dig deeper into troubleshooting options next.
Troubleshooting Common Circuit Board Issues
Now that you’ve tested the power supply, what do you do if it’s not working as it should? Here are some common issues that could affect the Craftsman circuit board and how to approach them.
– Faulty Power Supply: If the voltage is absent or too low, check for tripped circuit breakers or blown fuses in your garage’s electrical system. These issues can prevent power from reaching your opener.
– Physical Damage: If you spotted burnt areas or loose wires during your visual inspection, those might be the culprits. In many cases, replacing damaged sections or the entire board might be necessary.
– Interference from Other Devices: Sometimes, interference from other appliances can cause the circuit board to act up. If you’ve added new devices around your garage, consider their impact.
The beauty of troubleshooting is that it often leads you to the source of the problem. Stick to elimination—you’ll eventually pinpoint the issue.
Deciding on Repairs or Replacement
After your tests and troubleshooting, you’re likely faced with a decision: should you repair or replace the circuit board? Let’s break down how to approach this.
– Cost of Repairs: If you’re seeing minor issues like loose connections, fixing them might be straightforward and cost-effective. However, if you encounter significantly burnt areas or other major damage, replacement could save you future headaches.
– Skill Level: If you’re handy with soldering tools and feel comfortable with electronic repairs, you might choose to repair the board. If you’re unsure, calling a professional is often the safest route, especially when working with high-voltage components.
– Availability of Parts: Check if the specific parts you need for repairs are available. In some cases, it might be easier to simply replace the entire circuit board than to hunt down individual parts.
Ultimately, weigh your options honestly. Sometimes, investing in a new circuit board can mean added reliability for years to come.
Final Thoughts on Testing Craftsman Circuit Board
Testing the circuit board in your Craftsman garage door opener can seem like a daunting task, but it can also be empowering. With the right tools, a little patience, and our guidance, you’re capable of addressing these issues yourself.
Remember, the circuit board acts as the central hub for your opener—understanding it can resolve a host of problems. Whether you’ve identified a minor issue that can be repaired or a significant malfunction that needs replacement, you’re now equipped with the knowledge of how to proceed confidently.
Don’t hesitate to reach out for professional help if you need it, but give these steps a try first! Garage door openers are like many things in life—sometimes you just need to roll up your sleeves and take a closer look. Good luck!