
Reprogramming your Sears safety sensor might sound daunting, but it’s much simpler than it seems. Imagine reprogramming it like teaching a pet a new trick; it just takes a few steps, and you’ll get there with a bit of patience. In this guide, we’ll walk through the steps to reprogram your Sears safety sensor, ensuring your garage door operates safely and smoothly.
Understanding Your Sears Safety Sensor
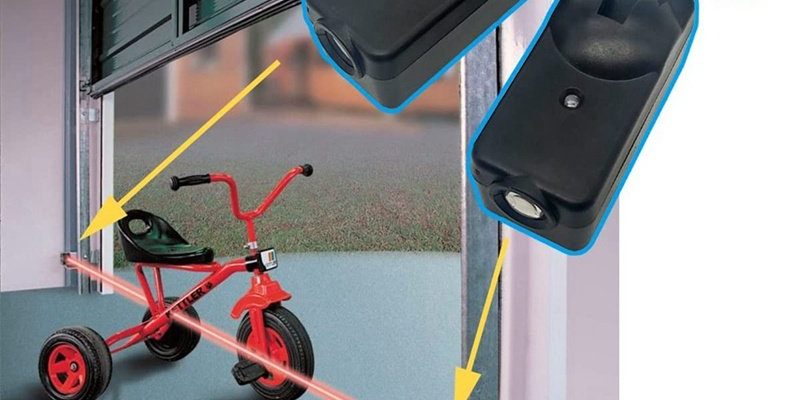
Before diving into the reprogramming process, let’s break down what a safety sensor does. Essentially, your safety sensors are designed to detect obstructions when the garage door closes. If something is in the way—like a pet, a box, or even a kid on a bike—the sensors send a signal to the garage door opener, causing it to stop or reverse its course.
These sensors are usually placed low on either side of the garage door. If they’re not aligned properly, or if there’s a malfunction, you may run into issues like the door not closing at all or opening unexpectedly. Essentially, these sensors are your garage door’s way of “seeing,” and it’s crucial to maintain them for safety.
Sometimes, these sensors can lose their signal, especially if there’s been a power surge or if the batteries in the remote are weak. Identifying the symptoms of a malfunctioning safety sensor is the first step to reprogramming it. If your garage door opener flashes its lights or doesn’t move, you’re likely dealing with a sensor issue.
Gathering Your Materials
Before you start, it’s essential to gather what you need. Don’t worry, it’s not a long list. Here’s what you need:
- Your Sears garage door opener: The device that’s doing all the heavy lifting.
- A ladder: Depending on where your sensors are installed, a ladder might help you reach them.
- Tools: You might require a screwdriver or a wrench to adjust the position of the sensors.
- Instruction manual: Having the manual can be helpful for specific codes or signals related to your model.
Having everything ready in one spot saves time and hassle later on. Once you have gathered your materials, you’ll be well-prepped for the task ahead.
Checking Your Current Setup
Before you start reprogramming, you need to ensure your current sensors are working as intended. Here’s how to diagnose any potential issues:
1. Inspect the Sensors: Look for any physical damage or dirt on the lenses of the sensors. Sometimes, a simple cleaning can do wonders. Use a soft cloth and some mild cleaner to wipe them down.
2. Check Alignment: Ensure the sensors face each other and are aligned correctly. Misalignment can happen over time, especially if you bump into them while parking. A quick adjustment may be all you need.
3. Examine the Wiring: If you notice the sensors are completely unresponsive, check the wiring. Sometimes, wires may have become loose or damaged, leading to a malfunction.
Make sure to run through these steps thoroughly. Getting everything in working order is vital before proceeding to reprogramming, as it ensures every element is functioning correctly.
Steps to Reprogram Your Sears Safety Sensor
Now that you have your setup checked, let’s get into the meat of the process—reprogramming those safety sensors. Here’s a step-by-step rundown of how to proceed:
1. Disconnect Power: Start by unplugging the garage door opener from the power source. This action helps reset the system, clearing any temporary confusion it may have.
2. Locate the Sensors: Make sure you know where each of the sensors is positioned. They should be mounted on the garage walls, near the floor.
3. Press the Reset Button: On the back of your garage door opener, you’ll find a reset button (usually red or yellow). Press and hold that button for about 10 seconds. You’ll likely hear a sound indicating that the system has reset.
4. Reconnect Power: Plug the opener back into the power source. You might notice that the lights on the unit blink. That’s good; it means the system is recognizing the reset.
5. Re-calibrate the Sensors: This step often involves temporarily covering one of the sensors with an object. Press the garage door opener button to test the functionality. The door should not close if the sensors are working properly.
6. Remove the Obstruction: Take away the obstruction from the sensors and try closing the door again. If it closes smoothly, congratulations! You’ve successfully reprogrammed your Sears safety sensor.
By following these steps, you’re on your way to a safely functioning garage door again.
Troubleshooting Common Issues
Sometimes, even after reprogramming, you might run into hiccups. Here’s a list of common issues and their solutions to keep you on track:
– Inconsistent Operation: If the sensors work sometimes but not all the time, check for dirt or minor misalignments. Small adjustments can often fix this issue.
– Flashing Lights: If the lights on your opener are flashing repetitively, it indicates a problem with the sensors. Go through the inspection process again to pinpoint the issue.
– Door Reversing: If the garage door closes and then immediately opens again, this indicates that something is still obstructing the sensors. Ensure nothing is in the way, and try recalibrating them one more time.
By keeping these troubleshooting tips handy, you can swiftly resolve any unexpected challenges that come your way.
Why Proper Sensor Function Matters
Having a functional safety sensor isn’t just about convenience; it’s about safety. These sensors protect your loved ones and belongings by preventing accidents that could occur if the garage door were to close improperly. Think about it: if your garage door is the gateway to your home, the safety sensors are its security guards.
Ensuring they’re programmed correctly can save you from potential injuries or expensive damage. And remember, as technology advances, so does the necessity for having well-functioning components. It’s worth the time and energy to check and reprogram your sensors regularly.
Reprogramming your Sears safety sensor might seem technical, but it’s a straightforward process once you understand the steps involved. With a little troubleshooting and maintenance, you can ensure that your garage door operates safely and efficiently. Plus, now you have the know-how to tackle future issues!
So, the next time you encounter any strange behavior from your garage door, remember to check those safety sensors first—they’re the first line of defense in keeping your garage—and everyone around it—safe. With a little patience and practice, you’ll become a pro at maintaining these essential safety devices. Happy garage door managing!