Understanding how to reprogram your opener can save you time and frustration. It’s all about getting that little remote—that trusty helper—to chat with your garage door again. So, whether you’ve lost the original remote or just need to add a new one, this guide is here to help you get your garage door functioning smoothly again.
What You’ll Need Before You Start
Before diving into the reprogramming process, it’s essential to gather a few items. This way, you can avoid any interruptions halfway through. Here’s what you’ll need:
- A working Sears garage door opener remote.
- A ladder, if needed, to reach the opener button on your garage ceiling.
- Two AAA batteries, since most remotes depend on fresh power.
Once you have these items, you’ll be prepared to follow the steps without any hiccups. Honestly, having everything ready makes the entire process smoother and less stressful. You wouldn’t want to be halfway through and find you’re missing a battery, right?
Finding the Learn Button on Your Opener
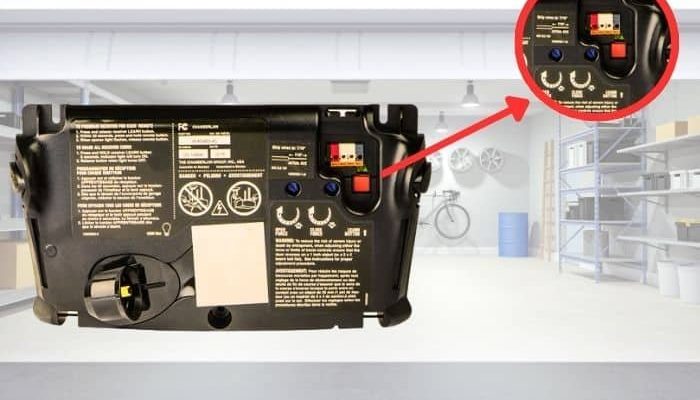
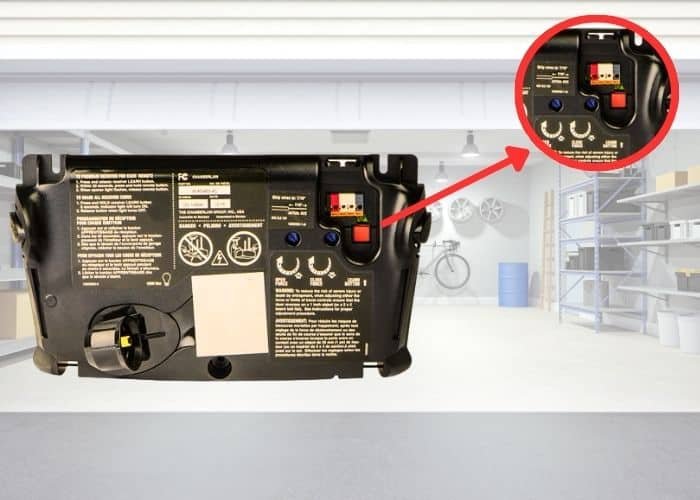
Next, you’ll need to locate the learn button on your Sears garage door opener. This button is crucial for pairing your remote. It’s usually found on the back or side of the motor unit. If you’re standing beneath your opener, look for a small, colored button—typically in red, yellow, or purple.
It’s like the heart of your garage door system. When you press it, it allows the opener to learn the code of the remote. If you’re having trouble finding it, don’t hesitate to use a flashlight. Just think of it like looking for the hidden treasure; once you find it, the rest is easy!
Resetting Your Garage Door Opener
Here’s the thing: Sometimes you might need to reset your garage door opener before reprogramming. This step can help resolve issues where the remote seems unresponsive.
To reset, just press and hold the learn button until the lights on the opener blink, usually around six seconds. You’ll know it’s reset when the lights go off. This step clears any previously stored codes, making a fresh start for your reprogramming. It’s like clearing the cache on your phone—it gets rid of the old stuff so you can add new info smoothly.
Programming Your Remote Control
Now for the fun part—programming your remote! Here’s a simple step-by-step process:
1. Press the Learn Button: Quickly press and release the learn button on your opener unit. You should see a light start to blink.
2. Press the Remote Button: Within 30 seconds of pressing the learn button, press and hold the button on your remote that you want to use. This communicates the new code to the opener.
3. Watch for Confirmation: You’ll notice the opener lights blink or click, which means the code has been accepted. Release the button on the remote.
4. Test It Out: Lastly, try using the remote to open or close the garage door. If it works, congratulations—you’ve successfully reprogrammed your Sears garage door opener!
Let me explain: this process might take you a couple of tries; don’t get discouraged if it doesn’t work right away. Just repeat the steps, and you should get it sorted out.
Troubleshooting Common Problems
If you find that your remote still won’t work after reprogramming, don’t panic. Here’s what you can do:
– Check the Batteries: Make sure your remote has fresh batteries. A weak battery can disrupt communication.
– Distance Matters: Sometimes, the remote might not work better if you’re too far from the opener. Try getting closer when reprogramming.
– Repeating the Process: If it’s still a no-go, try resetting the opener and programming the remote again. Sometimes, a repeat is all it takes to get everything back on track.
Each of these troubleshooting tips serves as a safety net, helping you to figure out what might be causing issues and how to fix them.
Alternative Options: Universal Remotes
You might be wondering, “What if I don’t have my original remote anymore?” That’s where universal remotes come into play. They’re designed to work with multiple garage door brands and models, making them a great alternative if yours is lost or broken.
When choosing a universal remote, just ensure it’s compatible with Sears garage door openers. Most options come with straightforward programming instructions that mirror what we’ve talked about, so it’s still a simple process. It’s like getting a new phone model but feeling right at home with how it works.
In a nutshell, learning how to reprogram your Sears garage door opener is a handy skill that can save you time and hassle. With simple tools and a clear step-by-step process, you can get your garage door remote back in action in no time. Always remember, whether you’re resetting or syncing, patience and persistence are key.
By understanding the basics of reprogramming your opener, you’re empowered to handle any hiccups that come your way. Plus, you won’t have to rely on a neighbor or call in a professional for help. Now, whenever you’re ready to hit the road, you can do so with just the push of a button!