You might be asking yourself, “How complicated could this be?” Well, worry not! Reprogramming a LiftMaster garage door opener is usually straightforward. You’ll feel like a tech wizard in no time, effortlessly syncing your remote or keypad back to the opener. Getting this done may involve several steps, but they’re easy to follow, much like assembling IKEA furniture (minus the confusing instructions).
Understanding Your LiftMaster Garage Door System
Before we dive into the reprogramming steps, let’s take a moment to understand what we’re working with. The LiftMaster garage door opener consists of a motor unit that’s usually mounted on the ceiling of your garage, a wall-mounted control panel, and one or more remotes or keypads. Each component communicates with each other to ensure smooth operation.
There are different models of LiftMaster openers, such as the 8155 or the 8500W, and they may have variations in features and remote types. Some remotes are simple and feature just a couple of buttons, while others may incorporate a keypad for code entry. Identifying your specific model is essential because the reprogramming process can slightly differ between them.
If you’ve just moved into a new home with a LiftMaster, it’s actually a good idea to reprogram the opener. This adds a layer of security, ensuring that previous users can’t access your garage anymore. You might be changing the remote’s batteries or having issues with it not working; knowing your system allows you to troubleshoot effectively.
Gathering the Right Tools
Before you start the reprogramming process, it’s time to gather a few items. You won’t need much, but having everything ready will make your experience smoother:
- Your LiftMaster remote: Make sure you have the remote you want to reprogram.
- Batteries: If your remote is unresponsive, check the batteries first! It’s an easy fix and could save you the trouble of reprogramming.
- A step ladder: Depending on where your garage door opener unit is installed, you may need a ladder to access the motor.
- Your owner’s manual: If you have it handy, the manual can provide model-specific information.
Collecting these items helps you avoid running back and forth, making the process as stress-free as possible. Once you’re armed with your tools, let’s move on to the actual reprogramming.
How to Reprogram Your LiftMaster Remote
Now, let’s get to the fun part! Here’s a straightforward guide to reprogramming your LiftMaster remote. Don’t worry, I’ll walk you through each step.
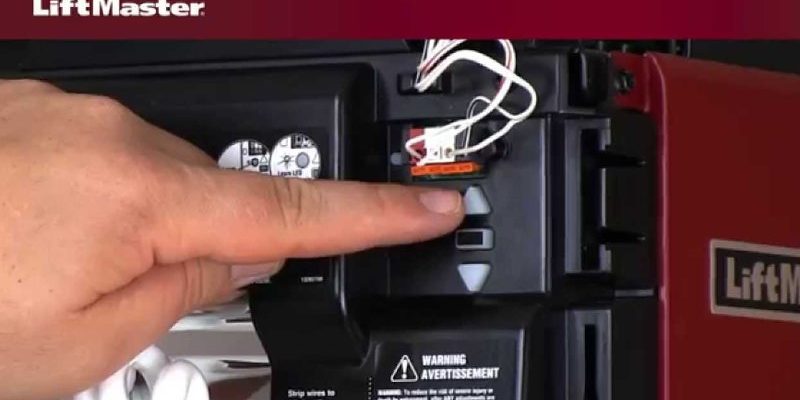
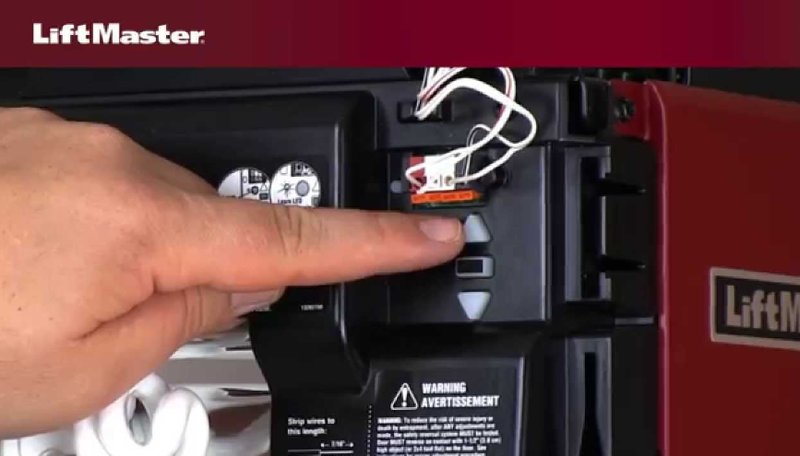
1. Step 1: Locate the Learn Button
Start by finding the *Learn* button on your garage door opener. It’s usually located on the back or side of the motor unit and often colored red, green, or yellow.
2. Step 2: Clear the Existing Codes
Press and hold the *Learn* button for about 6 seconds. This should clear any existing codes, allowing you a fresh start.
3. Step 3: Program the Remote
Grab your remote and press the button you want to program while the yellow light on the motor unit blinks. Once the light blinks, release the button. If done correctly, the light will remain on for about 30 seconds, indicating successful programming.
4. Step 4: Test the Remote
Finally, press the button on your remote to see if it operates the garage door. If it moves up or down, you’re good to go!
This process might feel a little daunting at first, but remember, each step is a victory. So take a breath and celebrate when you get it right!
Reprogramming the Keypad
If you’re using a keypad instead of a remote, here’s how you can reprogram it:
1. Step 1: Locate the Learn Button
Just like before, find the *Learn* button on the garage door opener.
2. Step 2: Clear Existing Codes
Press and hold the *Learn* button until the light goes out (about 6 seconds) to reset any existing codes.
3. Step 3: Enter a New Code
Enter your desired four-digit code on the keypad and press the *Enter* button. You’ll see the light blink, confirming the code was accepted.
4. Step 4: Test Your Code
Close the garage door and try entering your new code to see if it works. If it opens or closes, congratulations!
Having keypads can be incredibly convenient, especially if you or others frequently use the garage.
Troubleshooting Common Issues
Sometimes, even with the best intentions, things can go awry! Here’s how to troubleshoot some common reprogramming issues:
– Remote Not Working?
First, check the batteries. It’s a simple fix that often goes overlooked. If replaced and the remote still doesn’t work, try repeating the programming process.
– Keypad Not Responding?
Make sure you’re entering the correct code and that you’re pressing the *Enter* button afterward. If it still won’t sync, reset and reprogram it again.
– Lights Flashing?
If you see your LiftMaster lights flashing, this often indicates an error or a necessary adjustment. Refer to your owner’s manual for specific troubleshooting steps related to your model.
Remember, every garage door system has its quirks. Don’t feel discouraged if things don’t work right away. Your persistence will pay off.
Keeping Your LiftMaster Operating Smoothly
Maintaining your LiftMaster garage door opener can save you the hassle of frequent repairs and reprogramming. Here are some tips to keep everything in tip-top shape:
– Regularly Check Batteries:
Make it a habit to check your remotes and keypads for battery life every few months. That way, you’ll avoid surprises when you really need to open the door.
– Keep Tracks Clean:
Regularly inspect the tracks for any debris. Clear, unobstructed tracks will allow your garage door to run smoothly.
– Update Your Code Periodically:
Changing your codes regularly enhances safety, especially if you’ve shared remotes or keypads with others. It’s an easy way to keep your home secure.
Taking these small steps will not only prolong the life of your equipment but also offer peace of mind knowing your garage is safe.
When to Seek Professional Help
Sometimes DIY methods won’t cut it, and that’s perfectly okay. If you’ve gone through the reprogramming steps and your LiftMaster garage door opener still isn’t functioning as it should, it might be time to call in an expert.
Consider seeking professional help if:
– The opener isn’t responding at all, even after a reset.
– You notice strange sounds or jerky movements in the door’s operation.
– The system is old, and repairs seem extensive.
Garage door systems have many intricate parts, and sometimes troubleshooting involves more than a simple fix. It’s always best to prioritize safety over getting it done quickly, so don’t hesitate to reach out to a professional.
In the end, mastering how to reprogram your LiftMaster garage door opener not only boosts your tech skills but can also give you a sense of accomplishment. Remember, take one step at a time — and before you know it, you’ll have your garage door responding just as you want it to!