When your garage door opener’s brain—its circuit board—fails, you might wonder what to do next. Is it time to call a technician, or can you tackle this project yourself with just a little guidance? In this article, we’ll demystify the process, show you what tools you need, and guide you through the replacement step by step. Whether you’re dealing with a classic model or a new one, we’ve got you covered!
Identifying the Signs of a Faulty Circuit Board
Detecting a faulty circuit board isn’t always straightforward. You might think your garage door opener is just having a bad day, but signs of serious issues are usually there if you know what to look for.
First, listen carefully. If your Liftmaster opener makes unusual clicking noises but doesn’t respond when you press the buttons on your remote, that could indicate a problem. It’s like your opener is trying to speak but can’t get the words out. Another sign is if the lights on the unit blink or behave erratically, which often suggests internal issues within the circuit board.
Then there’s the classic “door won’t budge” scenario. If your garage door doesn’t respond at all when you hit the remote, it’s possible the circuit board is shot. Keep in mind that before blaming the circuit board, check the remote’s battery and test it with a different opener if available. Sometimes, troubleshooting can pinpoint the problem quickly.
Gathering Your Tools and Materials
Before embarking on this adventure, you’ll want to gather everything you need. Think of it like preparing for a camping trip—having the right tools will make your life a whole lot easier.
Here’s a handy checklist to help you out:
- Replacement circuit board: Ensure it’s compatible with your specific Liftmaster model.
- Screwdriver set: Usually, a Phillips head will do, but have flatheads on hand just in case.
- Safety goggles: Protect your eyes from dust and debris.
- Stationary work surface: A clean space where you can lay out parts without losing anything.
- Multimeter: This will help you test electrical connections.
Having all your tools handy will keep you focused and prevent unnecessary interruptions. Just like going into battle with your armor, being prepared puts you a step ahead!
Disconnecting Power to Your Liftmaster Opener
Before diving into the actual replacement, it’s crucial to disconnect power to your garage door opener. This step is like putting on your seatbelt; it keeps you safe while you work.
To disconnect power, locate the power cord that plugs into the outlet. A simple unplug will do, but if you can, turn off the circuit breaker for that outlet too. This ensures that when you’re poking around inside the opener, you’re not at risk of getting zapped. Better safe than sorry, right?
Take a moment to step back and breathe. This step may seem obvious, but it’s essential for not only your safety but also for avoiding any accidental damage to the circuit board or the opener itself.
Removing the Old Circuit Board
Now that you’re unplugged, it’s time to get into the guts of your Liftmaster opener and remove the old circuit board.
Start by opening the cover of your garage door opener. Most models use a few screws to hold the cover in place, so grab your screwdriver and start unscrewing gently. As you lift the cover off, make sure to handle it with care—you don’t want to break any clips or tabs that might be holding it in place.
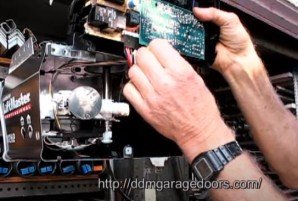
Once you’ve exposed the internals, locate the circuit board. It’s usually mounted on a bracket and may have several wires connected to it. Carefully disconnect these wires, taking note of where each one goes. If you’re worried about remembering their placements, snap a quick photo with your phone. It’s like a little insurance policy for when you’re reinstalling the new board.
Now unscrew the circuit board from its mount. Keep screws and bits in an organized pile, so you don’t lose them!
Installing the New Circuit Board
You’re on the home stretch now! Installing the new circuit board is where all that preparation pays off. It’s much like assembling a jigsaw puzzle—you’ve just got to fit the new pieces together.
Take your new circuit board and align it in the same position as the old board. Secure it in place with the screws you removed earlier. Just make sure it’s snug, but don’t over-tighten them. *Gentle* is key here; think of it like hugging your favorite stuffed animal—firm but not squishing it.
Next, reattach the wires you disconnected earlier. Remember that photo you took of the connections? Now is the time to refer back to it. Each wire should match the corresponding terminal or connector just like in the picture. If you’ve done everything right, your circuit board should be ready to rock!
Testing the System
Before sealing everything up, it’s crucial to give your Liftmaster circuit board a test run. It’s like taking a car for a spin after an oil change—you want to make sure everything is working smoothly.
Plug the opener back into the outlet or turn the circuit breaker back on. Then grab your remote and press the button to open the garage door. Ideally, if everything went to plan, the garage door should respond swiftly, moving up and down just like before.
If the door doesn’t budge, don’t panic! Double-check the connections. You might need to reset the remote or re-sync it with the opener. Look for a “Learn” button on the unit, usually near where the wires connect, and follow the steps in the user manual for syncing. Here’s the thing: troubleshooting now will save you a lot of hassle later!
Sealing It All Up
Once you’ve confirmed that everything is functioning properly, it’s time to put everything back together. Slide the cover back onto the opener, ensuring all clips are securely in place. Then, screw it down, bringing your opener back to its former glory.
After everything is secured, take a moment to clean your workspace. Just like a clean garage is essential for finding things easily, a tidy workspace can help you stay organized for the next time you take on a project.
With everything wrapped up, you can now sit back and relish in your accomplishment. Replacing the circuit board of your Liftmaster doesn’t have to be a chore; with some effort, you can save time and money while learning a valuable skill.
In essence, tackling the replacement of your Liftmaster circuit board can feel like a challenging task at first, but with the right tools, patience, and a clear process, it can turn into a rewarding project. Next time your garage door plays hard to get, you’ll know exactly how to bring it back to life.