
Think of the motor unit like the brain of your garage door system. It controls everything, from how quickly the door opens to how smoothly it runs. If you notice your Genie remote or keypad isn’t responding, or the motor is making odd sounds, it might be time to replace that unit. Let me walk you through the steps so you can get back to your regularly scheduled life—like parking your car without leaving it in the driveway overnight.
Identifying the Need for Replacement
Before you dive into the replacement process, it’s essential to make sure that’s the issue. Have you noticed that your Genie motor isn’t responding to your remote? Or perhaps it’s making a ton of noise? Here’s how to determine if you need to replace it:
- Loss of Power: If your door doesn’t respond when you hit the remote or push the button in the garage, first check the power supply. It could be a simple issue of the unit being unplugged.
- Strange Noises: Odd sounds like grinding or excessive clicking may indicate motor problems. You wouldn’t ignore the strange sounds from your car, right?
- Inconsistency: Is your door only working sometimes? If you find it’s a coin toss every time you want to park your car, it’s a clear sign something’s up.
If you’ve checked the power and still experience these issues, then it’s time for a replacement.
Gathering Your Tools
You wouldn’t cook a fancy meal without your pots and pans, right? Replacing the Genie motor unit requires some basic tools. Here’s what you’ll need:
- Socket Set: A reliable socket set will help with loosening and tightening screws.
- Adjustable Wrench: Handy for various nuts and bolts you will encounter.
- Screwdrivers: Both Phillips and flat-head for those tricky screws.
- New Genie Motor Unit: Of course! Make sure it’s compatible with your existing setup.
Having everything on hand will make the process much smoother. You don’t want to be halfway through the job and realize you’re missing that one little tool.
Shutting Down the Power
You wouldn’t want to mix a cake batter with a running blender, right? The same goes for working on the garage door motor. Safety first! Here’s how to properly shut down the power:
1. Disconnect the Unit: Unplug the motor unit from the power outlet. If it’s hardwired, turn off the circuit breaker controlling the garage door opener.
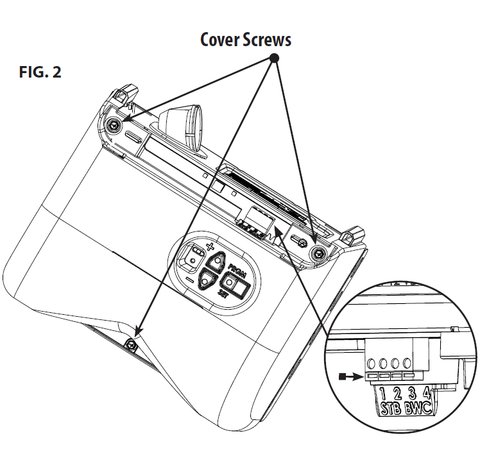
2. Remove the Body Cover: Use your screwdriver to carefully take off the cover. It’s usually attached with a few screws.
3. Make Sure It’s Completely Off: Double-check that the LED light on the opener is off. This confirms that there’s no power running through the unit.
Following these steps will ensure you’re working in a safe environment, reducing the chance of accidents.
Removing the Old Motor Unit
Once everything’s powered down, it’s time to remove the old motor unit. This part is pretty straightforward, but take your time:
1. Detach the Motor: Locate the mounting screws securing the motor unit to the ceiling or wall brackets. Use your socket set to remove these screws.
2. Disconnect Wires: Carefully disconnect any wiring, making a note of how they were connected. This step can be a bit like a puzzle, so take pictures or write notes if needed!
3. Lower the Unit: Gently lower the motor unit away from the mounting brackets. It should come off without much force.
Now you’re just steps away from installing the new motor unit!
Installing the New Genie Motor Unit
With the old motor out, let’s welcome the new Genie motor unit to your garage! Here’s how to do it right:
1. Position the New Motor: Lift the new unit into place, aligning it with the mounting brackets. It’s like setting a new paintbrush on the easel, ready to create!
2. Reconnect Wiring: Refer to your earlier notes or pictures to connect the wiring correctly. If you’re unsure, consult the manual that came with your new motor unit.
3. Secure Mounting Screws: Using your socket set, secure the motor unit with the screws you previously removed. Make sure it’s snug, but don’t over-tighten.
Now that the unit’s mounted, let’s move on to the final steps.
Testing the New Motor Unit
Once installed, it’s time for the moment of truth! Testing ensures everything works smoothly:
1. Reestablish Power: Plug the new unit back in or turn on the circuit breaker. If it’s hardwired, ensure everything else is secure.
2. Use Your Remote: Give your remote a try! If the door opens smoothly, you’ve succeeded.
3. Observe Functionality: Watch for any unusual noises or movements. If something feels off, revisit the wiring or installation steps.
It’s like taking your brand-new car for its first drive—exhilarating and a little nerve-wracking!
Troubleshooting Common Issues
Sometimes, even with the best intentions, things don’t go as planned. Here are a few troubleshooting tips if you encounter issues after installation:
- Remote Not Pairing: If your remote won’t connect, double-check the battery. A fresh battery might do the trick!
- Door Stops Midway: Ensure the motor unit’s travel adjustments are set correctly. These settings control how far the door should open and close.
- Unusual Sounds: Rattling or grinding can indicate loose screws or misaligned tracks. Take a moment to check these areas.
It’s common for some hiccups to occur, but a little patience can go a long way in troubleshooting.
Final Thoughts
Replacing your Genie motor unit doesn’t have to be a daunting task. Think of it as an exciting DIY project that not only saves you money but gives you a sense of accomplishment. By methodically following steps to identify issues, gather the right tools, and systematically install the new unit, you’ll have your garage door up and running smoothly again.
So, why not take on this challenge? You’ll not only learn something new but also ensure your garage door is functioning properly for years to come. Remember to keep safety in mind and, when in doubt, feel free to consult a professional. Happy repairing!