So, why might you need to replace your Genie keypad? Maybe the buttons are sticky (thanks to spilled soda), the backlight is out, or it’s just old and weathered. Whatever the reason, we’ll walk through how to swap out that keypad step by step. Think of this article as your personal toolbox, with simple instructions and helpful tips that will make the job feel straightforward.
Gathering Your Tools
Before diving in, let’s make sure you have everything you need at your fingertips. Having the right tools will save you time and frustration later on. Here’s a quick list:
- A replacement Genie keypad (specific model to match your opener)
- A flat-head screwdriver
- A Phillips screwdriver (if needed)
- Some fresh batteries for the keypad
- A ladder (if your keypad is mounted high)
Once you’ve collected these tools, you’re ready to move on. It’s like prepping your ingredients before a big cooking session—you’ll thank yourself later when everything goes smoothly!
Removing the Old Keypad
Now that you’ve got your supplies, let’s get to the fun part: removing the old keypad. Here’s how you can do it effectively:
1. Start by ensuring your garage door is closed. This step can prevent any accidental openings while you’re working.
2. Locate the old keypad, which is usually mounted on the outside wall of your garage. If it’s high up, use that ladder to reach it safely.
3. With your flat-head screwdriver, gently pry the keypad off. Be cautious not to damage the wall or the surrounding paneling. Most keypads have a few screws holding them in place, so you might need the Phillips screwdriver for that part. Take note of where you undo everything, as we’ll be installing the new one in the same spot.
4. Once it’s off, disconnect the wiring, if applicable. There should be simple clips or connectors to unfasten.
Removing the old keypad might feel like peeling off an old sticker. It takes a little finesse, but with patience, you’ll have it off in no time.
Installing the New Keypad
Let’s get your new Genie keypad installed! The process is quite simple, but there are a few steps to follow:
1. Position the new keypad where the old one was. Make sure it’s level and aligned with any other nearby fixtures. It’s important for both aesthetics and functionality.
2. Reconnect the wiring. If your new keypad has wires, plug them back into their respective connectors. It’s usually color-coded—just match them up.
3. Secure the keypad by pressing it back into place and screwing it in (use the same screws you removed from the old keypad).
4. If your model requires batteries, replace them now before testing. This ensures everything is fully powered.
Installing the new keypad should feel satisfying, like putting the last piece in a puzzle. You’ll know you’re one step closer to seamless garage access!
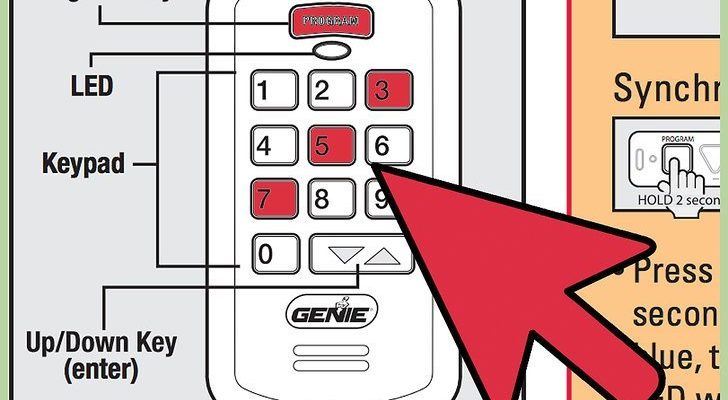
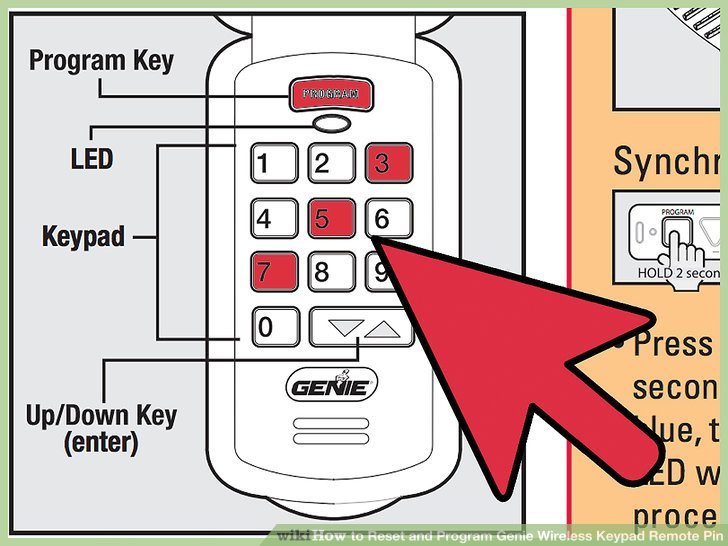
How to Program Your New Genie Keypad
Programming your new keypad is essential for it to work, so let’s break this down into easy steps.
1. Find the ‘Learn’ button on your Genie garage door opener. It’s typically located on the back or side of the unit itself. Press this button until the LED light turns on.
2. Go to your new keypad. Press and hold the “*” button, then enter your desired code (usually a 4-digit number). After that, press the “Enter” button.
3. Test the new setup by pressing your newly programmed code. If all goes well, the garage door should open or close, confirming the keypad is successfully paired with the opener.
This programming process is a bit like setting up a new phone. Just follow the steps closely, and you’ll be up and running in no time.
Troubleshooting Issues
Sometimes, even the most straightforward tasks can hit a snag. If your new keypad isn’t working right away, don’t panic. Here’s what you can check:
– Make sure you’re using the correct code. It can be easy to forget, especially if you’ve had your old keypad for a while.
– Check battery connections. If the keypad isn’t lighting up, the batteries might be improperly seated or dead entirely, so swap them out if needed.
– Look for any distance issues. Sometimes, if you’re too far from the garage door opener, it might not respond.
Troubleshooting is like being a detective; sometimes, a small oversight can lead you to the solution quickly.
Maintaining Your New Keypad
Now that you have everything up and running perfectly, consider routine maintenance. Here are a few tips to prolong the life of your new Genie keypad:
– Keep it clean. Dust can get into the buttons and affect functionality. Wipe it down with a damp cloth occasionally.
– Check the batteries regularly. Changing them proactively will save you from unexpected lockouts.
– If the weather is rough, give your keypad a little extra TLC. You can cover it with a plastic shield or even bring it inside when it’s particularly harsh.
Think of maintenance as a little love for your new gadget; it’s worth the effort to keep it working smoothly!
Replacing your Genie keypad may seem a bit intimidating at first, but with the right tools and some easy-to-follow steps, it can be done in about an hour. Remember to check your connections, program the keypad correctly, and pay attention to those maintenance tips. Before you know it, you’ll be arriving home, hands full of groceries, and opening your garage door with just a couple of taps. Enjoy the convenience of your new keypad knowing you’ve successfully tackled a DIY project with flying colors!