Replacing the battery often feels like a mad science project. But, don’t fret! Whether you’re using a Chamberlain model with a built-in battery or one that connects to an external battery backup, the process is pretty similar. This guide will walk you through everything step-by-step, so you can confidently tackle the task without needing a PhD in garage tech.
Let’s dive right in and explore how to replace the battery backup for your Chamberlain garage door opener without breaking a sweat!
Understanding Your Chamberlain Battery Backup
Before you get your hands dirty, it’s wise to understand what’s going on under the hood of your garage door opener. The battery backup typically ensures that your garage door system functions even during a power failure. This is particularly handy if you’ve ever been caught outside in a storm or during a power outage.
Chamberlain has a few different types of backups, but most operate similarly. They come in either built-in systems or as attachable battery packs. If your garage opener was installed within the last few years, it’s likely equipped with a rechargeable battery. These batteries can last anywhere from 24 hours to a few months, depending on usage. Knowing how this battery works means you’ll be better prepared for replacing it when the time comes.
Plus, it’s good to recognize when your battery is nearing the end of its life. Be on the lookout for signs such as your garage door opener running sluggishly or the battery light flickering on your unit.
Gathering Tools for the Replacement
Now that you’re familiar with what you’re dealing with, let’s get ready to tackle the replacement. No need for complicated robotics gear here! You’ll just need a few everyday tools:
- Philips screwdriver: To access the battery compartment.
- Replacement battery: Make sure it’s the correct model for your Chamberlain.
- Gloves: Optional, but a good idea to avoid any acidic residue on your hands.
Check your Chamberlain manual or model number to find the right battery replacement. It’s like bringing the right recipe to a potluck; you wouldn’t want to show up without the main dish, right? Once you have everything gathered, you’re ready to start the replacement journey.
Powering Down Your Garage Door Opener
It might seem obvious, but you want to ensure your safety first. Before starting the replacement, it’s wise to power down your garage door opener. Here’s how to do it:
1. Unplug the unit: This will prevent any accidental activations while you’re working.
2. Disconnect the battery: If your garage door opener has an external battery pack, disconnect it to avoid any chance of short circuits.
3. Clear the area: Make sure the space around your opener is free from clutter or anything that might get in the way.
Taking these steps ensures there’s no chance of mishaps while you’re replacing the battery. Safety first—after all, you want this to be a simple and stress-free process!
Opening the Battery Compartment
Now for the fun part—accessing the battery! This step can vary a bit between models, but here’s how it generally goes:
1. Locate the compartment: Most Chamberlain openers have the battery compartment positioned at the back or side. It might be covered with a sleek plastic panel.
2. Remove the screws: Using your Philips screwdriver, take out the screws holding the cover. Be gentle, as you don’t want to strip them and make future access a pain.
3. Take off the cover: Gently lift the panel away, revealing the battery inside.
Once you pop that cover off, you’ll see the battery just sitting there, waiting for a new lease on life.
Removing the Old Battery
Once you’ve bleached the dust bunnies away and the compartment is exposed, it’s time to remove the old battery.
1. Disconnect the wires: Depending on your model, you may see two wires—one for positive and one for negative. Gently pull the connectors off. You might need to wiggle it a bit, but it shouldn’t take a lot of force.
2. Lift out the battery: Once the wires are disconnected, simply lift the old battery out of the compartment. It’s as easy as pulling a loaf of bread out of a bag!
Handle that old battery carefully! If it looks swollen or rusty, be sure to dispose of it properly at your local recycling facility.
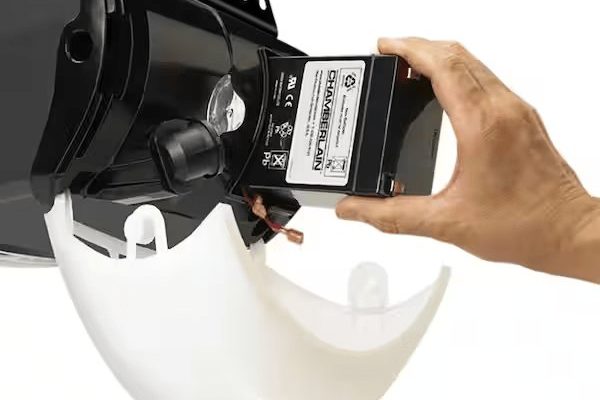
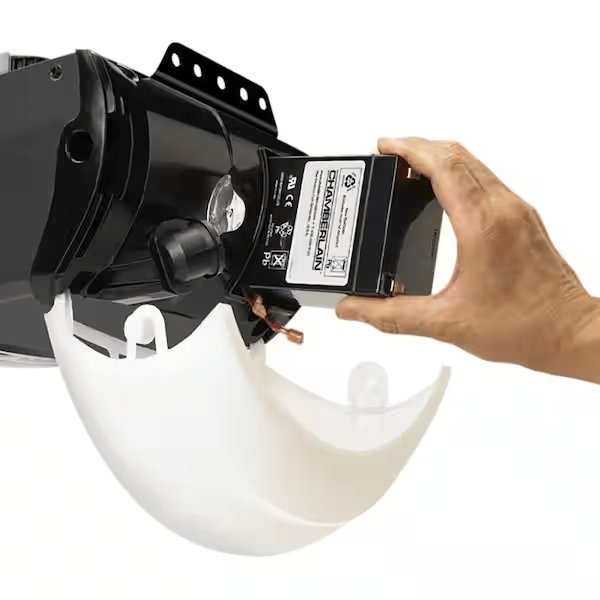
Installing the New Battery
With the old battery evicted, it’s time to introduce its replacement! Here’s how to get the new battery hooked up:
1. Position the new battery: Slide the new battery into the compartment, making sure it fits snugly.
2. Reconnect the wires: Connect the positive wire to the positive terminal (often marked with a red label) and the negative wire to the negative terminal (usually black). Listen for a little “click” sound to ensure they’re securely in place.
3. Double-check your connections: Give everything a gentle tug to ensure they won’t come loose.
Getting this step right is crucial. Loose connections can prevent your garage door opener from getting the power it needs.
Closing the Compartment and Testing
You’re almost there! Now it’s time to close things up and see if you’ve successfully completed the operation:
1. Reattach the cover: Carefully place the cover back over the compartment and tighten those screws you removed earlier. Don’t over-tighten, as you might crack the panel.
2. Plug it back in: Reconnect your garage door opener to power.
3. Test the unit: Most importantly, hit the button to test whether it opens and closes smoothly.
If everything goes well, congratulations! You’ve successfully replaced your Chamberlain battery backup. If it doesn’t work, double-check your connections. Sometimes wires can get a little shy—just urge them back out gently.
Troubleshooting Common Issues
If your new battery isn’t working right away, don’t panic! Let’s go over a couple of common hiccups:
1. Check the battery connections: It might sound simple, but sometimes wires get loose or aren’t connected properly. Give those connections a once-over.
2. Reset your garage door opener: If you’re still facing issues, you might need to reset your unit. Find the reset button (usually located on the motor unit) and hold it down for about 10 seconds.
3. Sync or pair the remote: If you notice that your remote isn’t working as expected, it might need to be paired with the opener again after replacing the battery.
If you still face issues after trying these steps, consulting the user manual or contacting Chamberlain support can help.
Replacing the battery backup in your Chamberlain isn’t just a handy skill; it’s empowering. Knowing you can tackle minor repairs boosts confidence, and who doesn’t love a fully functional garage door, especially when the weather goes south?
So, the next time you find yourself facing a power outage, you can trust that your garage door will still open and close like a charm. Plus, you might impress that neighbor who always seems to have their act together!
If this process felt straightforward, remember: it’s always good to follow up on your maintenance checks. A little TLC here and there can go a long way in keeping your garage door opener in top shape. Happy DIY-ing!