
Raynor garage door openers are known for their reliability and advanced features, and their control panels follow suit with user-friendly interfaces. Whether you’re trying to program a new remote, sync the panel, or reset everything to factory settings, I’ll guide you through each part of the process. So grab your cup of coffee—let’s dive in!
Understanding Your Raynor Control Panel
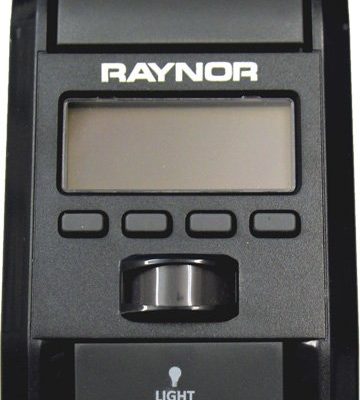
To start off, it’s essential to familiarize yourself with your Raynor control panel. Depending on the model, the layout and buttons might change slightly, but the primary functions remain similar. Most models will have buttons for opening and closing the door, as well as for programming additional remotes or other accessories.
When you look at the control panel, there are likely several buttons with unique labels. These could include a “Learn” button or a “Program” button, which are critical for syncing new remotes or devices. Picture the control panel as a map of sorts—it guides you through the programming territory.
If you can, give your control panel a bit of a once-over. Is the battery working? Are there any flashing lights? These can clue you in on potential troubleshooting tips later. If the control panel seems unresponsive, it might need a simple reset before you start the programming process.
Gathering Your Tools and Equipment
Before we dive into programming, let’s gather everything you’ll need. Usually, all you need is:
- Your Raynor control panel
- A compatible Raynor remote or accessory device
- A step stool (if your control panel is mounted high)
- Your user manual (always handy)
- A little patience and maybe even a notepad
Having everything together not only speeds up the process, but it also prevents those frustrating moments when you realize you’re missing something essential. If your remote needs a battery replacement, that’s something to check right away. Trust me, batteries can be sneaky little devils that steal the show when you least expect it!
Programming Your Remote: Step-by-Step
Now, let’s get to the heart of the matter: programming your remote. Here’s how to do it step-by-step:
1. Prepare the Panel: Locate the “Learn” or “Program” button on your Raynor control panel. This is often found on the back or side of the panel, so don’t hesitate to check your manual if you can’t find it.
2. Press the Learn Button: Once you have located the button, press and hold it until the indicator light turns on. This usually takes a few seconds. Once it lights up, release the button—it’s showtime!
3. Activate Your Remote: Within 30 seconds, press and hold the button on your remote that you want to program. If you’ve got a multi-button remote, choose the button that will control your garage door.
4. Wait for Confirmation: The indicator light on the panel should blink and then turn off. This means your remote has been successfully programmed. If it doesn’t, there could be a few reasons why—more on that later!
Programming your remote can seem daunting, but it’s really just a series of steps guiding you through the process. Just like following a recipe, one step leads to the next!
Troubleshooting Common Issues
Sometimes, things might not go as planned during the programming process, and that’s okay. Here are some common issues you might face and how to troubleshoot them.
If your remote won’t sync at all, make sure it has a fresh battery installed. A weak battery can be the culprit behind many remote problems. Also, check if you’re within range of the control panel. Standing too far away can prevent successful syncing.
Sometimes the control panel itself might need a reset. To do this, find the power source and unplug it for a minute, then plug it back in. This can refresh the system and resolve minor glitches. If the light on the control panel continues to flash unexpectedly, refer to the user manual for specific error codes.
It’s helpful to have a problem-solving mindset during this phase. Just like troubleshooting a computer, trying different things can often lead you to a solution.
Resetting the Raynor Control Panel
If for any reason, you end up needing to reset your Raynor control panel to factory settings, the process is also straightforward. A reset can clear out all programmed devices, so it’s something you’ll want to do wisely.
Here’s how you can reset the panel:
1. Find the Reset Button: Similar to the “Learn” button, there’s often a reset button hidden on the control panel itself.
2. Press and Hold: Press and hold the reset button until you see a blinking indicator light. This usually takes around 10-15 seconds.
3. Release the Button: Once the light is blinking, release the button, and wait for it to stabilize. This indicates that the reset is complete.
After resetting, you’ll need to reprogram any remotes or devices you had previously synced. It’s like hitting a “refresh” button on your control panel. This step is useful if your panel is misbehaving or acting erratically.
Exploring Alternatives and Additional Features
If you’re finding your Raynor control panel isn’t meeting your needs, there are alternatives available. For example, universal remotes can sometimes work with various garage door openers. However, compatibility varies, so it’s essential to check if your specific models can work together.
Additionally, Raynor offers features like smart home integrations, allowing you to control your garage door with a smartphone app. If you’re tech-savvy, exploring these options can enhance your experience.
It might also be helpful to look into garage door safety features. These can add layers of security, ensuring that you don’t have to worry about unauthorized access. Knowing what’s available can help you make an informed decision about how to upgrade or support your existing system.
Final Thoughts on Programming Your Raynor Control Panel
Programming your Raynor control panel doesn’t have to be a headache. By following the simple steps outlined here, you can take control over your garage door system and have it working smoothly in no time. Remember that it’s okay to take your time and tackle one step at a time. With a little practice, you’ll find yourself handling the system with ease.
Always keep your user manual handy for quick references and don’t hesitate to reach out to Raynor’s support if you find yourself in a jam. They’ve got resources to help you figure out any problems that might pop up.
Embracing these tech tools may seem a bit intimidating at first, but once you’ve got it down, you’ll wonder how you ever managed without it. Enjoy the convenience of a well-programmed Raynor control panel—it’s like having a friendly assistant right at your fingertips!