Craftsman is a well-known brand for garage door openers. They come with remote controls that sync up with the circuit board inside the opener itself. If you’ve recently replaced your remote or just moved into a home with a Craftsman opener, programming it is essential to ensure your door operates smoothly. Let me explain how you can tackle programming the Craftsman circuit board, step by step.
Understanding Craftsman Garage Door Openers
Before diving into the programming process, it’s helpful to understand what a Craftsman garage door opener is and how it works. Essentially, it’s an electrically powered device that opens and closes your garage door via a remote or a wall switch. When you press the button, a signal is sent to the circuit board, instructing the motor to either pull the door up or lower it down.
There are various types of Craftsman garage door openers, including belt, chain, and screw drive models. Each type functions slightly differently, but they all have circuit boards at their core. These boards receive signals and manage the operation of the motor. That’s the part we’ll be engaging with when programming your remote.
In short, the circuit board is like the brain of your garage door opener. It needs to be programmed to recognize the remote control so they can communicate properly.
Gathering Your Tools
To start programming your Craftsman circuit board, you’ll need a few basic tools. Don’t worry; they’re probably all right at home:
- Remote control: Ensure you’ve got the right Craftsman remote that matches your opener.
- Screwdriver: You may need this to access the circuit board compartment.
- Owner’s Manual: Having the manual handy is always helpful for specific instructions.
- Patience: This isn’t a race! Take your time to get the programming right.
By having these ready, you’ll create a smoother programming experience. Honestly, a little preparation can save you a lot of time and frustration down the line.
Accessing the Circuit Board
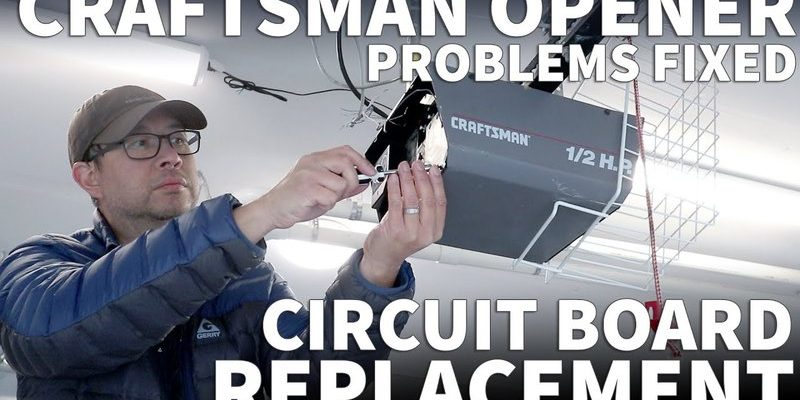
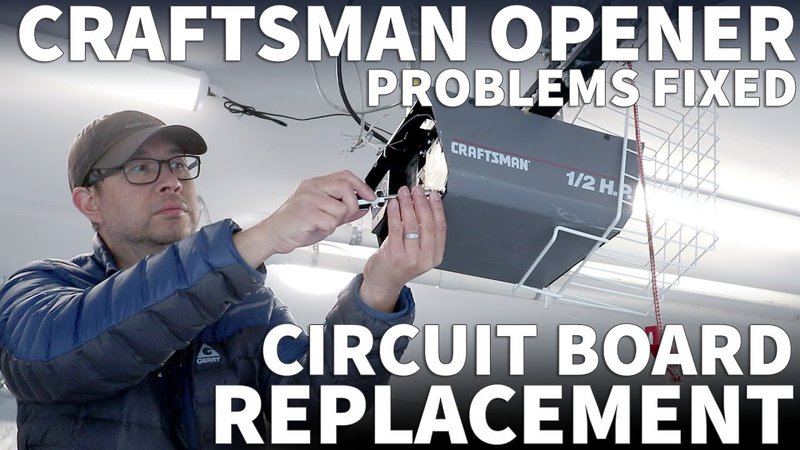
Now, let’s get to the heart of the matter—accessing the circuit board where all the action happens. Your garage door opener is typically located on the ceiling of your garage, so you’ll need a sturdy step ladder to reach it.
Once you’re up there, locate the casing of the opener. It’s usually secured with screws, which you can remove with your screwdriver. Gently take off the cover to reveal the circuit board inside. Take a moment to look around; you’ll likely see buttons, connectors, and perhaps a blinking light. This is the brain you’ll soon be working with!
Be careful not to touch any of the wires or components unnecessarily to avoid damaging them. If you’re feeling unsure about this step, consulting your owner’s manual for the exact location of the circuit board and any tips for handling the unit can be beneficial.
Programming the Remote Control
Now that you’ve accessed the circuit board, it’s time to program your remote. Here are the steps you’ll want to follow:
1. Locate the “Learn” Button: This is typically a small button on the circuit board, and it can usually be identified by its distinctive color (often red or yellow). This button tells the circuit board to learn the signal from your remote.
2. Press the “Learn” Button: Press and hold this button until you see the LED light blink or turn on. The light signals that the circuit board is now in learning mode.
3. Press the Remote Button: Now take your remote and press the button you wish to use for the garage door. The LED on the circuit board should blink again, confirming that it has received the signal.
4. Test the Remote: After programming, press the same button on the remote to see if the garage door operates as expected. If it doesn’t work, you may need to repeat the steps, giving it another shot.
In summary, programming your Craftsman remote is a straightforward process if you follow these steps closely. Remember, you might be wondering about why the remote doesn’t seem to work. Don’t fret! It could just mean it didn’t sync properly—an easy fix with a quick repeat of these steps.
Troubleshooting Common Issues
Sometimes, things don’t go as planned, and that’s perfectly okay. If the remote isn’t syncing with the circuit board, here are some troubleshooting tips to get you back on track:
– Check Power Supply: Ensure the garage door opener is plugged in and receiving power. A quick power surge or disconnection can easily happen.
– Replace Remote Batteries: Often overlooked, weak or dead batteries in the remote can be the culprit. Make sure you’re using fresh batteries.
– Inspect the Learn Button: Sometimes, the learn button can be finicky. Ensure it’s functioning correctly by pressing it several times to confirm it’s responsive.
– Clear Previous Programmed Remotes: If you have multiple remotes, they might overlap. To clear previous settings, hold the learn button for about six seconds until the LED light turns off.
If you try these steps and still can’t get it to work, don’t hesitate to consult your owner’s manual for additional troubleshooting tips specific to your model.
Understanding Safety Features
Safety features are so important for any garage door opener, and Craftsman models are no exception. Understanding them can not only ensure the door operates efficiently but also protect your home and family.
Most Craftsman openers come equipped with safety sensors that prevent the door from closing on objects or people. If the sensors are misaligned, the door won’t function properly. Always check that the sensors are unobstructed and aligned.
Another crucial feature is the manual override option. In case of power failure, you can still close and open the door manually. Knowing how to operate this feature will give you peace of mind, especially during emergencies.
It’s a good idea to familiarize yourself with these safety features to avoid any surprises down the road. Often, these manual operations are included in your owner’s manual, so keep it close for reference!
Understanding how to program the Craftsman circuit board might seem like a chore at first, but once you break it down into manageable steps, you’ll find it’s not too daunting. Just like tuning a musical instrument, once you get it just right, you’ll enjoy the operation of your garage door like a beautiful melody.
Being aware of troubleshooting tips and safety features can also make your experience with your garage door much smoother. So next time you need to program a remote or reset the circuit board, you’ll feel confident tackling it head-on. If you ever run into issues, remember that others have faced the same challenges, and there are solutions! Got any further questions? You know where to find the answers. Happy programming!