Imagine you’re sitting down with a cup of coffee, and you’re eager to unlock the mystery of your wall button. This little device can make your life easier by letting you control your garage door with just a press. With a comprehensive guide, I’ll walk you through the steps to set it up and even tackle some common hiccups you might encounter along the way.
What You Need to Start Programming
Before diving in, it’s crucial to gather everything you need. Think of it like prepping your workspace before starting a project. For programming your Chamberlain wall button, here’s a quick checklist of items to have on hand:
- Chamberlain Wall Button—This is your main tool.
- Your Garage Door Opener—Make sure it’s powered on and the antenna is unobstructed.
- User Manual—If you have it handy, it can be a valuable reference.
- Access to a Ladder—If your wall button is mounted high. Safety first!
Having these items ready will streamline the process and save you from running back and forth. Plus, it’s good to have everything nice and tidy before you get started.
Finding the Right Location for Your Wall Button
Choosing the right spot for your Chamberlain wall button is essential for both functionality and safety. Ideally, it should be within easy reach of your vehicle but high enough to prevent little hands from accidentally pressing it. Here are some tips to consider:
1. Height Matters: Install the wall button at about 54 inches above the ground, which is a comfortable height for adults while keeping it out of reach of children.
2. Accessibility: Make sure the button is placed where you can easily access it when pulling into your garage. You don’t want to fumble around or strain yourself after a long day.
3. Avoid Obstructions: Check that there are no obstacles blocking the line of sight to your garage door. This ensures reliable communication between the button and the opener.
Choosing wisely means you’ll enjoy using that wall button without any unnecessary hassle down the line.
Programming Your Chamberlain Wall Button
Now onto the fun part—programming! This is where you get to connect your wall button and make it operational. Here’s a simple step-by-step guide to follow:
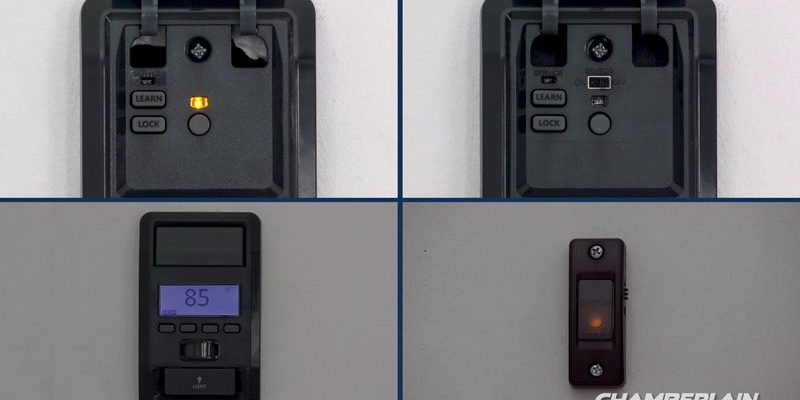
1. Locate the Learn Button: On your Chamberlain garage door opener, find the small “Learn” button. It’s usually on the back or side of the unit. You might need a ladder to reach it safely.
2. Press the Learn Button: Press and release this button. You should see a light on the opener start blinking. This indicates that the opener is ready to accept a new device.
3. Prepare Your Wall Button: Within 30 seconds, press and hold the button on your Chamberlain wall control until you see the garage door move slightly. This indicates a successful sync.
4. Test the Button: Give it a try! Press the wall button to see if the garage door responds. If it does, congratulations! You’ve successfully programmed your wall button.
If it doesn’t work, don’t worry. Sometimes, it helps to repeat the process or troubleshoot further.
Troubleshooting Common Issues
Even with the best of intentions, sometimes things don’t go smoothly. You might be thinking, “What if my wall button isn’t responding?” Here are a few troubleshooting tips to help you out:
– Check the Power: Make sure that your garage door opener is plugged in and functioning. If it has a battery backup, check and replace if necessary.
– Inspect the Wiring: If you’ve got a wired wall button, ensure that the wiring is intact. Look for any frayed wires or loose connections.
– Reset the Opener: If all else fails, perform a reset on the garage door opener. This can often solve unresponsive issues. Just remember, this may wipe any programmed remotes, so be prepared for a little extra setup.
These steps should help get your wall button back on track. If it still gives you trouble, consulting the user manual can provide additional insights tailored to your specific model.
When to Consider Professional Help
Sometimes, despite your best efforts, you might find yourself stuck. It’s completely normal to seek help when needed. Here are a few situations when bringing in a professional is wise:
– Complexity Overload: If your garage door system involves multiple remotes and setups beyond the wall button, it might be time for a pro.
– Persistent Mechanical Issues: If your door isn’t opening or closing properly, there could be an underlying mechanical problem that needs addressing.
– Safety: If you’re unsure about handling any electrical components, it’s best to err on the side of caution.
Bringing in a trained technician can save you time and frustration, ensuring everything is safe and functioning correctly.
Maintaining Your Chamberlain Wall Button
Once you’ve got everything set up, you’ll want to make sure your wall button stays in great shape. Regular maintenance can prolong its life, ensuring that it continues to work without a hitch. Here are some tips to keep in mind:
1. Regular Checks: Periodically test the button to ensure it’s working. This simple step can catch any problems early.
2. Clean the Area: Dust and dirt can accumulate around the wall button and the garage opener. A quick wipe-down occasionally can keep everything functioning smoothly.
3. Battery Changes: If your wall button is battery-operated, check the battery level every so often and replace it as needed.
By investing a little time in maintenance, you’ll ensure your Chamberlain wall button continues to serve you for years to come.
Closing thoughts: Programming a Chamberlain wall button might seem daunting, but with these steps, it’s manageable. Take your time, follow the instructions, and don’t hesitate to reach out for help when needed. Soon enough, you’ll master the art of garage door control, all with a simple click!