Installing the Skylink Smart Hub may seem daunting, but it’s simpler than you might think. Imagine setting up a new gadget is similar to putting together a puzzle. At first glance, it might look complicated, but once you have the edge pieces in place, everything else starts to click together. With this guide, I’ll walk you through the steps, from getting started to troubleshooting common issues, ensuring you have the best setup possible.
Gather Your Tools and Materials
Before diving into the installation process, let’s make sure you have everything you need on hand. To set up the Skylink Smart Hub, you’ll want to gather:
- Skylink Smart Hub
- Compatible devices you want to connect
- A stable Wi-Fi connection
- Your smartphone or tablet for the app
- A small screwdriver (if needed for mounting)
Take a moment to check that your smart devices are compatible with the hub. Generally, Skylink products work well, but other brands may vary. If you’re unsure, refer to your device’s manual or online resources to confirm compatibility. Knowing you’re set up correctly from the start can save you a lot of headaches down the line.
Setting Up the Hub: Step-by-Step
Now that you’ve gathered your tools, let’s jump into the installation process. Following these steps will help ensure everything goes smoothly, like putting together those puzzle edge pieces we talked about earlier.
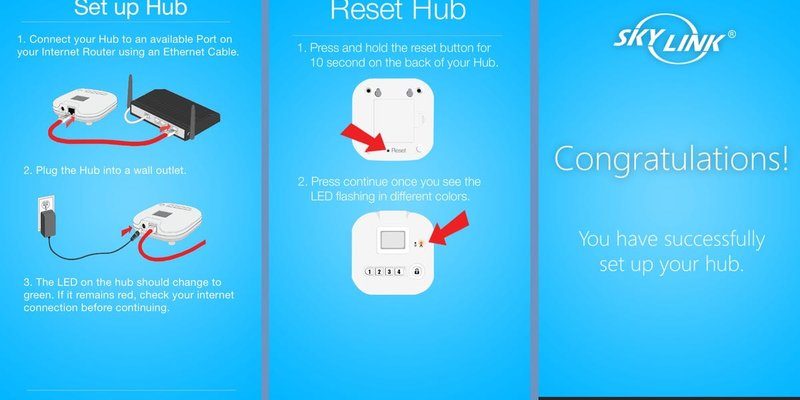
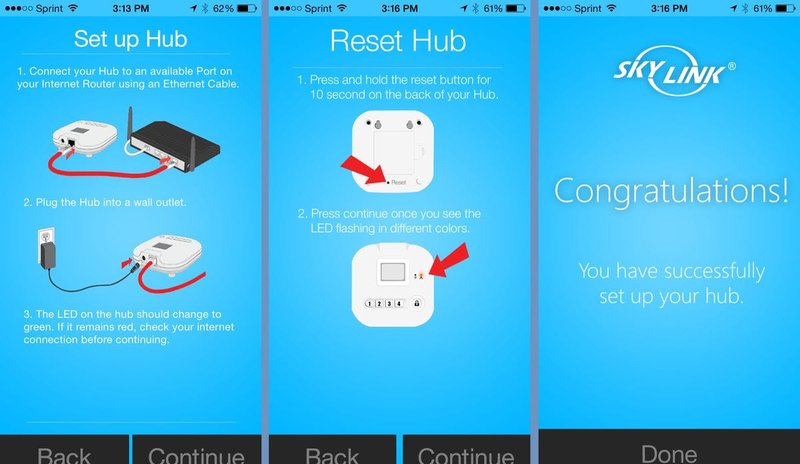
1. Plug In the Skylink Smart Hub
Start by choosing a convenient location to plug in your Smart Hub. Ideally, it should be close to a power outlet and within range of your Wi-Fi router. Once you’ve decided, simply plug the hub into the outlet. You should see indicator lights that signal it’s powered on.
2. Download the Skylink App
Next, grab your smartphone or tablet. Head to either the Apple App Store or Google Play Store and search for the Skylink App. Once downloaded, go ahead and open the app. You’ll need to create an account or log in if you already have one. The app will be your primary tool for syncing devices to your hub, so it’s essential to get it set up first.
3. Connect to Wi-Fi
Now, in the app, you’ll need to connect the Smart Hub to your Wi-Fi network. The app will guide you through this process. Typically, you’ll select your network from a list and enter your Wi-Fi password. Just like that, you’re one step closer to a fully operational smart home!
4. Pair Your Devices
With your hub connected to Wi-Fi, it’s time to bring those smart devices into the mix. In the app, look for the option to add a device. Follow the prompts to pair each device with your Smart Hub. This might involve pressing a button on the device or entering a code you see on the screen. Be patient—sometimes, devices take a moment to sync up.
Troubleshooting Connection Issues
Okay, so everything seems in order, but what if your new Skylink Smart Hub isn’t cooperating? Don’t worry; troubleshooting can be easier than deciphering that puzzle’s picture —most problems can be resolved with simple steps.
Check Your Wi-Fi Connection
First, check to see if your Wi-Fi is working properly. You can do this by connecting another device, like your smartphone or tablet, to your Wi-Fi network. If that’s functioning, move on to the next step. If not, rebooting your router might solve the issue.
Restart the Smart Hub
Sometimes, all it takes is a reset to clear minor glitches. Unplug the Smart Hub from the outlet, wait about 10 seconds, and plug it back in. Once the lights stabilize, try connecting your devices again.
Double-check Device Compatibility
If you’re still having issues, revisit the compatibility of your devices with the Skylink hub. Sometimes devices may look similar but have varying technology standards. A quick online search or checking the device’s manual can shed light on potential compatibility issues.
Why Use the Skylink Smart Hub?
You might be wondering, “Why should I invest time and energy into using the Skylink Smart Hub?” Well, for starters, it provides seamless control over multiple devices from a single app. Imagine never having to juggle between different remotes or apps again.
Additionally, consolidating devices under one hub can lead to a more organized smart home experience. Instead of feeling like a tech novice, you’ll have everything working harmoniously around you. Whether you’re adjusting lights, checking your security camera feed, or setting the thermostat, the Skylink Smart Hub makes it all easy and accessible.
Replacement Remote Options
If at some point, you find yourself needing a replacement remote, there are options available. A universal remote can work with various devices, including your Skylink hub. Although brand-specific remotes may require more setup, they often provide the best functionality specific to your devices.
Here’s what you should consider when looking for a new remote:
- Compatibility with your existing devices
- Ease of setup and use
- Price and features offered
Remember, convenience doesn’t have to come with a hefty price tag. Sometimes, a simple remote is all you need to keep your smart home running smoothly!
Installing your Skylink Smart Hub can transform your home into a connected haven. As we’ve explored, the process is straightforward when broken down into clear steps. By following the installation instructions and troubleshooting tips, you’ll be on your way to achieving a seamless smart home experience. Remember, you’re not just adding gadgets; you’re creating a more convenient life for yourself. So, enjoy the journey and embrace the wonderful world of home automation!