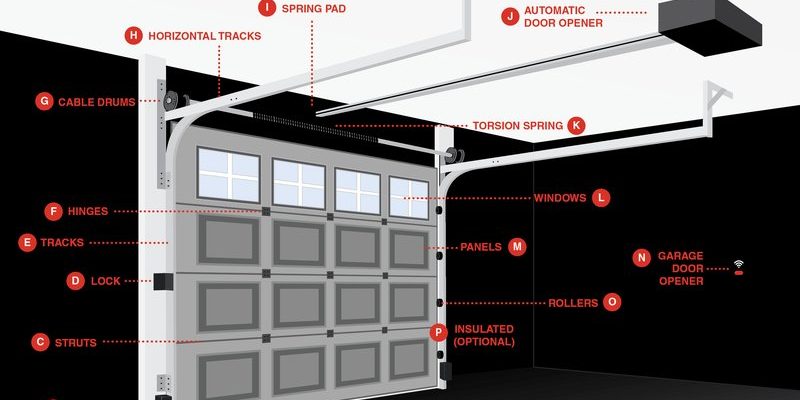
In this guide, we’ll walk you through the installation process for a common brand, such as LiftMaster or Chamberlain. Whether you’re a seasoned DIYer or a curious beginner, you’ll find that installing an overhead door control panel isn’t as scary as it might sound. You might be wondering what tools you’ll need or, more importantly, how you can make sure everything works perfectly when you’re done. Let’s dive in.
Gathering Your Tools and Materials
Before diving into installation, it’s essential to gather all the necessary tools and materials. Think of this as preparing for a cooking recipe. You wouldn’t want to start cooking only to discover you’re missing a key ingredient.
Here’s a quick list of what you’ll typically need:
- Overhead door control panel
- Phillips and flathead screwdrivers
- Wire cutters/strippers
- Drill with appropriate bits
- Safety goggles
- Wire nuts
- Electrical tape
Make sure to double-check that you have everything before you start. No one likes interrupting a project to hunt down a screwdriver! And, of course, don’t forget to wear your safety goggles. Protecting your eyes is a must, even for simple tasks.
Turning Off Power to Your Garage Door Opener
Okay, here’s the most crucial step: safety first! Before you start fiddling with wires or the new panel, ensure that the power supply to your garage door opener is turned off. Honestly, do not skip this step, or you could shock yourself or cause unintended damage.
To do this, locate the circuit breaker that controls your garage door opener. Flip it to the “Off” position. If you’re unsure which breaker it is, you might need to check each one—better safe than sorry!
Once you’ve flipped the switch, it’s a good idea to test the door’s remote or wall button to make sure the opener isn’t responding. If it works, check those wiring connections one more time! If it doesn’t, you’re set to proceed.
Removing the Old Control Panel
Now that the power is off, it’s time to bid farewell to the old control panel. Just like changing the batteries on a clock, this is a pretty straightforward process.
Start by unscrewing the control panel from the wall. Use your Phillips screwdriver, and set the screws aside in a safe spot. You might find it helpful to label these screws if you think you’ll forget where they go later.
Once you’ve removed the panel, gently pull it away from the wall and disconnect the wires. This typically involves unscrewing a couple of terminal screws that hold the wires in place. Note how the wires are connected since you’ll need to replicate that with your new panel.
Wiring the New Control Panel
With the old panel out of the way, you’re ready to install the new overhead door control panel. Don’t worry if wiring seems complicated; it’s basically a color-coded game.
Here’s what to do:
1. Connect Wires: Refer to the installation manual for your new panel to see how the wires should connect. In many cases, you’ll find color-coded connections like red, white, and green. Just match them accordingly.
2. Secure the Connections: Once you’ve connected the wires, use wire nuts to secure them. Twist them tightly and make sure no exposed wire is showing. Electrical tape can also provide added insurance.
3. Place the Panel on the Wall: Now, carefully push the new panel back onto the wall and screw it in place. It’s like putting a new book on a shelf—nice and secure.
Testing the Connections and Features
Time to get a little anxious (in a good way) because it’s testing time! Go back to your circuit breaker and flip it back to the “On” position. Now, hold your breath and give your new control panel a go.
First, check if the lights on the panel illuminate, indicating it has power. If nothing happens, recheck your wiring connections—it might be as simple as a loose wire. If the lights are on, you’re in good shape!
Next, push the buttons on the control panel to see if the door opens and closes as it should. If the door responds well, fantastic job! Just like that, you’ve successfully installed your new overhead door control panel.
Troubleshooting Common Issues
Sometimes, even after following all the steps, things don’t work out as expected. If your door isn’t responding, don’t worry; you’re not alone.
Common issues can include:
– Wiring Errors: Double-check that each wire is connected correctly. It’s easy to get colors mixed up or cables switched.
– Circuit Breaker: Make sure the breaker is indeed turned on. Again, it’s a classic oversight.
– Batteries in Remote: If your remote isn’t working post-installation, replace the batteries to rule out power issues.
If you’ve checked these areas and still face problems, consult the user manual for specific troubleshooting tips related to your brand—terms like “reset,” “sync,” or “pair” might pop up.
Final Touches and Maintenance Tips
Congratulations! You’ve made it to the end, and your new overhead door control panel should be up and running. But before you call it quits, let’s discuss a few maintenance tips.
Regularly check the batteries in your remote control. Out of nowhere, it’ll stop working, and you’ll wonder why. Plus, periodically inspect the connections on the panel to ensure everything remains tight and clean.
Also, consider cleaning the control panel and surrounding area. Dust can accumulate and interfere with sensors. Keep it tidy, and it’ll serve you well for years.
Wrapping up, installing an overhead door control panel is a straightforward process that, when broken down step-by-step, anyone can accomplish. A little patience and attention go a long way. If you have questions or need to troubleshoot, don’t hesitate to reach out. Enjoy your newly upgraded garage door system!
