
You might be wondering why a Smart Hub is so essential. Picture this: you’re at the grocery store, and you can’t remember if you closed the garage door. Instead of turning back, you just pull out your phone, check the app, and close it with a tap. That’s the power of having a Liftmaster Smart Hub. In this guide, we’ll walk you through every single step to set it up, ensuring you have the tech-savvy confidence of a pro by the end.
What is a Liftmaster Smart Hub?
Before diving into the installation, let’s clear up exactly what a Liftmaster Smart Hub does. Essentially, it’s a device that connects your Liftmaster garage door opener to your home Wi-Fi network. This connection allows you to control and monitor your garage door remotely using the MyQ app on your smartphone.
You can sync multiple devices to the Smart Hub as well. Imagine being able to open your garage for a friend while you’re miles away—it’s all possible with this nifty gadget. Besides remote access, the Smart Hub can send alerts directly to your phone. So, if the garage door opens unexpectedly, you’ll know right away. It truly brings convenience and peace of mind to your daily routine.
Additionally, the installation isn’t rocket science. You don’t have to be a tech expert or an electrician. As long as you can follow a few simple instructions, you’ll be good to go!
Gathering Necessary Tools for Installation
Before we jump into the installation, you need to gather a few essential tools. Having everything handy will streamline the process and save you from unnecessary trips to the toolbox. Here’s your checklist:
- Liftmaster Smart Hub
- Smartphone (iOS or Android)
- Wi-Fi network information (SSID and password)
- Power source for the Hub
- Smartphone charger (just in case)
Having these tools on hand makes the installation process much smoother. If you don’t have your Wi-Fi details readily available, grab them before starting. You might also want to keep a notepad handy to jot down any important codes as you go. Plus, ensuring your phone is charged means you won’t be stuck halfway through the setup with a dead battery.
Connecting the Smart Hub to Your Garage Door Opener
Now that you have everything ready, it’s time to connect the Smart Hub to your garage door opener. Here’s the deal—it’s easier than it sounds! You’ll be looking for two main points of connection: making sure your Smart Hub is powered and linking it to the opener.
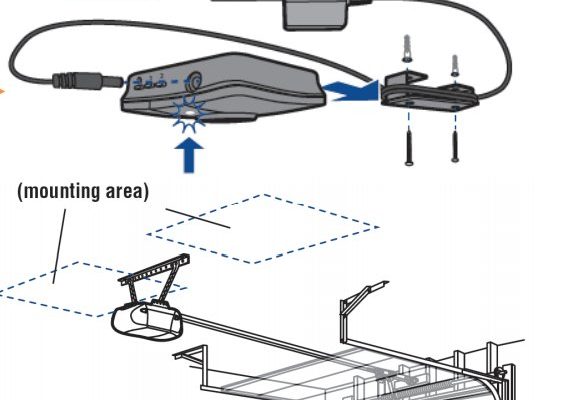
1. Connect the Power: Start by plugging the Smart Hub into a power outlet near your garage door opener. A good tip is to find a spot on the wall where it won’t be in your way, but also close enough to your router to maintain a strong Wi-Fi signal.
2. Linking the Opener: Locate the Learn button on your Liftmaster garage door opener. It’s usually on the back or side, depending on your model. Press this button—this makes the opener ready to pair with the Smart Hub.
As you can see, the magic of connecting technology lies in simple steps. Once you’ve paired it successfully, you’ll hear a click indicating the Smart Hub is ready to go. At this point, you might be experiencing a mix of excitement and apprehension. Don’t worry; you’ve got this!
Setting Up the MyQ App
With your Smart Hub linked to the garage door opener, it’s time to set up the MyQ app. This critical step allows you to manage everything from your smartphone, so let’s dive in.
1. Download the MyQ App: Head over to your app store and download the MyQ app. It’s available for both iOS and Android, so you’re covered no matter which device you use.
2. Create an Account: Once downloaded, open the app and create a new account. Here’s where you’ll need the Wi-Fi password you gathered earlier. Make sure to enter it accurately to avoid any headaches later.
3. Add Your Smart Hub to the App: After creating your account, follow the prompts in the app to add your Smart Hub. You’ll be guided step-by-step. Just keep an eye on the screen, and ensure your Smart Hub is powered on while you do this.
Setting up the app might sound straightforward, but here’s the thing: take your time. Double-check that you’ve entered everything correctly to avoid connectivity issues. If anything seems off, you might have to reset the Hub, which we’ll cover later.
Syncing Your Smart Hub with Wi-Fi
Now that the app is set up, let’s focus on syncing the Smart Hub with your home Wi-Fi network. Think of this as creating a bridge that connects your devices to the internet.
1. In the MyQ App: Go to the settings menu within the app and find the Wi-Fi setup option. This shouldn’t take long to locate.
2. Choose Your Wi-Fi Network: When the app prompts you to select a network, pick your home Wi-Fi from the list. It’s essential to choose the right network here, especially when multiple options are available.
3. Enter Your Wi-Fi Password: Type in your password carefully. Any typo here could mean starting over. If you have a slightly complex password with symbols or numbers, it may help to write it down before entering it to ensure you get it all right.
Once you’ve completed these steps, your Smart Hub should connect to your Wi-Fi. If it’s successful, celebrate! You’re almost done. Just a few more tweaks, and you’ll have complete control over your garage door right from your phone.
Troubleshooting Common Issues
Even the best-laid plans can run into a few bumps. If you encounter issues during installation, don’t panic. Here’s a couple of common problems and how to tackle them:
1. Wi-Fi Connection Failure: If the Hub struggles to connect to Wi-Fi, try moving it closer to your router. Sometimes, a weak signal can cause problems, making it hard for the Hub to communicate.
2. Can’t Find the Learn Button: If you can’t spot the Learn button on your garage door opener, try checking the manual for your specific model. It should have a diagram that points you to the right location.
3. Syncing Issues with the App: If the Smart Hub doesn’t sync with the MyQ app, ensure your phone’s Bluetooth is enabled. Restarting both the app and your smartphone can also work wonders for stubborn connections.
Getting tech to play nice can occasionally feel like wrestling with a cat—it can be unpredictable. With a bit of patience and persistence, you’ll likely resolve the issue quickly.
Final Thoughts on Your Liftmaster Smart Hub
And just like that, you’ve successfully installed your Liftmaster Smart Hub! With it, you can now operate your garage door from your phone, receive alerts, and even manage multiple devices. It’s like having a personal assistant for your garage—how nifty is that?
Learning to install smart tech not only saves you money but also empowers you to troubleshoot common issues. You might even impress your friends with your new-found tech skills! Remember, if you run into hiccups, don’t hesitate to reach out to customer support or refer to online resources.
Enjoy the convenience of your new setup, and relax knowing your garage door management is only a tap away. Happy smart living!