Imagine tweaking your garage door system, like adjusting the volume on your favorite playlist. You want it just right, ensuring that it operates smoothly and safely. We’ll dissect the steps necessary for installing your LiftMaster safety sensors, so you can get back to enjoying the convenience of your garage door opener without breaking a sweat.
What Are LiftMaster Safety Sensors?
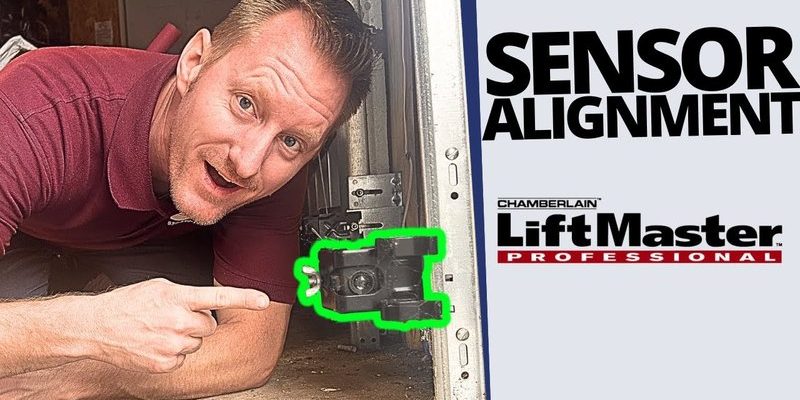
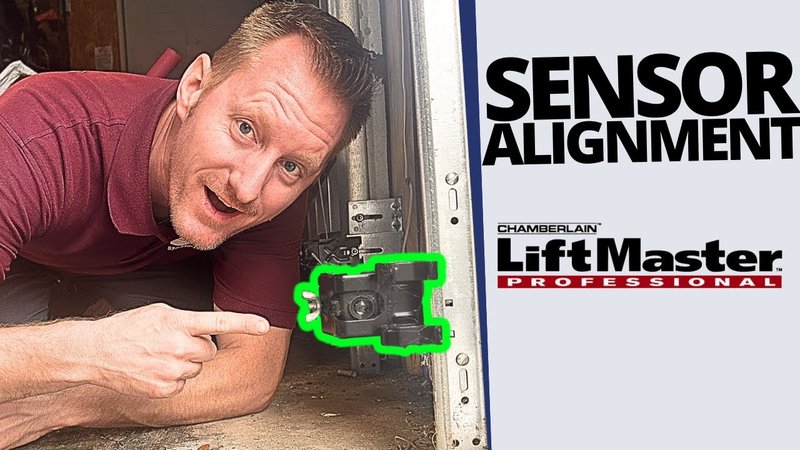
LiftMaster safety sensors are small devices positioned near the bottom of your garage door tracks. They work together to create an invisible beam across the doorway. When anything interrupts this beam while the garage door is closing, it signals the door to reverse and open again. This is crucial for preventing accidents, especially if you have kids or pets around. It’s a bit like a friendly invisible hand, ready to intervene when your garage door tries to come down.
These sensors don’t require a lot of maintenance, but they do need to be properly installed to function correctly. If your garage door isn’t responding as it should, it might be because these sensors are damaged, misaligned, or, in some cases, not even installed yet. So, if you’re ready to tackle this project, let’s dive into the installation process!
Preparing for Installation
Before you get started, it’s essential to gather everything you need. You wouldn’t want to be halfway through just to find out you’re missing a crucial piece. Here’s a quick checklist for your installation:
- LiftMaster safety sensor kit
- Wire strippers (if needed)
- Screwdriver
- Drill (if necessary for mounting)
- Tape measure
- Level
First, ensure that your garage door opener is unplugged to avoid any accidental closing while you’re working. Then, inspect where the sensors will be placed. Ideally, they should be positioned about 6 inches above the ground. This height is perfect for detecting obstacles like bicycles or kids’ toys while keeping them out of basic reach. If you don’t have an existing mounting bracket, it might be a simple task to create a spot for the sensors.
Locating the Right Spot for the Sensors
Now that you have your tools ready, it’s time to find the perfect spot for the sensors. The sensors should be mounted on the vertical tracks of your garage door, one on each side. This positioning allows for optimal detection across the entire door’s width. Here’s how to do it:
1. Measure the Height: Use your tape measure to ensure that both sensors are positioned at the same height on each side. A small assistant can help hold the sensor while you mark the position.
2. Level It Up: Use a level to confirm that your marks are even. If the sensors are misaligned, it can cause serious issues when the door operates.
3. Mounting Brackets: If your sensors came with brackets, use those for installation. Secure them using your drill. If not, you can screw the sensors directly to the wall but ensure they’re at the correct height and alignment.
Wiring the Sensors
Once your sensors are securely mounted, it’s time to wire them up. If you’re feeling a little intimidated by this step, don’t be. It’s like connecting two puzzle pieces; you just have to make sure they fit correctly.
1. Connecting the Wires: Most LiftMaster safety sensors come with color-coded wires. One sensor typically has a black and white wire, and the other has a green and white wire.
2. Strip the Wires: Use the wire strippers to expose about half an inch of wire at the end of each cord.
3. Attach the Wires: Connect the corresponding wires according to the manual provided with your kit. Ensure that they’re tightly secured; a loose connection might lead to sensor failure. If you’re unsure, check out the LiftMaster user manual or consult online resources for specific wire connections.
Testing and Troubleshooting Your Safety Sensors
After wiring everything up, it’s crucial to test the sensors. Think of this as doing a final check before you hit the road—making sure your equipment is functioning as it should.
1. Reattach Power: Plug your garage door opener back in.
2. Testing: Press the garage door opener remote or button to close the door. As it begins to close, wave an object (like a broomstick) to interrupt the beam between the sensors. The door should stop and reverse—if it does, you’re on the right track!
3. Troubleshooting: If the door doesn’t respond, double-check the wiring. Sometimes, a simple mistake can disrupt the entire setup. Look for indicators like blinking lights on the sensors as well; they’re often helpful in diagnosing issues.
Regular Maintenance of Your Safety Sensors
Installing your LiftMaster safety sensors is just the beginning. To keep them functioning smoothly, a bit of regular maintenance is beneficial. Much like you wouldn’t ignore your car’s oil change, these sensors need attention too.
1. Clean the Sensors: Dust and debris can block the sensors. Use a damp cloth to wipe them down periodically. This helps prevent interference with the sensor beams.
2. Check for Alignment: Over time, vibrations or impacts can throw the sensors out of whack. Regularly check that both sensors are aligned correctly. Just like adjusting a picture frame, even a slight tilt can make a difference.
3. Test Regularly: Make it a habit to test your sensors every few months. This proactive approach can catch issues before they become serious problems—saving you time and potential frustration.
Installing LiftMaster safety sensors is a straightforward process that can significantly enhance the safety of your garage door. With careful preparation, precise installation, and some regular maintenance, you can ensure your garage door operates safely for years to come. Remember, unless you create a clear, direct path for those sensors, they can’t do their job effectively. Now that you know the steps, you can confidently tackle this project, turning your garage into a safer place. Safe garage doors are happy garage doors—so get out there and install those sensors!