
Let’s take that leap together! Think of this article as your trusty sidekick on this DIY adventure. I’ll guide you through each step of the installation process, ensuring you feel confident and prepared. Whether you’re a total beginner or someone who just needs a refresher, I’ve got your back. You’ll be opening your garage door like a pro in no time.
Gathering the Necessary Tools and Materials
Before diving into the installation, it’s crucial to gather your tools and materials. Being prepared is half the battle! Here’s a simple list of what you’ll need:
- Craftsman garage door opener
- Step ladder
- Drill with appropriate bits
- Level
- Measuring tape
- Screwdriver (both flathead and Phillips)
- Pliers
- Safety goggles
- Hammer
- Wire cutters (if necessary)
Having everything on hand will streamline the process. It’s like packing for a road trip—you want to make sure you have snacks (or in this case, tools) for the journey ahead.
Preparation for Installation
Before you start swinging your tools around, make sure your garage door is in good working order. This step is vital since a faulty door can lead to installation headaches. Here’s what to check:
1. Inspect the Door: Open and close the door manually. It should move smoothly without any sticking or grinding noises.
2. Check the Springs: Examine the door’s springs. If they’re broken or worn out, it’s best to replace these first.
3. Determine the Mounting Location: Decide where the opener will be installed. Typically, it goes on the ceiling above the garage door, but ensure there’s enough headroom.
Doing these checks is like prepping your car before a long drive. You wouldn’t want to hit the road with flat tires, right?
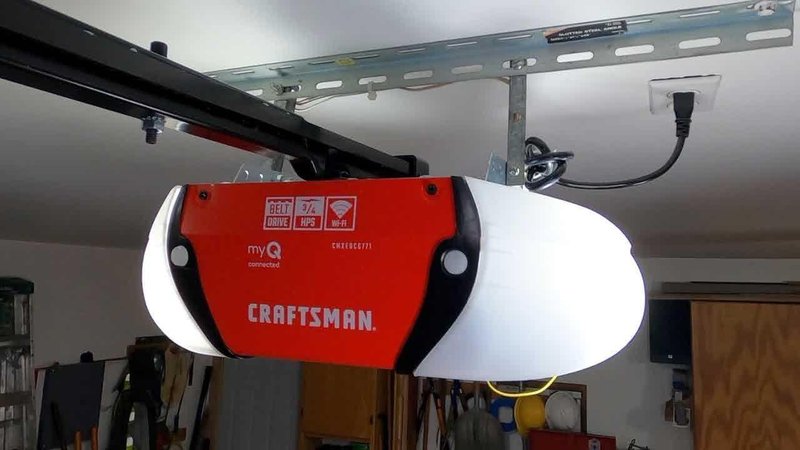
Reading the Manual and Understanding Components
While I know manuals can feel like a series of complicated cartoons, take a few moments to read through the Craftsman garage door opener’s instructions. Understanding each component will make the process smoother:
– Motor Unit: This is the heart of your system. It drives the trolley that moves the door.
– Trolley: This attaches to the door and glides along the rail.
– Rail: This guides the trolley.
– Remote Controls: These are what you’ll use to open and close your garage door. Make sure they’re included and have functioning batteries.
Think of the manual as your travel guide—it helps you know what to expect. You might be thinking, “But I can just wing it!” Sure, but knowing what each part does will save you time and frustration later on.
Installing the Mounting Bracket
With your tools ready and your knowledge in hand, it’s time to install the mounting bracket. This step gives your Craftsman garage door opener a solid place to hang out. Here’s how to do it:
1. Measure and Mark: Use your measuring tape to find the center of the garage door. Mark where the bracket will mount.
2. Level the Bracket: Placing a level on your mark ensures it will be straight.
3. Drill Holes: Follow your marks and use the drill to create holes for the screws.
4. Attach the Bracket: Secure it in place with screws and make sure it’s tight.
You can think of this bracket as the foundation of a house. If it’s wonky, your whole project could come crashing down—or in this case, your garage door could malfunction.
Attaching the Rail and Trolley
Next up, let’s connect the rail and trolley. This is where things start to really come together. Here’s how to get it done:
1. Connect the Rail: Most Craftsman models have rails that snap together easily. Follow the instructions in your manual for specifics on how to assemble them.
2. Attach the Trolley: Slide the trolley onto the rail. Ensure it moves freely.
3. Secure the Assembly: Once the rail is up, attach it to the mounting bracket you previously installed.
Imagine this step like putting together a model airplane—each piece slots into place until it resembles what it’s meant to be.
Wiring the Garage Door Opener
Now for the wiring. This step can seem daunting, but it’s really just like connecting a few simple dots. Here’s how to do it safely and correctly:
1. Power Source: Ensure the opener is unplugged while you’re wiring. Safety first!
2. Connect the Wires: Follow the manual’s wiring diagram, which will show you where each wire should go.
3. Attach the Safety Sensors: These are usually found at the base of the garage door tracks and are crucial for preventing accidents.
4. Tidy Up the Wires: Use zip ties to bundle them neatly to avoid any tripping hazards.
Remember, this part is like wiring a new light fixture. Just take your time and double-check your connections.
Final Steps: Testing and Troubleshooting
Congratulations! You’re almost there. It’s time to power up your Craftsman garage door opener and test it out.
1. Plug It In: Once connected, plug the unit into an outlet.
2. Program the Remote: If your model has a remote, follow the instructions to sync it with the garage door opener. This usually involves pressing a button on both the remote and the unit.
3. Test the Door: Press the remote to see if the door opens and closes smoothly. If it doesn’t, there’s often a troubleshooting section in your manual to help out.
If the door hesitates or doesn’t move, take note of any error codes shown on the opener. It’s like having a little diagnostic tool for your garage door. Check the sensors and wiring again if needed.
And there you have it! Installing your Craftsman garage door opener doesn’t have to be a chore. By taking it step-by-step, you’ve successfully created a system that adds convenience to your life. It’s like turning the key to a whole new world of ease and efficiency in your daily routines.
Don’t forget to regularly check the mechanisms and keep the opener clean for ongoing performance. With a little bit of care, your garage door opener will serve you well for years to come. So, take a moment to enjoy your handiwork. You’ve earned it!