So, how do you go about installing one? Don’t worry; it’s more straightforward than it sounds. We’ll break this down step by step, using an example of a popular brand, like Chamberlain. By the end, you’ll feel confident enough to tackle this task like a pro!
Gather Your Tools and Materials
Before you get started, let’s look at what you need. Gathering your tools and materials in advance will save you time and frustration later. Here’s a quick list of what you’ll need:
- Wireless garage door opener wall button (brand like Chamberlain or LiftMaster)
- Screwdriver (usually a Phillips head)
- Drill (if applicable)
- Battery (check if your new button requires one)
- Level (to ensure your button is straight)
- Tape measure
- Pencil (to mark spots)
Having these essentials at hand will make the installation process smooth sailing. You wouldn’t set off on a road trip without your keys, right? The same logic applies here!
Choose the Perfect Location
Selecting the right spot for your wall button is crucial. Ideally, you want it to be within arm’s reach when you enter or exit. Think of it like a secret doorbell, located so you can easily access it without awkward stretches or jumps.
Here are a few tips for choosing the right spot:
- Near the garage entrance: Install it close to the door you typically use to enter the garage. You don’t want to walk halfway across the garage just to press it!
- Away from obstructions: Make sure the button isn’t blocked by shelves, boxes, or anything else that might make it hard to get to.
- Height: Aim for a height that’s comfortable for everyone in your household. Usually, around 4-5 feet above the ground works great.
Once you’ve identified the ideal spot, use your tape measure to mark it with a pencil. Trust me; it’s worth taking a moment to do this step correctly.
Installing the Wireless Wall Button
Now comes the fun part—actually installing the wall button. Follow these steps for a successful setup:
1. Remove the Back Cover: Most wireless buttons have a removable back cover. Carefully remove it to expose the mounting holes. Many buttons snap off easily.
2. Align and Drill: Use the back cover as a template, positioning it on your marked spot. If your button doesn’t come with pre-drilled holes, you might need to drill some based on the template’s placement.
3. Attach the Wall Button: Use screws to attach the back cover to the wall. If you’re using a drill, make sure you’re steady to avoid crooked holes. Check with your level to make sure it’s straight!
4. Put On the Front Cover: Once the back is secure to the wall, snap the front cover back into place. It should fit snugly and look tidy.
5. Power Up: Install the necessary battery if applicable. This usually means just sliding or clicking the battery into place.
Program the Wall Button with Your Garage Door Opener
Here’s the thing: installing the wall button is only half the battle. Next, you need to pair the new button with your garage door opener. Follow these guidelines for smooth syncing:
1. Find the Learn Button: On your garage door opener (usually mounted on the ceiling), locate the “learn” or “program” button. This may be colorful, often resembling a small green or orange button.
2. Press the Learn Button: Press the learn button. You’ll typically have about 30 seconds to proceed to the next step. This time frame is like a countdown in a game—don’t dawdle!
3. Press Your New Wall Button: Go to your newly installed wall button and press it. If your opener responds (like you hear a click or see it light up), voila! You’re officially programmed!
4. Test It: Give it a test run. Stand back and hit the button to see if your garage door opens. If it doesn’t work, don’t worry—frequent troubleshooting involves repeating these steps or checking the batteries.
Troubleshooting Common Issues
Sometimes, technology isn’t on our side. If the wall button doesn’t work as expected, don’t panic. Here are a few common issues to check:
- Distance Problem: Ensure that the wall button is within the effective range of your garage door opener. It shouldn’t be too far away.
- Blocked signals: Objects between the button and the opener can interfere with the wireless signal. Clear any obstructions.
- Battery Check: If the button isn’t lighting up, it might be time to replace the battery. It’s an easy fix!
Following these troubleshooting tips should help you clear up most issues. You might even find the process a little satisfying—like solving a puzzle!
Alternatives to Wireless Wall Buttons
If you find that a wireless wall button isn’t the right fit, there are alternatives you can consider. Here’s a quick rundown:
- Smart Garage Door Openers: These allow you to operate your garage door via your smartphone. Kind of like having a remote but with a lot more features!
- Universal Remotes: If you lose your main remote, a universal remote can be programmed to work with various brands of garage door openers.
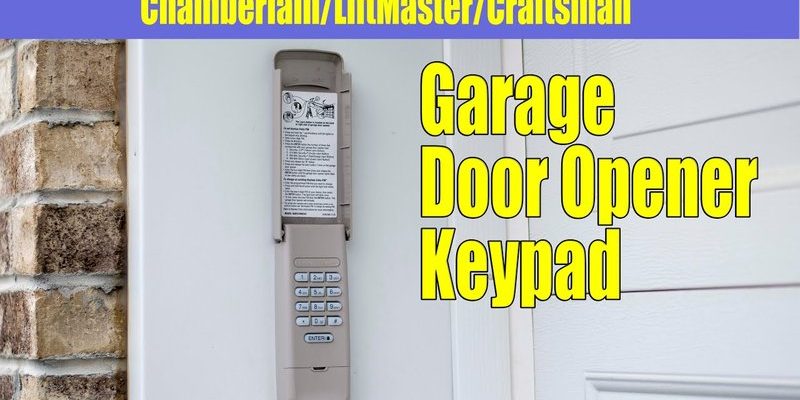
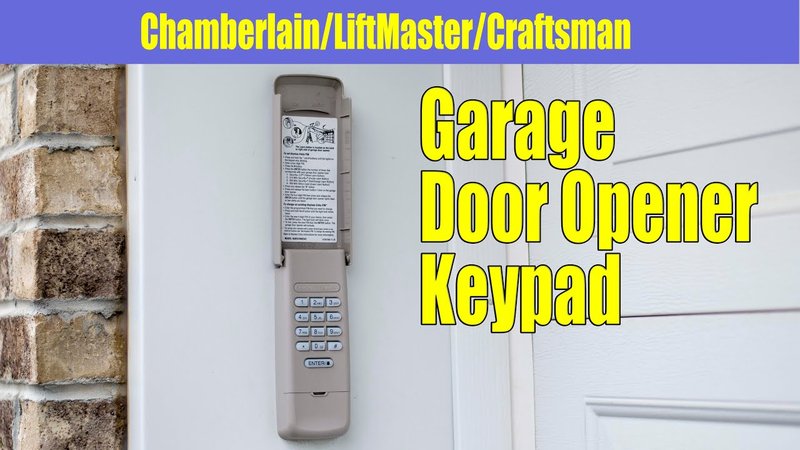
- Keypads: Installing a keypad outside your garage lets you enter a code to open your door without a remote. It’s secure and convenient.
Think about what fits best with your lifestyle. Whether you’re tech-savvy or prefer something straightforward, there’s often a solution out there.
Maintenance and Safety Tips
Once everything’s installed, maintaining your wireless garage door opener wall button is essential for longevity and safety. Here’s what to keep in mind:
- Routine Testing: Check the button and opener at least once a month. Press the button, and if it reacts slowly or not at all, it could be a sign of battery issues.
- Keep It Clean: Dust and debris might collect around the button. A quick wipe-down with a damp cloth can keep it working smoothly.
- Children and Pets: Ensure the button is out of reach of small children and pets to prevent accidental openings. You wouldn’t want them getting stuck outside, right?
Taking these simple precautions can make a significant difference. It’s all about keeping your garage functional and secure.
Installing a wireless garage door opener wall button is a straightforward project that can greatly enhance your convenience and security. By gathering the right tools, choosing the ideal location, and following the pairing instructions, you can tackle this installation head-on!
The sense of accomplishment you feel after successfully installing it? That’s the cherry on top. So, grab your tools, pick a spot, and get started. You’ll be opening your garage door with a simple press in no time!