When it comes to garage door openers, there are various types, often coming equipped with remotes from brands like LiftMaster, Chamberlain, or Genie. Most modern openers offer features such as smart connectivity and battery backups. This means you can control your door from your smartphone or ensure it operates even during power outages. Let’s dig into how to get your garage door opener installed seamlessly.
Gather Your Tools and Materials
Before starting the installation, you need to gather some essential tools and materials. It’s like preparing for a cooking session; you want to have everything within reach so that you don’t end up running around.
- Garage door opener kit
- Drill with various drill bits
- Screwdriver (flathead and Phillips)
- Level
- Measuring tape
- Wire cutter/stripper
- Ladder
- Pencil
Make sure to read the instruction manual that comes with your specific opener; it’ll have guidelines tailored to your model. Some openers might come with additional installation pieces, so having everything sorted out will make the process smoother.
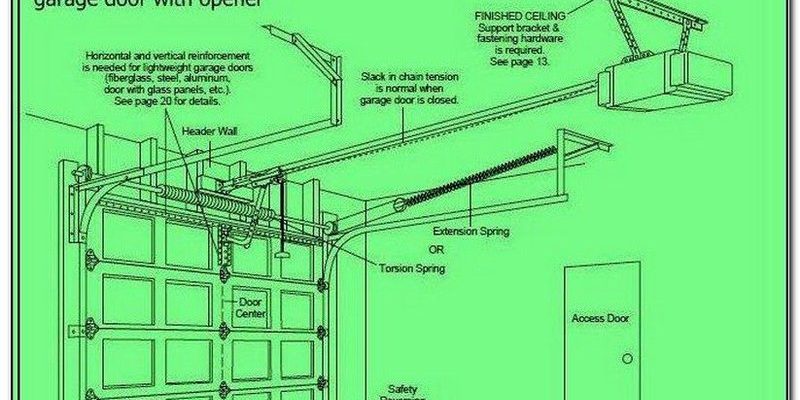
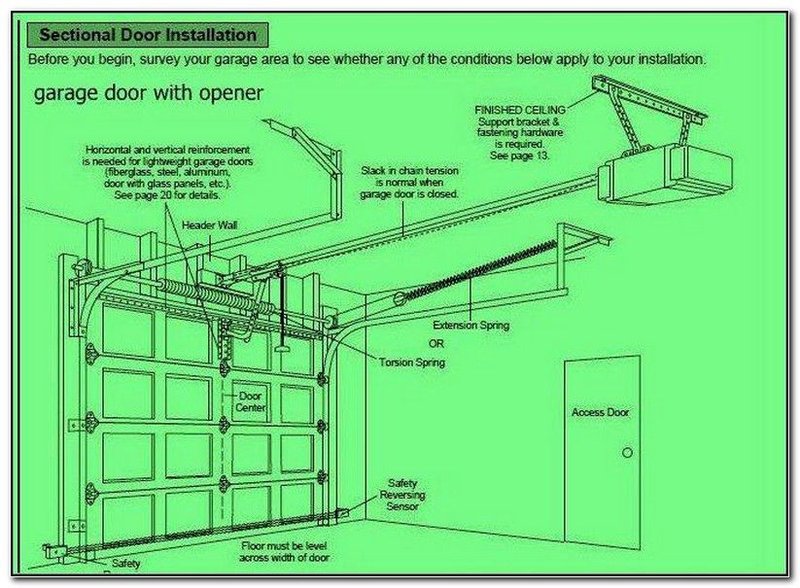
Prepare Your Garage Door
Before you install the opener, ensure your sectional door is in good shape. Check if the door opens and closes smoothly. If you have issues, such as a stuck door or noisy operation, it might be best to address those first.
Here’s a quick checklist of things to look for:
- Inspect the rails for any obstructions.
- Check the springs for any signs of wear or damage.
- Ensure the tracks are straight and aligned.
If anything feels off, this is the time to fix it. Just like you wouldn’t build a house on shaky foundations, installing a garage door opener on a faulty door can lead to more significant problems down the road.
Decide on the Mounting Location
Next, you’ll need to choose where the garage door opener will be mounted. It should typically be positioned on the ceiling, between the two tracks of the sectional door.
Why does the placement matter? Well, positioning the opener correctly will ensure the door operates smoothly without any obstructions. Here’s what to consider:
- Make sure the rail isn’t too close to the ceiling lights or overhead pipes.
- Ensure you have enough clearance to accommodate the opener and its moving parts.
- Check the height of the garage door to plan the opener position.
Grab your tape measure and mark the installation spot with a pencil. This step is crucial; a small adjustment can make a big difference in operation quality.
Assemble the Garage Door Opener
Now it’s time for the fun part—assembling the garage door opener. While the specific assembly steps may differ from brand to brand, most openers will have similar components.
Start by following the included instructions to put together the rail and the motor unit. Generally, you’ll need to:
1. Connect the rail sections according to the manual.
2. Attach the motor unit to one end of the rail.
3. Secure everything using the screws provided in the kit.
You’ll want to tackle this part enthusiastically; it’s like building your favorite piece of furniture! Carefully check each step to ensure all components are snugly fastened.
Mount the Opener to the Ceiling
With the opener assembled, it’s time to mount it to the ceiling. This part may require a bit of muscle, so don’t shy away from asking a friend for assistance.
Using your ladder, lift the opener into position at the marked location. Secure it to the ceiling beams with lag screws, ensuring it’s tightly fixed. To verify that it’s level, use your level tool, adjusting as necessary.
It’s essential to make sure the opener is stable. A shaky installation might lead to operational issues later, like a bumpy garage door run.
Connect the Door Arm
Once the opener is set in place, it’s time to connect the door arm. This arm connects the door to the opener and is vital for proper function.
To connect it:
1. Pull the door into a closed position.
2. Attach one end of the door arm to the door and the other to the trolley that moves with the opener.
You’ll want to ensure this connection is tight, yet flexible enough for the door to open and close naturally. If you find it challenging, visualize it like the connection between a bicycle and its pedal—the two must work together without interference.
Wire the Garage Door Opener
Now we reach the stage of wiring the opener. This might seem intimidating if you’re not familiar with electrical work, but stay with me; it’s straightforward.
1. Identify the power source; you’ll need an outlet within reach—usually close to the opener.
2. If your opener allows for battery backup, follow those instructions, as it varies from model to model.
3. Run the wires from the opener down to the button you’ll place inside the garage.
When connecting the wires, ensure the connections are secure. Like tightening the laces on your shoes, you want everything to stay put!
Set Up the Wall Button and Safety Sensors
After wiring the main unit, you’ll set up the wall button and safety sensors. These components are essential for user convenience and safe operation.
For the wall button:
1. Choose a location about eye-level near the garage entrance.
2. Drill the mounting holes and secure it in place.
Now, for the safety sensors:
1. Position them a few inches above the ground near the door track.
2. Follow the wiring instructions from the manual—this step usually involves connecting the sensors to the main system.
These sensors detect obstacles in the door’s path—think of them as the eyes of the opener, ensuring safety throughout operation.
Finalize and Test the System
After everything is connected, it’s time for the moment of truth—testing your installation! Here’s how to do it:
1. Plug in your garage door opener.
2. Press the wall button to see if it responds.
3. Test the door’s safety sensors by placing an object in the path and trying to close the door.
If the door stops or reverses, the safety feature is working. If it doesn’t, double-check your wiring. Honestly, troubleshooting is part of the joy of DIY projects. Consider it the final step of your beautiful puzzle!
Regular Maintenance for Longevity
After installing the opener, take some time to think about maintenance. Just like how you regularly change the oil in your car, your garage door opener will benefit from routine checks.
Here’s what to keep an eye on:
- Check the opener and door balance regularly.
- Inspect the tracks for any obstructions.
- Investigate any unusual noises during operation.
Regular maintenance will extend the life of your opener and keep your garage running smoothly.
Common Troubleshooting Tips
Even with the best installations, sometimes things don’t go as planned. Here are some common issues and how to troubleshoot them:
- The door won’t open: Check if the opener is plugged in and the circuit is functional. Also, ensure the remote battery isn’t dead.
- The door moves erratically: Inspect if the tracks are aligned and screws are tightened.
- The safety sensors don’t work: Make sure they are clean and properly aligned.
The key is to stay calm and approach any problems methodically. You’ve got this!
Installing a garage door opener on a sectional door can feel overwhelming at first, but it’s a satisfying endeavor that empowers you to take control of your home’s security and convenience. Through this guide, you’ve taken steps from gathering tools to finalizing the setup and even troubleshooting common issues.
Whether you’re jamming out to some tunes while you work or proudly showing off your newly installed system to friends, know that you’ve accomplished something that adds value to your home. So, roll up those sleeves and enjoy the ease of having a functioning garage door opener—it’s only a push of a button away!