
Before diving in, it’s worth noting that many modern garage door openers, like those from Chamberlain or Genie, come with specific instructions tailored for various garage configurations. Knowing your opener model can make the process smoother. But regardless of your choice, the goal remains the same: to make your life easier with a reliable and efficient garage door opener.
Understanding Low Headroom Requirements
Low headroom garages typically have limited vertical space between the garage door and the ceiling. This situation often arises in older homes or areas where maximizing living space is essential. The standard vertical space for garage door installation is about 12 inches or more from the top of the door to the ceiling. If your garage measures less than this, you’ll need special adjustments.
Why does this matter? Simply put, if you install a regular opener in a low headroom garage, it won’t fit properly and can lead to damage or malfunction. Low headroom installations often use a special track or garage door opener designed specifically for these situations. Knowing this first will save you time and trouble later.
Gathering Your Tools and Materials
Before jumping into the installation, let’s make sure you have everything at your fingertips. You wouldn’t start baking a cake without measuring cups, right?
Here’s a handy checklist you’ll need for installing your garage door opener:
- Garage door opener kit
- Drill and drill bits
- Socket wrench set
- Measuring tape
- Stud finder
- Level
- Safety glasses
- Step ladder
- Tape (for marking)
Having the right tools not only makes your job easier but also ensures safety. So, take a few minutes to collect these items before you begin.
Reviewing Your Garage Door Opener Manual
Most garage door openers come with a manual, and while tempting to toss it aside, I’d strongly encourage giving it a glance. Different brands have unique installation requirements, and it’s your best source for specific instructions. Here’s what you should focus on:
- Assembly of the opener parts
- Mounting instructions specific to low headroom setups
- Programming the remote control
By understanding these components, you can better anticipate what you’ll encounter during the installation process, making it easier to handle any surprises.
Preparing Your Garage Door
Before installing your opener, it’s crucial to check the garage door itself. After all, an opener can only operate smoothly if the door is functioning properly. Start by inspecting:
- The door tracks for obstructions
- The rollers for wear or damage
- The balance of the door (does it stay up when manually lifted?)
If you find any issues, it’s best to address them first. Trust me; a well-maintained door makes for a headache-free opener installation.
Installing the Mounting Bracket
Once your preparations are complete, it’s time to kick off the actual installation. Start by installing the mounting bracket on the wall. Follow these steps:
1. Measure and mark where your opener will be mounted. This usually means aligning it with the center of your garage door.
2. Use your stud finder to locate the nearby studs. Securing the bracket to a stud is essential for a sturdy installation.
3. Drill pilot holes and attach the bracket, making sure it’s level. If you don’t have a level, you could risk the alignment being off, leading to performance issues.
A solid mounting bracket is essential for ensuring your opener works both safely and efficiently.
Assembling the Rail System
Next up is the rail system, which is what the opener moves along. Since you’re working with a low headroom garage, you might be using a *low headroom rail kit*. Here’s how to get it right:
1. Follow your manual’s specific instructions. Every brand has different assembly guides.
2. Generally, start by assembling the rail pieces according to the diagrams.
3. Secure the assembled rail to the mounting bracket you just installed as per the instructions.
Be sure to double-check that the rail is aligned just right. Any misalignment here can lead to the opener straining or malfunctioning.
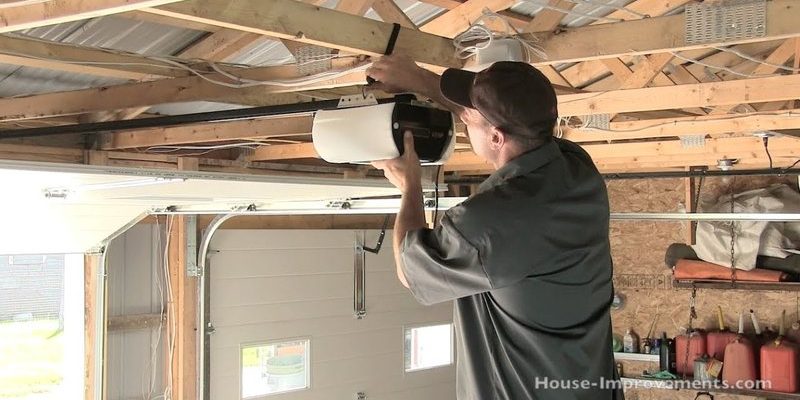
Installing the Opener Unit
Now comes the exciting part: installing the actual opener unit! This is where the magic happens.
1. Lift the opener unit and secure it to the rail system as directed in the manual.
2. Make sure it’s bolted on tightly but leave some wiggle room to adjust later if necessary.
3. Connect the power cord and any additional wiring as specified.
This step is essential for ensuring your opener operates efficiently.
Connecting the Garage Door and Safety Features
You’re almost there! It’s time to connect the opener to your garage door. Moreover, let’s not forget about safety features such as the safety reverse mechanism:
1. Attach the lifting arm from the opener to the garage door. This usually involves securing it with hardware from your kit.
2. Carefully test if the door opens and closes smoothly.
3. Don’t skip the safety features! Test the safety reverse by placing a block (like a piece of wood) under the door. If your door doesn’t reverse upon hitting the block, double-check your settings.
Testing these features will prevent any accidents, keeping you and your family safe.
Programming Your Garage Door Opener Remote
Once everything is set up, it’s time to program your remote control. Think of this as setting the personal touch to your new opener. Here’s how to do it:
1. Press the learning button on the opener unit until the light begins to blink.
2. Within 30 seconds, press the button on your remote that you wish to use.
3. Wait for the light to blink, indicating a successful pairing.
Congrats! Your remote is now synced with your garage door opener, ready to make your life much easier.
Troubleshooting Common Installation Issues
Even the best plans can hit a few bumps. Here are some common hiccups you might encounter during installation and how to address them:
- Remote not working: Check the batteries and ensure it’s correctly paired.
- Door doesn’t close completely: This might indicate you need to adjust the up and down limits in your opener settings.
- Noise issues: Tighten any loose screws or bolts on the rail system or motor unit.
By being aware of these potential problems, you can save yourself time and frustration down the line.
Final Adjustments and Testing
Before you call it a day, take a moment to make final adjustments:
1. Test the opener multiple times. It should operate smoothly without needing extra effort.
2. Adjust any settings for force or limit as needed based on its performance.
3. Finally, review the safety settings and ensure everything is in working order.
Remember, a little extra time spent on adjustments can save hours of frustration later!
Enjoying Your New Low Headroom Garage Door Opener
Congratulations on your successful installation! Now, go ahead and enjoy the luxury of a garage door that opens with a press of a button. There’s something satisfying about watching it glide open effortlessly, isn’t there?
Regular maintenance, like lubricating the moving parts and checking the settings, will keep your opener running smoothly. Keep that manual handy for future reference, and feel proud of your DIY achievement!
With your new setup, you’ll wonder why you didn’t do it sooner. In the end, it’s all about making your life easier, and you just took a huge step in that direction!