In this guide, I’ll walk you through the common issues and fixes for the Sears wall button with a friendlier twist. Whether it won’t respond at all, or it opens and closes the door erratically, there’s usually a straightforward solution that can save you from unnecessary stress and potential repair costs. Let’s dive into the nuts and bolts of troubleshooting and fixing that pesky button!
Understanding the Sears Wall Button Mechanism
The Sears wall button is generally straightforward in design and use, but many don’t realize what’s happening behind the scenes. When you press that button, it sends a signal to the garage door opener to engage. Think of it like flipping a light switch—the electrical circuit needs to be complete for the light to shine.
Inside the button, there’s a simple mechanism that usually consists of a spring, a contact plate, and wiring. Over time, dirt and dust can mess with these components, just as a dusty old lightbulb can dull its glow. When troubleshooting, you want to ensure the connections are clean and intact. A bit of insight can spare you from unnecessary replacements, so let’s unravel some common problems.
Common Problems with the Sears Wall Button
Every now and then, you may face a few quirks with your Sears wall button. Here are some of the most frequent issues that can pop up:
- No Response: Pressing the button yields no movement. The garage door sits firmly in place, and it can be frustrating.
- Intermittent Response: The door works sporadically, sometimes responding to the button and sometimes leaving you in the lurch.
- Opening/Closing Actions: The door might open or close erratically, almost like it’s playing a game of peek-a-boo.
Understandably, these problems can make you feel like you’ve stepped into a comedy of errors. Before calling a technician, it’s worth troubleshooting and seeing if the issue can be easily resolved.
Initial Troubleshooting Steps
If your Sears wall button isn’t working as it should, the first step is simple—check the power supply. Here’s how to start:
1. Inspect the Power Source: Ensure the garage door opener is properly plugged in and check any blown fuses. It’s like ensuring your phone is charged before you start troubleshooting any apps!
2. Look at the Wiring: Examine the wiring connected to the button. Check for any frayed wires that could be interrupting the connection. If you notice any damage, it may be time to replace that section.
3. Check the Wall Button: If everything else seems fine, it’s likely the wall button itself that’s the culprit. A quick visual inspection is a good start.
These quick checks can often lead you to the heart of the problem without much hassle.
Inspecting and Cleaning the Wall Button
If the initial troubleshooting doesn’t resolve the issue, focus on cleaning the wall button. Dust and grime can host a tiny party and block the button’s functionality. Here’s how to get it back in shape:
– Remove the Button Cover: Usually, this involves unscrewing a couple of screws. Once off, you’ll expose the inner workings.
– Clean the Internal Contacts: Use a soft cloth or a cotton swab to gently wipe away any debris. Be cautious—these components are delicate, and you want to treat them kindly.
– Reconnect and Test: Once cleaned, reattach the cover and test the button again. Sometimes a simple cleaning can do wonders.
If the problem persists after this, you may be looking at a more serious issue.
Testing Wiring Connections
If you’re still grappling with that stubborn wall button, it’s time to dig into the wiring connections. A loose or damaged wire can often cause issues. Follow these steps:
1. Access the Button Wiring: Unscrew the wall button’s cover and gently pull back the wiring harness.
2. Check for Loose Connections: Ensure all wiring connections are tight. If you find any loose wires, tighten them securely. Picture adjusting a necklace chain—you don’t want it falling off unexpectedly!
3. Look for Damage: Inspect the wires for any obvious wear, fraying, or breakage. If you see something amiss, you may need to replace that section or consult a professional.
Getting a bit hands-on may sound daunting, but even small adjustments can mean a world of difference.
Resetting the Garage Door Opener
Sometimes, the wall button and the garage door opener just need a little reset. It’s akin to rebooting your computer—sometimes all it needs is a quick refresh to get back on track. Here’s how to do it:
1. Locate the Reset Button: Most Sears garage door openers have a reset button on the unit itself.
2. Press and Hold: Press and hold the reset button until you see the lights blink on the opener. This usually indicates it’s resetting.
3. Test the Button Again: Once the opener completes the reset, try using the wall button to operate the door.
Resetting can clear out any chaotic signals or glitches that may have built up. If everything syncs again, fantastic! If not, we might have to take a deeper dive.
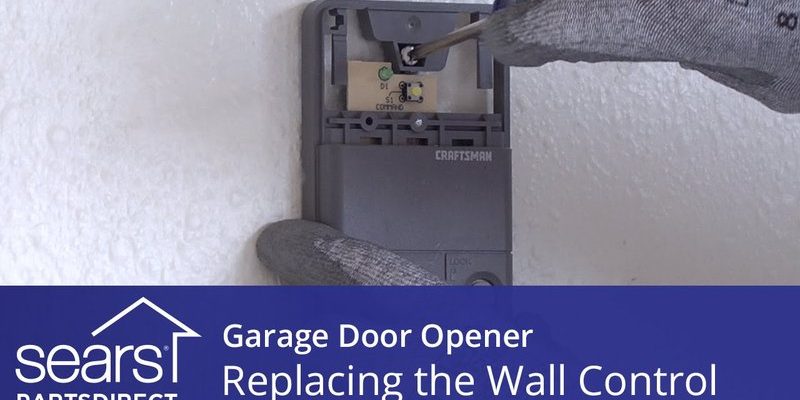
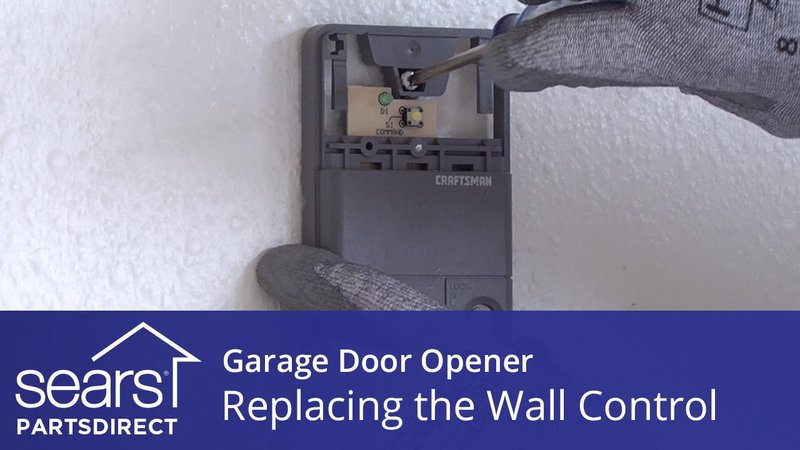
Replacing the Wall Button
If you’ve followed all the troubleshooting steps and still find your Sears wall button isn’t cooperating, it might be time for a replacement. Think of it as swapping out an old key that just doesn’t work anymore. Here’s a step-by-step way to do it:
1. Purchase a Compatible Replacement: Make sure to choose a wall button that’s compatible with your specific Sears garage door opener model.
2. Disconnect Power: Always safest to disconnect power while you’re working on electrical components.
3. Remove the Old Button: Unscrew and disconnect the wiring from the old wall button.
4. Connect the New Button: Connect the wiring to the new button and screw it into place.
5. Test It Out: Reconnect the power and test the new wall button. Celebrate this small victory—sometimes the simplest fixes spark the most joy!
Final Thoughts on Fixing Your Sears Wall Button
Fixing a Sears wall button doesn’t have to be overwhelming. With just a little patience and some basic troubleshooting steps, you can often resolve minor issues on your own. Remember, it’s all about checking power sources, cleaning contacts, and understanding wiring connections.
If at any point you feel uncomfortable, don’t hesitate to call a professional. Garage door systems can be intricate, and safety should always be your top priority.
So, as you’re sipping that cup of coffee (or tea), keep in mind that keeping your garage door working smoothly is just a few adjustments away. With a little time and effort, that wall button can soon be back in action, making your garage door openings as easy as pie!
Originally posted 2025-02-07 03:29:21.