The Genie brand offers various openers, often equipped with unique smart remotes that make life easier. But when something goes wrong, that handy little remote becomes more of a nuisance than an aid. Knowing how to troubleshoot and fix the circuit board can restore functionality and will help you avoid costly repairs. Let’s get into the nitty-gritty of fixing your Genie circuit board!
Recognizing Symptoms of a Faulty Circuit Board
Before diving into repairs, let’s take a moment to identify the signs that your Genie circuit board might need some attention. Think of it as checking for leaks before you decide to check the plumbing. Common indicators include:
- Remote won’t work: If your garage door doesn’t respond to your remote at all, it could be a circuit board issue.
- Intermittent operation: Does your door only work sometimes? That erratic behavior can point to circuit issues.
- Lights flickering: If the lights on your opener are flickering or not illuminating at all, it’s a sign of electrical problems.
It’s essential to recognize these symptoms correctly. If you notice any of these signs, your Genie circuit board is likely the source of the problem. But don’t worry; fixing it is within your reach!
Gather the Right Tools
Like any good project, having the right tools at your disposal is crucial. Before you start poking around in your garage door opener, make sure you have the following items handy:
- Screwdriver set: You’ll need various types, typically Phillips and flathead, to unscrew the cover.
- Multimeter: This handy tool helps you test electrical connections and ensure everything is working correctly.
- Replacement circuit board: If necessary, you can find these online or at your local hardware store.
- Cleaning supplies: A soft brush or cloth can remove dust and debris that may impede functionality.
Having these tools will make the process much smoother and keep things organized. So take a moment to gather everything—trust me, you’ll thank yourself later!
Powering Down For Safety
Before you start tinkering, it’s crucial to prioritize safety. Nobody wants to deal with electric shocks or accidental power surges. Here’s how to safely power down your Genie opener:
1. Locate the power source for your garage door opener. Usually, this is a standard outlet on the ceiling.
2. Unplug the opener from the wall. If you’re worried about forgetting, you can also turn off the circuit breaker.
3. Make sure to give the system a minute to fully power down. This prevents any accidental shocks while you’re working.
Remember, safety first! Double-check that it’s unplugged before proceeding further.
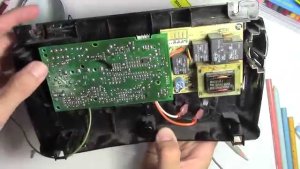
Accessing the Circuit Board
Now that you’re safely powered down, it’s time to access the circuit board. Here’s how to do that:
1. Use your screwdriver to remove the screws holding the opener’s cover in place. Keep these screws in a safe spot—nobody likes a missing piece!
2. Gently pull off the housing to expose the internal components. Be careful not to yank it too hard, as there may be wires attached.
3. Locate the circuit board, which is usually a rectangular board with various components attached. This is where the magic happens!
Once you’ve accessed the board, inspect it for any visible signs of damage like burn marks or loose connections.
Troubleshooting and Repairing the Circuit Board
If you’ve identified issues on your circuit board, it’s time to troubleshoot. Here are a few steps you can take:
1. Check for loose connections: Often, wires can become loose over time. Carefully tug on the connections to see if they feel secure.
2. Inspect for burn marks: If you see burn marks, the circuit board might be toast. In this case, a replacement may be necessary.
3. Test components with a multimeter: This tool can help you measure voltage and ensure that all parts are functioning correctly. If you spot something off, you’ll know what needs replacing.
Taking a methodical approach here is essential. Each little step can lead you closer to a solution, and a careful inspection can save you from wasted time and effort later.
Replacing the Circuit Board
If your troubleshooting reveals that your circuit board is beyond repair, don’t fret. Replacing it isn’t as daunting as it sounds:
1. Order a replacement board: Ensure you choose a board that is compatible with your specific Genie model.
2. Disconnect the faulty board: Carefully unclip or unscrew it from its mount, making a note of how the wires are connected.
3. Install the new board: Follow the same wiring connections for the new board as you noticed on the old one. If in doubt, the new board often comes with instructions.
4. Reassemble the opener: Put the housing back together and secure it with the screws you set aside earlier.
Voilà! You’ve just replaced your Genie circuit board. Now it’s time to power it back on and see if everything operates smoothly.
Testing Your Repairs
With your opener all set up, it’s time for the moment of truth. Testing is crucial to ensure all your hard work paid off. Here’s how to perform a comprehensive check:
1. Plug the opener back in or turn the circuit breaker on.
2. Manually test: Start the opener using the wall switch if available. Ensure it responds quickly and smoothly.
3. Test the remote: Finally, grab your remote and see if it successfully operates the door. If it does, congratulations! You’ve fixed the circuit board!
If it doesn’t work, retrace your steps. There might be something you missed or need to adjust.
Final Thoughts
Fixing your Genie circuit board may seem challenging, but with a little patience and the right tools, it’s entirely doable. From recognizing the symptoms of a faulty board to replacing the entire unit, you’ve taken the necessary steps to breathe new life into your garage door opener. Remember, safety and precision matter the most throughout the process.
Keeping your Genie opener in good repair can ensure peace of mind and reliable operation for years to come. So, the next time you hear that garage door slow to respond, you’ll feel ready to tackle the fix efficiently, like a pro!