
Just like how you wouldn’t want a friend constantly blocking your doorway when you try to enter their house, a misaligned photo eye sensor stops your garage door from doing its job. This guide will stroll you through the simple steps to get that sensor back on track. We won’t be diving into anything too technical. Whether you’re using a Chamberlain, LiftMaster, or any common brand, you’ll find the tips relatable and straightforward.
What Is a Photo Eye Sensor?
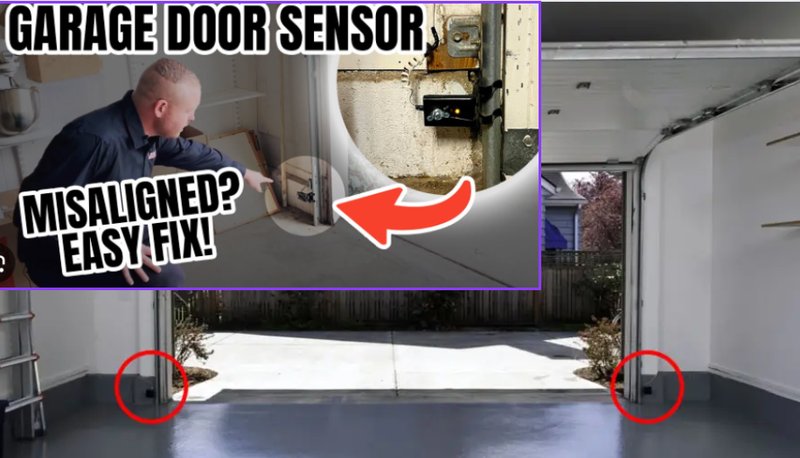
A photo eye sensor is a small but essential component of your garage door opener system. It’s typically located a few inches above the ground on either side of the garage door. These sensors work by emitting a beam of light to connect with another sensor. If something interrupts that beam—like your car or a pet—your garage door stops closing to prevent accidents.
You might wonder why this is important. The sensors help ensure safety. They prevent the door from closing on a person, pet, or vehicle. This is especially crucial for homeowners with kids who might not always be aware of their surroundings. When functioning correctly, they act like your personal safety net.
However, over time, these sensors can get misaligned due to several reasons, including weather damage, minor collisions, or simply from vibrations in the garage. Understanding what this sensor does is the first step in fixing it. In the next sections, we’ll dig into how to identify and correct any misalignment.
Signs Your Photo Eye Sensor Is Misaligned
Recognizing a misaligned photo eye sensor can save you a lot of time and frustration. Here are some straightforward signs to watch for:
- Your garage door won’t close: If your door reverses to the open position immediately after attempting to close, it’s a telltale sign of an issue with the sensors.
- LED indicator lights: Most modern garage door openers come with LED lights on the sensors. If the light is blinking or off, alignment issues could be the culprit.
- Visible misalignment: Take a close look at the sensors. If one appears tilted or crooked compared to the other, it’s likely time for some adjustments.
Being proactive in noticing these signs can help you troubleshoot before the issue escalates. It’s definitely easier to fix things sooner than later!
Preparing for the Fix: Safety First
Before diving into the actual fixing process, safety should be your top priority. You wouldn’t dive into a pool without checking the water level, right? Here’s how to prepare for your garage door sensor adjustment:
1. Unplug the garage door opener: To prevent any accidental activations, make sure the power is disconnected.
2. Clear the area: Remove any objects near the door that might interfere with your movement.
3. Wear safety gear: Although this is a simple fix, wearing gloves can protect your hands while working around the sensors.
Taking these precautions will ensure that you’re in a safe environment while you tackle the misalignment of your photo eye sensors.
Tools You Might Need
You don’t need a full toolbox to get this job done, but having a few handy tools can make the process smoother. Here’s a quick list of what you may need:
- Level tool: A small level helps check if the sensors are perfectly aligned.
- Screwdriver: Depending on your model, you might need this for any necessary adjustments.
- Soft cloth: Keep a cloth handy for cleaning the sensors while you work.
Having these tools on hand can save you a back-and-forth trip to the garage. You might find that a little organization goes a long way in terms of getting the job done right.
How to Check Sensor Alignment
Now that we’re prepped, let’s figure out how to check the alignment of your photo eye sensors. You might be thinking, “Isn’t this just a simple adjustment?” Well, it can be if you follow these steps carefully:
1. Locate the sensors: Find your photo eye sensors on either side of the garage door.
2. Inspect the lens: Look for any dirt or debris on the lens. A quick clean with your soft cloth can go a long way.
3. Use your level tool: Place the level against the sensor to confirm it’s straight. If it’s not aligned, you’ll be making some adjustments soon.
Checking for alignment doesn’t take long, and you might discover that a simple cleaning resolves your problem!
Adjusting the Sensors
Let’s get to the heart of the matter: adjusting the sensors. If you’ve found out that they’re misaligned, here’s how you can fix them:
1. Loosen the screws: If the sensors are attached with screws, use your screwdriver to gently loosen them without removing them entirely.
2. Adjust the position: Carefully move the sensor until it’s lined up perfectly with its counterpart on the other side. Use your level to ensure it’s straight.
3. Retighten: Once aligned, securely tighten the screws. Be careful not to over-tighten them, as this could damage the sensors.
It’s as simple as that! A little bit of tweaking often does the trick—much like adjusting the angle of your computer screen until it’s just right.
Testing the Sensors
After adjustments, it’s crucial to test your sensors to ensure everything is back in working order. Here’s how you do a quick test:
1. Reconnect the power: Plug your garage door opener back in and make sure everything is energized.
2. Close the door: Use your remote to close the door while standing back and watching closely.
3. Check operation: As the door begins to close, wave your hand or an object in front of the sensors. The door should stop and reverse if the sensors are working correctly.
Testing your sensors will confirm whether your earlier efforts were successful. You’ll feel accomplished once you see that garage door operating smoothly again!
What to Do If the Sensors Still Won’t Work
If you’ve adjusted and tested your sensors but they still aren’t functioning correctly, don’t panic. There are a few additional things to check before bringing in a professional:
– Inspect wiring: Look for any visible damage to the wiring connecting the sensors. Frayed or broken wires may need replacement.
– Check for obstructions: Ensure there’s nothing blocking the sensor’s beam. Even a small leaf can disrupt the connection.
– Reset the system: Sometimes, a reset is all that’s needed. Refer to your garage door opener’s manual for specific instructions.
If all else fails, it might be time to consult a professional. But don’t be discouraged—many issues can be resolved with minor adjustments.
Maintaining Your Photo Eye Sensors
After getting your sensors back on track, a little maintenance can go a long way in prolonging their life. Here are some easy tips:
– Regular cleaning: Use a soft cloth to wipe the lens every few months to remove dirt and grime.
– Periodical checks: Schedule regular checks to ensure they remain aligned and functional.
– Protect from weather: If possible, install a small barrier to shield them from the elements.
Simple maintenance can prevent future headaches and keep your garage functioning as it should.
Fixing a misaligned garage door opener photo eye sensor can seem like a daunting task, but with the right approach, it’s more manageable than you might think. By taking the time to understand how these sensors work and following the steps outlined here, you’ll be back to smoothly operating your garage door in no time.
Remember, regular maintenance is key. A little care goes a long way in ensuring the safety and longevity of your garage door system. So, next time you’re heading to the garage, take a moment to check on those sensors. You’ll be grateful for it!
Originally posted 2025-02-06 15:49:39.