If you’ve got a LiftMaster or Chamberlain opener, this guide is especially for you. Whether you’re troubleshooting an annoying issue or getting ready to reset your system, understanding how to disable the circuit board is a crucial skill. Think of it as knowing how to turn off the brain of your garage door opener temporarily. Let’s dive in and tackle this step-by-step, so you can regain control over your garage door with ease.
Why You Might Need to Disable the Circuit Board
Disabling the circuit board of your overhead door is usually a response to specific situations. Imagine you’ve got a garage door that keeps opening on its own or won’t open at all. Talk about frustrating, right? Disabling the circuit board can help reset the system and may resolve various annoying glitches.
Here are a few typical reasons to disable your circuit board:
- System Reset: Sometimes, a good reset is all it takes to get things functioning smoothly again.
- For Pros: If you’re installing a new part or troubleshooting an issue, turning off the circuit board is a smart first step to avoid further complications.
- Battery Change: If you’re changing the battery in your remote control, you’ll want to disable the circuit board to prevent accidental door activity.
Taking a moment to disable the board can save you a lot of headaches later, so it’s worth knowing how to do it.
Gather Your Tools Before You Start
Before diving into the actual disabling process, you’ll want to gather a few essential tools. Sure, disabling the circuit board isn’t rocket science, but being prepared can make the job smoother and reduce the risk of mistakes.
Here’s a handy list of tools you might need:
- Screwdriver: A Phillips-head screwdriver will usually suffice to access the circuit board casing.
- Flashlight: Good lighting is essential, especially if your garage is dimly lit.
- Protective Gloves: They aren’t mandatory but can protect your hands from sharp edges in the circuit board casing.
Having your tools at the ready not only helps you work faster but also reduces the chance that you’ll have to stop mid-project to hunt for something.
Locating the Circuit Board
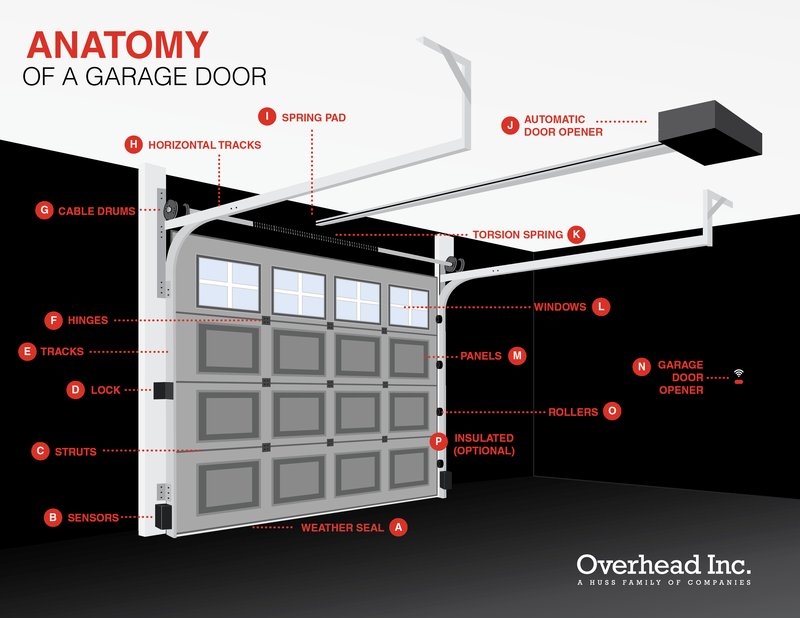
Now that you’re all set with tools, it’s time to locate the circuit board in your overhead door system. Each model varies slightly, but generally, the circuit board can be found inside the motor unit. Approaching your garage door opener is like trying to find the TV remote in a messy living room; it might take a bit of looking around.
To locate the circuit board:
1. Open the Motor Unit: Look for a cover panel on the garage door opener. This is often secured with screws that you’ll need to remove.
2. Refer to Your Manual: If you’ve got it handy, your owner’s manual will have illustrations showing where the circuit board is located.
3. Visual Inspection: Once you’ve opened the unit, examine the internal components. The circuit board is typically a flat panel with various wires connected to it.
By taking the time to locate it carefully, you’ll ensure you’re working on the right part without causing any unintentional damage.
How to Disable the Circuit Board
You’ve found the circuit board—great! Now let’s proceed with the disabling process. This might feel a little intimidating, but remember, you’re in control here. Disabling the circuit board is like hitting the pause button on your favorite show.
Here’s a straightforward way to disable the circuit board:
1. Disconnect Power: The first and most important step is to disconnect power to the garage door opener. Unplug it from the outlet or disconnect the power supply. Doing this makes sure you won’t zap yourself while working.
2. Locate the Manual Disconnect: Most overhead door openers come with a disconnect feature. Look for a pull cord (usually colored) hanging down from the motor unit and pull it to disengage the door from the opener.
3. Remove the Board Connector: If you’re ready for a full disable rather than just a disconnect, find the wiring harness connected to the board. Gently detach it, remembering to take a photo if needed for reference later.
That’s it! You’ve successfully disabled the circuit board.
What Happens Next?
Now that the circuit board is disabled, you might be wondering what to do next. This is a good time to take care of any maintenance or troubleshooting tasks you planned.
For instance, if you’re looking to:
- Install a New Component: With the board disabled, you can confidently install new parts without risking damage to the system.
- Reset the System: Sometimes, simply leaving it unplugged for a few minutes can restore functionality.
- Perform Routine Maintenance: Take this opportunity to clean components and check for wear and tear.
Just remember, after you’re done, you’ll want to re-enable the circuit board and reconnect everything carefully. It’s like flipping the switch back on after a break.
Re-enabling the Circuit Board
Congratulations! You’ve tackled the disabling part. Now, let’s go over how to re-enable your circuit board so you can get back to using your garage door opener.
Here’s how:
1. Reconnect the Wiring: If you’ve disconnected any wires or harnesses, gently reconnect them while ensuring that everything is secure.
2. Replace the Cover Panel: Use the screws you removed earlier to secure the cover back onto the motor unit.
3. Restore Power: Plug the garage door opener back in. You might hear it hum back to life, and if you’ve done everything correctly, you should be good to go!
It’s often a good idea to test the remote control and any connected devices right after re-enabling to confirm everything is working as expected.
Common Troubleshooting Tips
Sometimes, you might run into some hiccups even after disabling and re-enabling the circuit board. That’s okay—let me share some common troubleshooting tips to smooth things out.
1. Check the Remote: Make sure the battery in your remote is functioning. A dead battery is often the culprit behind malfunctioning openers.
2. Inspect Connections: If the garage door still isn’t responding, double-check all the wiring connections and ensure nothing is loose or frayed.
3. Look for Blockages: Sometimes, the problem can be as simple as something blocking the door’s path. Make sure the track and rollers are clear during operation.
Dealing with tech issues can feel overwhelming, but with a little patience, many problems can be solved without needing a professional.
Disabling your overhead door circuit board might seem like a daunting task, but with this guide, you can approach it with confidence. Whether you’re resetting the system or troubleshooting a problem, understanding the process empowers you to take control of your garage door opener.
Remember that safety is key—always disconnect power before working on your opener. With the right tools and a bit of patience, you’ll find that managing your overhead door could be as easy as pie. So grab your screwdriver, and let’s keep that garage door opener in tip-top shape!
