The Chamberlain remote and wall button system are often the unsung heroes of home convenience. Imagine arriving home, heavy groceries in hand, and the garage door opens with just a click; it’s a small comfort that adds up over time. However, if you’re finding that the wall button is accidentally triggered or used by someone who shouldn’t have access, learning how to disable it can bring back a sense of control to your space. Let’s dive into how you can easily achieve this.
Understanding Your Chamberlain System
Before you go ahead and disable that wall button, it’s important to know exactly how your Chamberlain system works. Most Chamberlain garage door openers come with a wall button that communicates with the motor unit via a simple wiring connection. This button lets you control the garage door without needing to reach for your remote every time.
If you think of your remote as the “magic wand” of your garage door, then the wall button is a trusty companion that always stands ready. But just like with any magic trick, sometimes you need to know when to put it away. Imagine the wall button as a helpful tool, but one that you might not want in every situation, especially if kids or guests frequently use your garage.
So, how does disabling this button affect your system? Well, when the wall button is disabled, you can still use your remote or smartphone to manage the door, while also improving the security of your garage area.
Gathering the Tools You’ll Need
Disabling the Chamberlain wall button involves a few straightforward steps, but first, you need some basic tools. Don’t worry; you won’t need an entire toolbox—just a few essentials will do the trick:
- Flathead screwdriver
- Small Phillips screwdriver (if needed)
- Wire cutters (depending on your method)
- Electrical tape (for safety)
Now, here’s the thing—having the right tools at your disposal can make the process surprisingly easy. If you’ve got a flathead screwdriver and some electrical tape, you’re already halfway there! Collect these items before you start, so you don’t find yourself in the middle of a step, searching around for that pesky Phillips screwdriver.
Steps to Disable the Wall Button
Alright, let’s get into the nitty-gritty of disabling the wall button on your Chamberlain system. It’s a bit like following a recipe—take it one step at a time, and you’ll have a successful outcome.
1. Disconnect Power: Safety first! Unplug the garage door opener from the outlet. It’s always a smart move to cut off power before tinkering with electrical components.
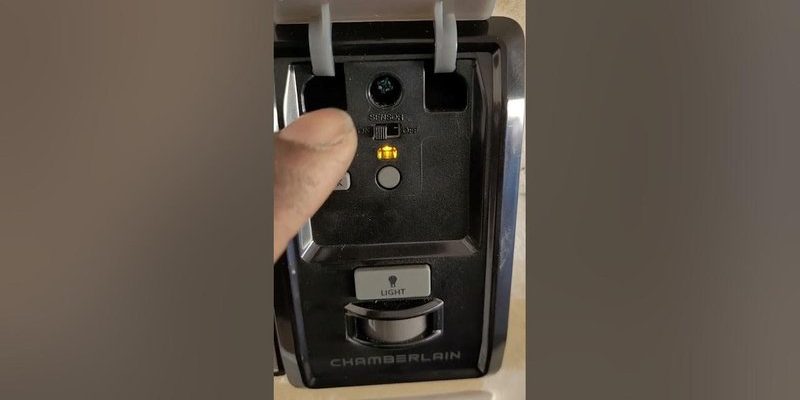
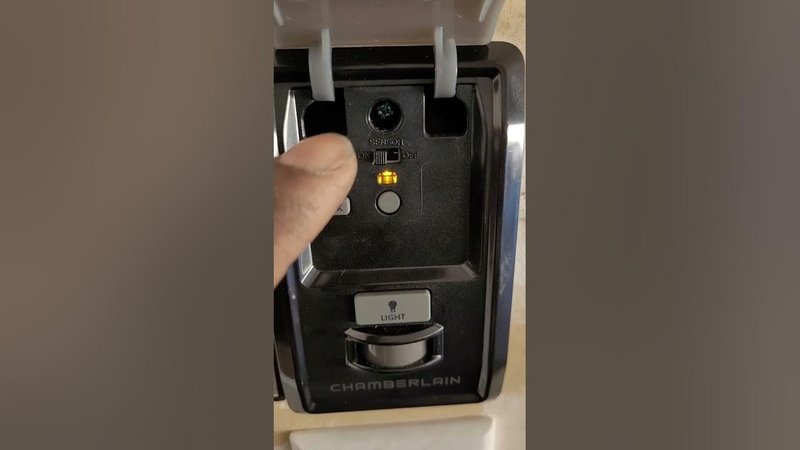
2. Accessing the Wall Button: Locate the wall button, which is typically mounted on the wall near your garage entrance. Gently pry it off using your flathead screwdriver. You’ll often find screws holding it in place. If you need to use the Phillips screwdriver, have it handy.
3. Identifying the Wires: Once you’ve removed the button from the wall, you’ll see two wires connected to it. These are usually marked as “up” and “down.”
4. Disconnecting the Wires: Carefully loosen the screws holding the wires, or if you prefer, gently cut the wires if you’re certain you won’t be reusing them. If you do cut the wires, make sure to cover each end with electrical tape to prevent any future shocks or short circuits.
5. Final Check and Reassembly: After disconnecting, double-check that everything is secure, then reattach anything you removed. Finally, plug your garage door opener back in and give it a test with your remote. Make sure it works as expected!
And there you have it! You’ve successfully disabled the Chamberlain wall button.
What to Do If You Change Your Mind
Sometimes, after making a decision, you might realize that you miss that wall button. Don’t worry; it’s entirely possible to reconnect the wires if you change your mind later on. Simply follow the above steps in reverse. Reattach the wires to their respective terminals and secure the wall button back in place.
If you find yourself unsure about how to reconnect those wires, refer to the original installation manual or even a quick online video tutorial for a visual guide. It’s pretty forgiving work on most Chamberlain systems.
Keep in Mind: Other Options
Disabling the wall button isn’t your only option for controlling access to your garage. Here are a couple of alternatives you might consider:
– Remote Management: If you’re using a Chamberlain model that allows for smartphone integration, you might look into managing your garage door through an app. This way, you can keep the wall button active for family members while securing access through your phone.
– Upgrade Your Security: Consider investing in a keypad lock. This allows you to grant garage access to non-residents without the need for a wall button. It adds a layer of convenience and control, which can be especially useful for families with kids or frequent guests.
Troubleshooting Common Issues
Sometimes, things don’t always go according to plan. You might encounter a few bumps along the way while disconnecting the wall button. Here are some common issues and quick fixes:
– Garage Door Opens Randomly: If your door starts to open unexpectedly after you’ve disabled the wall button, ensure that the remote is operating correctly. Sometimes, interference from other nearby devices can cause this.
– Wall Button Still Active: If you find that your wall button remains active after following the steps, check to see if the wires are completely disconnected or if there are alternate control systems still connected.
– Door Won’t Respond: If your garage door won’t respond to the remote after disabling the wall button, double-check your connections and review the operating manual for any specific reset instructions.
If you’re still facing issues, seeking professional assistance can save you time and stress.
Final Thoughts
Disabling the Chamberlain wall button is a straightforward process that can enhance both security and convenience in your garage space. Just remember, having the wall button disabled doesn’t mean you lose control over your garage door; you still have the remote or smartphone app options.
What matters is understanding how your system works and making it work best for you. Each step you take—whether adjusting the wall button or opting for alternative controls—brings you closer to a home that feels safer and more convenient. If you ever change your mind, reversing your steps is just as easy. Now you can enjoy all the benefits of your garage door opener without the hassle of that wall button!