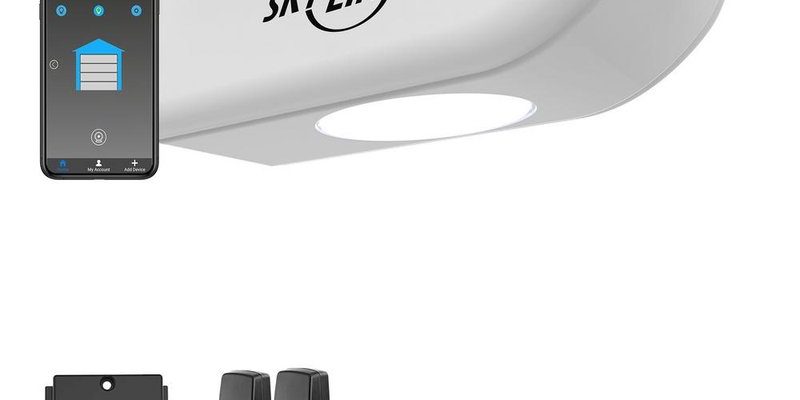
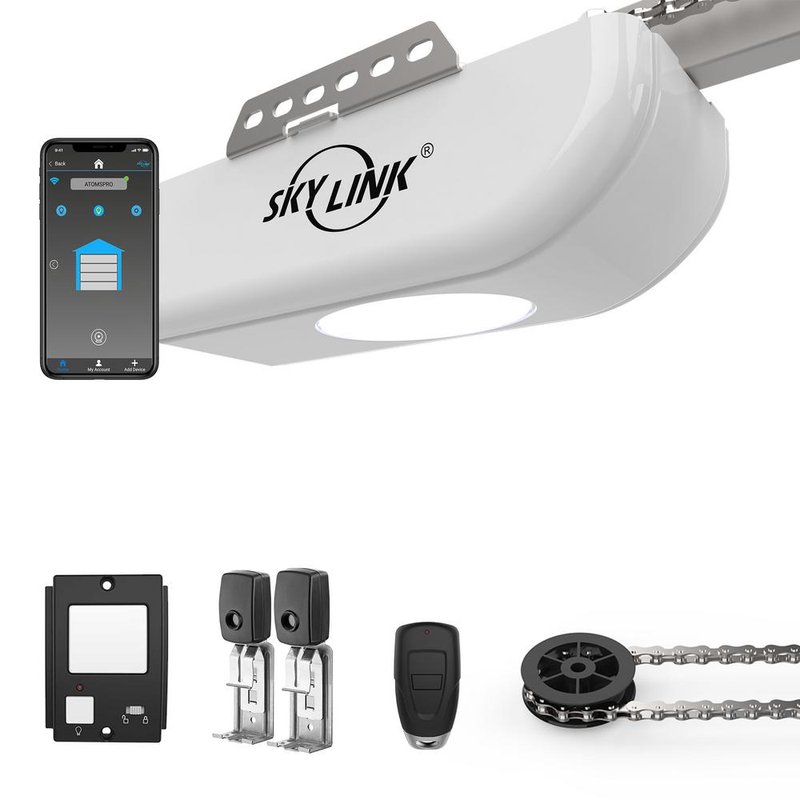
You might be wondering about the different parts involved. Essentially, you’ll need the motor unit itself and a compatible remote, which in this case, would be a Skylink remote. Connecting these pieces together can seem complicated at first, but don’t worry—I’m here to break it down step by step to help you get it done without a hitch.
Understanding the Components of Your Skylink System
Before diving into the connection process, let’s discuss the components you’ll be working with. The Skylink motor unit is your garage door opener and the heart of your system. This unit is equipped with a motor that lifts and lowers the door, powered by electric energy. You’ll also need your Skylink remote, which serves as your command center, allowing you to control the motor unit from a distance.
Here are some additional components you might find helpful:
- Wall Control Panel: This is typically installed inside your garage and allows you to operate the door without using the remote.
- Safety Sensors: Safety sensors at the bottom of the garage door help prevent accidents by stopping the door if something obstructs its path.
- Power Supply: Make sure your motor unit is plugged into a power source. Some units run on battery backups too, ensuring your system works even during outages.
Understanding these components not only clarifies how they fit together, but it also gives you a good idea of the overall system operation.
Installing the Skylink Motor Unit
Now, let’s tackle the installation of the Skylink motor unit. First, you’ll want to ensure that your garage door is compatible with the motor unit. Most standard garage doors will work, but if you have a specialty door, you might want to double-check.
1. Secure the Motor Unit: Start by mounting the motor unit on the ceiling. It should be centered over your door’s track. You can use brackets and screws that usually come with the unit. Make sure it’s secure, but don’t tighten everything yet—this will make adjustments easier.
2. Connect the Trolley: Attach the trolley to the garage door and connect it to the motor unit. This component is essential because it pulls the door up and down.
3. Attach the Door Arm: At this point, connect the arm that links the motor to your garage door. This is often a metal or plastic arm that moves along with the door.
Take a moment to verify all components are secured. If anything feels loose here, it can lead to issues later on.
Wiring and Powering Up the Unit
Alright, now that the physical setup is in place, it’s time to power up your Skylink motor unit. Carefully, follow these steps to connect it safely and correctly.
1. Plug in the Motor: Connect the motor unit to a power outlet. It’s important for this outlet to be easily accessible.
2. Connect the Safety Sensors: If your unit came with safety sensors, this is when you’ll want to wire them in. You’ll typically find terminals on the motor unit for this purpose.
3. Check for Proper Function: After everything is connected, double-check the wiring. Ensure all connections are tight and the wires are clear of any moving parts.
Here’s the thing: having a clear connection not only ensures that your unit works but also reduces the risk of short circuits. You want everything to be as safe as possible.
Syncing Your Skylink Remote
With the motor unit installed and powered up, the next step is to connect the Skylink remote. This is where your system really starts to come alive.
1. Locate the Learn Button: On the motor unit, find the “Learn” button. It’s usually a small button on the back or side of the unit.
2. Put the Remote into Sync Mode: While pressing the “Learn” button, simultaneously press the button on your Skylink remote that you want to use to open and close the door. Hold it for a few seconds; you should see the light on the motor unit flash. This indicates that the remote is now paired with the motor unit.
3. Test the Connection: After syncing, step back and press the remote button. Your garage door should respond! If it doesn’t, press the “Learn” button again and try the process. Sometimes it takes a couple of tries for the signal to sync correctly.
Troubleshooting Common Issues
It happens to the best of us: sometimes things don’t work out on the first try. Here are some common issues you might run into and how to troubleshoot them.
– Remote Not Responding: If your remote isn’t working, first, check the battery. Weak batteries can hinder the signal. If the battery is fine, make sure you pressed the “Learn” button properly; sometimes it can be a bit finicky.
– Door Not Opening or Closing Completely: If your garage door opens but doesn’t fully close, ensure that the safety sensors are properly aligned. Irregular positions can block the door’s movement.
– No Power to the Motor: If your motor unit isn’t getting power, check the outlet. Sometimes a tripped circuit breaker can be the culprit.
Don’t hesitate to refer to your user manual for specific advice related to your model too. Manufacturers often have solutions tailored to common problems.
Maintaining Your Skylink System
Once you’ve connected everything, you might be wondering how to keep your Skylink motor unit running smoothly. Regular maintenance can help extend its life and functionality.
– Inspect the Hardware: Periodically check the motor unit and all connections for wear and tear. Tighten any loose screws and ensure everything remains aligned.
– Clean the Tracks: Keeping the door tracks clean is crucial. Dirt and debris can cause the door to jam or operate erratically.
– Check Safety Sensors: Make sure the safety sensors are clean and positioned correctly. A little dust can block their signals and cause issues with the door’s functionality.
Taking these maintenance measures can save you trouble down the line, ensuring your garage door operates safely and reliably.
Connecting your Skylink motor unit might seem challenging at first, but with a little patience and the right steps, it can be a straightforward process. Remember to take your time while setting up, and don’t hesitate to troubleshoot if things don’t go as planned. By ensuring all components are fully connected and maintained, you’ll be well on your way to enjoying the convenience of an automated garage door.
So, whether you’re connecting it for the first time or just touching base for maintenance, keep these steps in mind. You’ve got this! Happy connecting!