Imagine you’re putting together a Lego set. Each piece has a specific spot, and when you snap them together correctly, the whole structure operates smoothly. Just like that, the circuit board needs to be in place and connected properly for your garage door opener to function well. Whether you’re using a wall remote, a smart garage door controller, or the traditional remote, getting this connection right is critical for smooth operation. Let’s dive in and break down how to connect that overhead door circuit board.
Understanding Your Overhead Door Circuit Board
Before you jump into connecting wires and cables, it’s important to understand what a circuit board does. At its core, the circuit board is responsible for controlling how your garage door opens and closes. It manages signals from your remotes and wires from the door itself. Think of it as the command center.
Typically, a circuit board has multiple connection points for various components, including sensors, switches, and the motor. Each connection point allows these parts to communicate. For example, when you press the remote, it sends a signal to the circuit board, which then instructs the motor to lift the door. Understanding this flow can make the entire wiring process clearer.
Also, familiarize yourself with the different types of circuit boards on the market. Some popular brands like Genie, Craftsman, and others may have slight variations in how they connect and communicate signals. Knowing your specific model will save you time and frustration later.
Gather Your Tools and Materials
Before you start connecting your overhead door circuit board, it’s crucial to gather the right tools. Here’s a handy list to help you prepare:
- Screwdriver set: To open the panel and secure the board.
- Wire strippers: For prepping wires if they need to be cut or reconnected.
- Multimeter: Useful for checking voltages and ensuring everything is working correctly.
- Wire connectors: To pair wires without permanent connections.
- Owner’s manual: Always helpful to reference specific settings or configurations.
Having these items ready will streamline the process and help you avoid any interruptions while you work. Honestly, it’s like preparing for a cooking session; you don’t want to start mixing ingredients (or wires) if you’re missing key items.
Safety First: Preparing for the Connection
Safety should always come first when dealing with electrical components. Here are a few quick tips:
1. Unplug the Power Source: Before you touch anything, disconnect the power to your garage door opener. This prevents any accidental shocks or circuit malfunctions.
2. Wear Safety Gear: While it’s not always required for small jobs, gloves and safety goggles can protect you from any potential hazards.
3. Check for Damage: Inspect the circuit board for any visible signs of wear or damage. If the board looks burnt or the components are corroded, it’s best to replace the entire unit.
Taking these precautions is like wearing a seatbelt; it might feel excessive, but it keeps you safe in case something unexpected happens.
Identifying Connection Points on the Circuit Board
Now, let’s talk about the actual connection points on the circuit board. Most models will have a labeled diagram printed right on the board. These labels specify where each wire should connect — for instance, you might see labels like “motor,” “power,” or “remote.”
Here’s a breakdown of typical connections you might encounter:
– Power Supply: This section connects to the wall outlet or ceiling socket that delivers power to your unit.
– Motor Connections: These wires connect to the motor that moves the garage door.
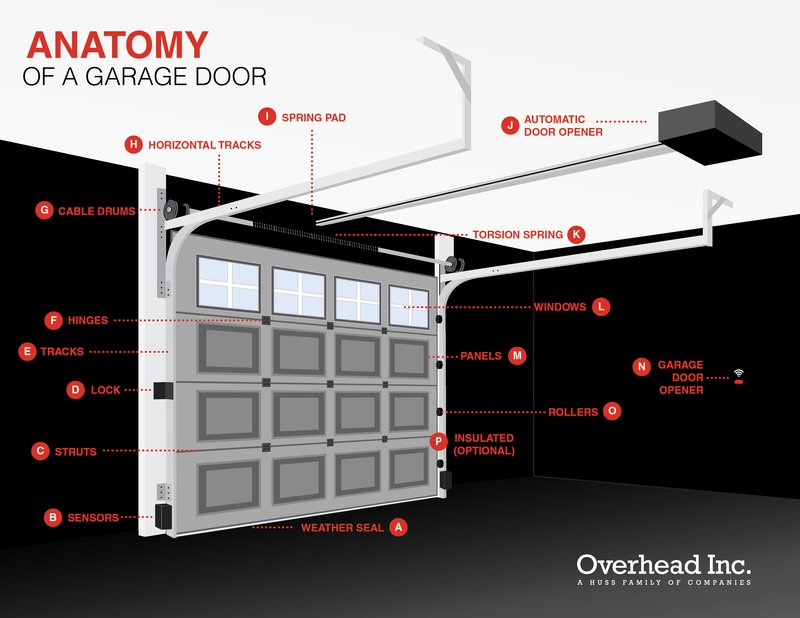
– Safety Sensors: Located near the ground, these sensors help prevent the door from closing on objects (or pets!). They connect to a specific pair of terminals.
– Remote Control Connections: These terminals sync with your remotes, allowing you to control the door without physically being there.
By pinpointing these key areas, you ensure every part is in the right place, leading to smoother operation. Remember, taking a moment to visually map out these connections can save you a lot of time and head-scratching later on.
Connecting the Wires: Step-by-Step Guide
Now that you know what each component is and where it goes, it’s time to start connecting the wires. Here’s a simple, step-by-step guide to follow:
1. Connect the Power Supply: Start by attaching the power supply wires to the designated spot on the circuit board. Usually, these wires are thick and must be firmly secured.
2. Attach the Motor Wires: Look for the terminals labeled for the motor. Strip the ends of the motor wires if they aren’t already exposed, then attach them to the correct terminals.
3. Wire the Safety Sensors: For the safety sensors, each will have a matching pair of connection points. Make sure these are secured tightly—they’re vital for safety!
4. Link the Remote Connections: Finally, connect the wires for your remote. Double-check the owner’s manual for any special instructions related to your specific system as this step can vary significantly from one brand to another.
Taking your time on each phase is key. It’s like assembling furniture; rushing through can lead to missing essential screws or connections.
Testing Your Connections and Troubleshooting
Once everything is connected, it’s time to conduct a test run. Reconnect the power supply, and watch closely. Does the door open and close properly?
If it doesn’t operate as expected, here are some troubleshooting steps:
– Check Connections: Ensure all wires are securely attached and correct. A loose wire can cause the entire system to malfunction.
– Examine the Safety Sensors: If the door reverses or doesn’t respond, the safety sensors might need readjusting. Make sure they’re aligned properly and free of dust.
– Use Your Remote: Try out the remote. If it doesn’t respond, check the batteries. Replacing batteries is a simple fix that often resolves issues.
You might be wondering, “What if nothing works?” In that case, refer to the manual or consider contacting a professional. Sometimes, it’s just better to leave it to the experts, especially if you feel stuck.
Final Thoughts on Connecting Overhead Door Circuit Boards
Connecting an overhead door circuit board doesn’t have to feel overwhelming. With a little preparation and understanding of how components work together, it becomes a manageable task. Take safety seriously and line up your tools before jumping in.
Remember, if you ever feel uncertain or confused during the process, there’s no harm in consulting a professional. You deserve a garage door that operates smoothly and safely. Once you’ve successfully connected everything, kick back and enjoy the convenience of having a garage door that opens at the click of a button. That sense of achievement is worth every minute spent!
