When it comes to Liftmaster, they have several models. From the humble chain drive to the slick belt drive, knowing the model can guide you in troubleshooting. This guide is here to break down everything—from identifying the parts of your circuit board to connecting it all together. So grab a coffee, and let’s dive into the steps you need to follow to connect your Liftmaster circuit board.
Understanding Your Liftmaster Circuit Board
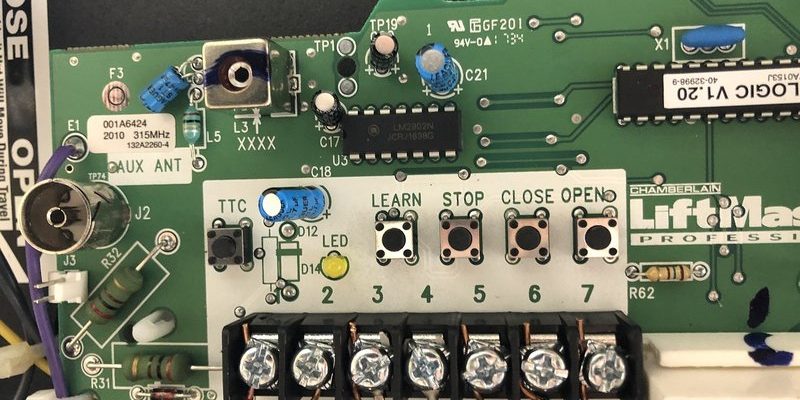
Before diving into the connection process, it’s helpful to get familiar with what a circuit board actually does. Think of it as the brain of your garage door opener. It controls all the operations, from communicating with your remote to managing the safety sensors. So, if something goes wrong, it’s usually a good idea to check the circuit board first.
Liftmaster circuit boards might look complicated at first glance, but they often come with clear labels and connections. You may find wires for the motor, safety sensors, and remote control. Knowing these parts can save you a lot of headaches later on.
Here’s a quick rundown of the main components you’ll typically find on your Liftmaster circuit board:
- Motor Connection: This is where you’ll connect the motor that lifts your garage door.
- Power Supply: Concerned about electrical issues? This wire connects your garage door opener to the home’s power supply.
- Sensor Inputs: These wires connect to safety sensors, which prevent the door from closing on something or someone.
- Remote Control Connections: These connect to your remote, allowing it to send signals to the opener.
Understanding these components is critical. You’ll often need to refer back to them when making connections.
Gathering the Right Tools
Before you start connecting your Liftmaster circuit board, have the right tools ready. This isn’t about being overly prepared; it’s about making sure you can get the job done without running around later.
Here’s what you typically need:
- Screwdriver: Most often, you’ll need a Phillips head screwdriver to open up the unit.
- Wire Strippers: If you need to adjust or replace any wires, these tools will help you strip insulation cleanly.
- Insulation Tape: For safety, use this to secure any loose connections.
- Multimeter: A useful tool for checking if power is running to your board.
Gathering these tools beforehand can make the whole process smoother. You want everything at your fingertips, so you minimize interruptions and distractions. Nobody wants to search for a screwdriver mid-project, right?
Powering Down Before You Connect
Here’s the thing: safety first! Before you start fiddling with your Liftmaster circuit board, you must ensure the power is off. This is a Non-Negotiable Rule when working with electrical components.
To power down, locate the circuit breaker for your garage door opener and switch it off. You might also want to unplug the opener to be extra cautious. When dealing with electricity, it’s better to err on the side of caution—nobody wants a nasty shock!
Let’s be honest; electrical work can be intimidating, but follow safety protocols, and you’ll be just fine. Once you’ve powered down, confirm electricity is off using a multimeter before proceeding.
Connecting Wires to the Circuit Board
Once you’re safely powered down, it’s time to connect those wires to the circuit board. If you’re working with an existing board, you’ll likely have to remove some screws to access the wiring.
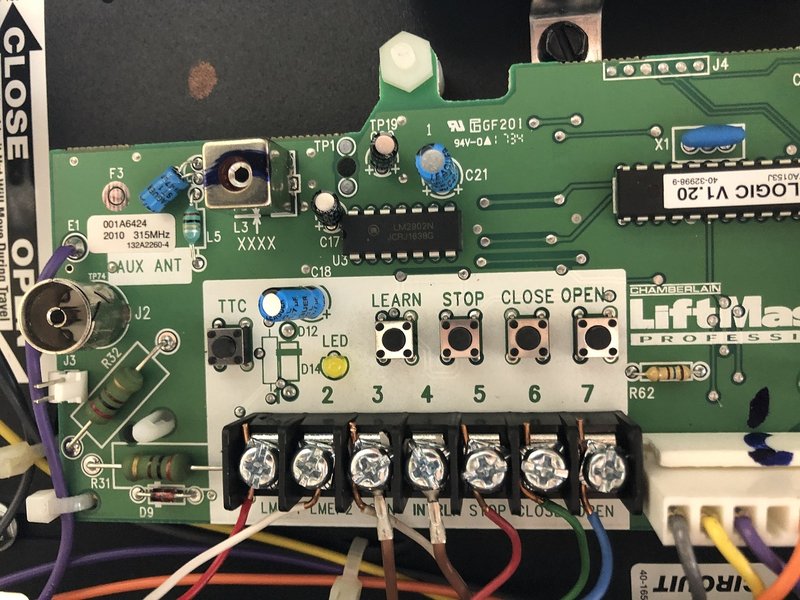
Identify the areas where the wires need to go based on the components we discussed earlier. Follow the stepped-out connections:
1. Motor Connection: This is usually located at the top or one side of the board. Align the wires from your motor to this connection and secure them.
2. Power Supply: Locate the power input connection. Attach the corresponding wires there, ensuring a snug fit.
3. Sensor Wires: These typically have specific positions, often labeled on the board. Connect each wire accordingly, ensuring to use color-coding for accuracy.
4. Remote Control Connections: Finally, look for the terminal designated for the remote controls and connect the wires.
Take your time and double-check your connections. Uneven or loose connections can lead to malfunctions. Trust me: double-checking now can save a lot of frustration later.
Reassembling Your Liftmaster Opener
After making the connections, it’s time to put everything back together. Start by carefully lowering the circuit board back into its housing. Make sure it’s positioned correctly and isn’t pinching any wires.
Secure the board using screws, being careful not to overtighten, which could strip holes or damage components. Once it’s in place, you can attach any covers or panels you removed earlier.
Before you plug it back in or turn on the circuit breaker, ensure everything looks correct. A quick visual check goes a long way in catching potential issues.
Powering Up and Testing Your Connections
Here’s the moment of truth: powering up your Liftmaster opener. Turn the circuit breaker back on or plug in the unit. If all goes well, your opener should spring to life.
Now, it’s time to test the remote. Stand a few feet away and press the button. Listen for that reassuring sound of the motor kicking in. If it works, fantastic! You’ve successfully connected the circuit board.
If it doesn’t work, don’t panic. Check for the following:
– Ensure all wires are secure.
– Verify that you connected the right wires to the right terminals.
– Confirm that your remote’s battery is charged.
Troubleshooting might take a bit longer, but it’s a normal part of the process. Take deep breaths—it’s all part of learning.
Wrapping It All Up
Connecting a Liftmaster circuit board doesn’t have to be a daunting task. With the right tools and safety protocols, it can be a straightforward process. Remember, it’s all about understanding the components, making secure connections, and testing your work.
This knowledge could keep your garage door functioning seamlessly for years to come. So, if you follow each step carefully and approach the task calmly, you’ll likely find that connecting your Liftmaster circuit board was well worth the effort. Happy DIYing!