Think of this process like connecting the dots in a puzzle. Each connection you make helps complete the picture, leading to a fully functional garage door system. Whether you’re replacing an old board or setting things up for the first time, understanding how to connect the Genie circuit board can save you time and money. So grab your tools, and let’s tackle this step by step.
Understanding Your Genie Garage Door Opener
Before diving into the connection process, let’s familiarize ourselves with the components at play. Your Genie garage door opener typically includes a circuit board, remote control, and various sensors. The circuit board is the power source that communicates the signals between your remote and the door.
The circuit board can vary depending on the model you have—be it the Genie Intellicode or the Genie TriloG series. Each type has its unique features, so it’s essential to consult your manual for specifics. If you’ve lost your manual, don’t sweat it! Online resources and communities can often provide backup documentation that might guide you through the connection process.
It’s also helpful to know that garage door openers can show signs of wear and tear over time. If your door isn’t responding to the remote or is behaving erratically, it might be time to check that circuit board and possibly connect it to a new remote.
Gathering the Right Tools
Every DIY project needs the right tools to get the job done correctly. For connecting your Genie circuit board, you’ll need a few essential items:
- Screwdriver – Usually a Phillips head will suffice.
- Replacement Circuit Board – Ensure it’s compatible with your Genie model.
- Wire Strippers – In case you need to strip wires for a better connection.
- Multimeter – Handy for testing electrical components.
- Safety Glasses – Always protect your eyes while working!
Having these tools at hand will make the process smoother. Imagine trying to bake a cake without a whisk; it can be a disaster! Similarly, without the right tools, you might face challenges that could easily be avoided.
Keep in mind that working with electricity, even in small doses, requires caution. Always ensure the power is turned off before you start tinkering with any of the components.
Preparing the Garage Door Opener
Now that you have your tools ready, it’s time to prep the garage door opener. This preparatory step is crucial for ensuring safety and ease while you’re working on the circuit board.
1. Disconnect the Power: Locate the power cord and unplug it. You wouldn’t want an unexpected shock while connecting wires.
2. Remove the Cover: Most Genie models have screws holding the cover in place. Use your screwdriver to gently remove these screws and lift off the cover. Set it aside carefully, as you don’t want to lose any parts.
3. Take Note of Connections: Before disconnecting any wires, take pictures of how everything looks. This will help you remember where each wire goes when it’s time to reconnect everything.
Doing this kind of prep work is like assembling your ingredients before you start cooking; it helps everything go smoothly when you begin the main event.
Disconnecting the Old Circuit Board
Now that everything’s prepped, we need to disconnect the old circuit board. This part of the process can take a little confidence, but simply follow these steps:
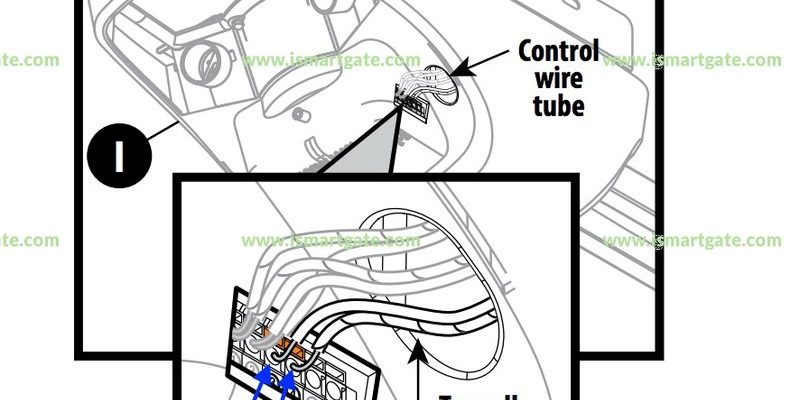
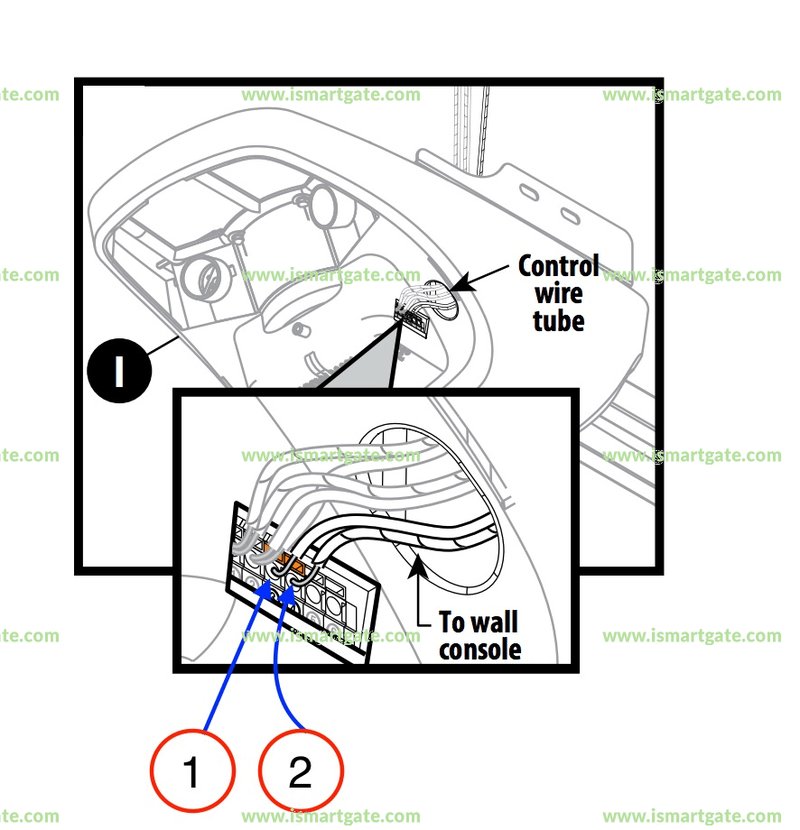
1. Identify the Circuit Board: Locate the existing circuit board in your garage door opener. It’s usually mounted on a back panel and connected to several wires.
2. Remove Connections: Carefully detach the wires from the circuit board terminals. If you’ve taken photos, this is the time to refer to them. Don’t pull; gently wiggle the connectors for easier removal.
3. Unscrew the Circuit Board: Your circuit board may be secured with screws. Use your screwdriver to remove these, ensuring to keep them somewhere safe for reinstallation.
At this stage, it can feel a bit erratic, like dismantling a contraption as a child. But with patience and the right technique, you’ll soon be ready for the fun part: installing the new board.
Connecting the New Genie Circuit Board
With the old board out, it’s time to connect the new Genie circuit board. If you’ve ever put together a new piece of furniture, this part will feel familiar.
1. Place the New Circuit Board: Align the new board within the opener and use screws to secure it in place.
2. Reconnect Wires: Refer to your previously taken photos to connect the wires back to the correct terminals. Make sure each connection is snug but not overly tight.
3. Check for Other Connections: Ensure that any additional components, such as safety sensors, are also connected appropriately to the new circuit board. These small parts keep your garage door safe, so don’t overlook them!
This might feel tricky at first, but think of how rewarding it will be to press that remote button and see your door spring to life.
Testing and Troubleshooting
Once you’ve connected everything, it’s time for a test run. This is where all your hard work gets to show its results!
1. Restore Power: Plug the garage door opener back into the outlet. Listen for any sounds that indicate it’s receiving power.
2. Test the Remote: Grab your Genie remote and press the button. Watch as the door opens or closes—a satisfying moment if everything is connected properly!
3. Troubleshooting: If the door doesn’t respond, don’t panic. Double-check the connections to ensure everything is in place. Even slight misalignments can prevent functioning. And, if your remote isn’t paired correctly, we’ll need to do a little syncing.
When it comes to troubleshooting, remember to stay calm. Think of it like a game: if your first move doesn’t work, change your strategy.
Final Thoughts on Connecting the Genie Circuit Board
Connecting a Genie circuit board might seem daunting at first, but with the right steps and a sprinkle of patience, you’ve now mastered it! You’ve transformed a complex problem into a manageable task, and hopefully, felt empowered along the way.
The beauty of tackling projects like this is not just the sense of accomplishment but also saving money that would otherwise go to a technician. Plus, now you have firsthand knowledge of how your garage door opener works, making you that much more of a home improvement wizard.
So next time something goes awry with your garage door, you’ll be prepared to tackle it head-on. Remember, like any great project, it’s all about connecting the dots—or in this case, the wires!