
Imagine sitting on your couch and suddenly realizing you left the garage door open. With the Hub, you can simply pull out your phone and take care of it right then and there! The smart hub connects to your Wi-Fi network, and once you’ve paired it with your opener, you have remote access from an app on your smartphone. Let me guide you through each step to connect your Chamberlain Smart Hub without breaking a sweat.
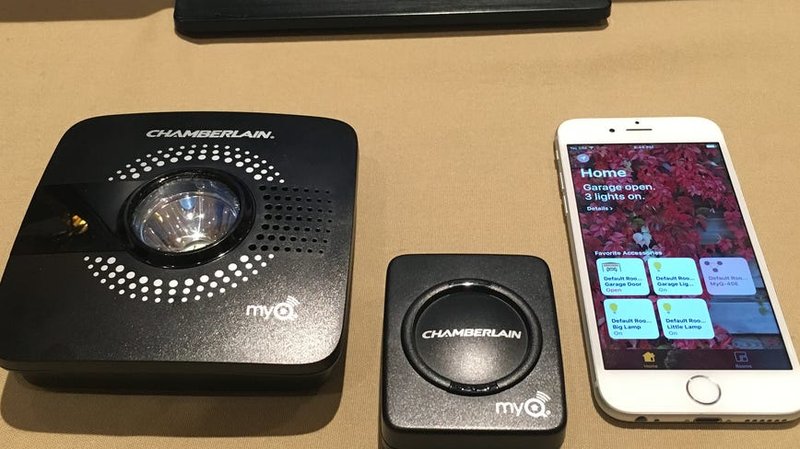
Understanding the Chamberlain Smart Hub
Before jumping into the connection process, take a moment to familiarize yourself with what the Chamberlain Smart Hub actually does. This device isn’t just a pretty face; it’s packed with features that make managing your garage door a breeze. First, it allows for mobile access to control your garage door opener from anywhere. That means you can open or close the door, check its status, and even get notifications if it’s been left open.
The Smart Hub communicates with your garage door opener using special codes and signals. When you connect it to Wi-Fi, it syncs with the MyQ app, letting you manage your garage from your smartphone. It’s like having a remote control for your door, no matter where you are. Imagine coming home with arms full of groceries and being able to open your garage door from the driveway before you even reach it.
Gather Everything You’ll Need
Now that you know what the Smart Hub can do, let’s get you prepared for the installation. Here are the items you’ll need to ensure everything goes smoothly:
- Chamberlain Smart Hub – This is the star of the show.
- Compatible Garage Door Opener – Make sure yours is on the compatibility list.
- Smartphone – With the MyQ app downloaded.
- Wi-Fi Connection – A steady signal is essential for a smooth experience.
- Batteries – Double-check if the hub requires batteries to operate.
You might be wondering, “What if I don’t have everything?” Don’t worry! You can always pick up compatible batteries at your local store and ensure your smartphone has enough room for the MyQ app. Preparation is key, and having all your tools ready will make you feel like a pro!
Installing the Chamberlain Smart Hub
Once you have everything in hand, it’s time to set things up. Start by placing the Smart Hub within range of your Wi-Fi router and your garage door opener. The Hub should be close enough for a strong signal, yet accessible for any manual configurations you might need to do later.
Next, plug your Smart Hub into a power outlet. If it uses batteries, install them according to the included instructions. Here’s a useful tip: check that the Hub’s LED light is on. This light will guide you through the setup process, so if it’s blinking, it means it’s time to connect or troubleshoot.
Connecting to Wi-Fi
Now comes the part where the magic happens—connecting your Smart Hub to your home Wi-Fi network. Open the MyQ app on your smartphone and follow these steps:
1. Create an Account or Log In – Open the app and either create a new account or log in if you’ve used MyQ before.
2. Select ‘Add Device’ – Look for the option to add a new device and select the Smart Hub.
3. Follow On-Screen Instructions – The app will guide you through the Wi-Fi connection process. You’ll need to enter your Wi-Fi password, so have that handy.
This part can feel a bit overwhelming, but take it one step at a time. If you encounter any issues, make sure your Wi-Fi signal is strong and that your Hub is within range.
Pairing the Smart Hub with Your Garage Door Opener
With your Smart Hub now online, let’s pair it with your garage door opener. Make sure it’s compatible first—most Chamberlain models will be, but it never hurts to check the manual or the official website.
Here’s a simple way to pair them:
1. Locate the Learn Button – On your garage door opener, find the ‘Learn’ button, usually on the back or side.
2. Press the Learn Button – When you press it, the LED light will blink. This means it’s ready to accept new devices.
3. Initiate Pairing in the MyQ App – Back on your smartphone, follow the instructions to pair the devices. This usually involves tapping a button in the app that says “Pair” or “Connect.”
Once they’ve synchronized, you’ll receive a confirmation notice in the app. You’ll likely be motivated to do a little victory dance—now you’re one step closer to controlling your garage door like a tech wizard!
Troubleshooting Common Issues
Sometimes, even the easiest setup can come with a few bumps along the way. If things aren’t working, don’t panic! Here are some common issues and quick fixes to help you troubleshoot:
– Connection Problems: If your Hub is not connecting to Wi-Fi, ensure your router is functioning well. Make sure the Smart Hub is within range and free of obstructions.
– Not Pairing with the Opener: If the Hub isn’t pairing, double-check that your opener is indeed compatible. A reset may help. To reset, press and hold the Learn button until the light turns off.
– App Issues: Close and reopen the MyQ app. Sometimes a simple restart clears out any glitches.
It’s important to remember that technology can be finicky sometimes. Just approach any hiccups with patience. After all, you’re not alone in this—many others have successfully navigated this journey, just like you!
Changing Settings and Managing Notifications
Now that you’re officially connected, it’s important to customize your Hub experience. One handy feature is the ability to manage notifications through the app. You can set alerts for when your garage door opens or closes, which can be helpful for security.
To change your notification settings:
1. Open the MyQ app and go to Account Settings.
2. Look for Notifications and toggle the options you want to enable or disable.
You might also want to explore advanced settings, like scheduling times for your garage door to open or close. It’s a handy feature that allows you to automate when your door functions, perfect for busy mornings or when you’re away from home.
Connecting your Chamberlain Smart Hub doesn’t have to be a frustrating experience. Just like anything new, following the steps methodically will have you connected in no time. With mobile access to your garage door, not only do you gain convenience, but also peace of mind knowing that you can check on your home from anywhere.
Hopefully, you feel more at ease tackling this process. Remember, if something doesn’t work initially, it’s okay to pause, breathe, and troubleshoot. Soon enough, you’ll be rolling in the tech-savvy world of home automation, all thanks to your newly connected Chamberlain Smart Hub. Happy controlling!