Those tiny sensors on either side of your garage door play a huge role. They send signals to the opener to let it know when the door should open or close. If the wiring gets pinched or frayed, it can create a real headaches-ville scenario. In this guide, we’ll walk through how to check for damaged sensor wiring on your garage door opener, step by step.
Understanding Your Garage Door Opener
Before you dive into checking the wiring, it’s important to know how your garage door opener works. It typically consists of a motor that raises and lowers the door, a remote control, and those all-important sensors. These sensors help prevent the door from closing when something is in the way. Think of them as the gatekeepers of your garage.
Most garage door openers are either chain-driven, belt-driven, or screw-driven. Each of these has its own quirks, but the sensors remain fairly similar across models, whether you’re rocking a Chamberlain, LiftMaster, or Genie opener. Familiarizing yourself with the components ensures you’re not feeling around in the dark.
Common Signs of Damaged Sensor Wiring
You might notice several symptoms that hint at damaged sensor wiring. It’s essential to catch these early to avoid worse problems down the line. Here are some signs to watch out for:
- The garage door won’t open or close: This is the most obvious sign. If your door seems stuck, it could be a sensor issue.
- Flashing error lights: Many remote-operated garage doors have lights that blink in patterns. Check your manual for how to interpret these signals.
- Physical damage: Look for frayed wires, bent connectors, or anything that looks out of the ordinary near the sensors.
If you notice any of these issues, it’s time to check those sensor wires.
Gathering Your Tools
Before you get down and dirty with your sensor wires, you’ll need a few handy tools. Here’s what you should have on hand:
- Multimeter: This will help you test electrical connectivity in the wiring.
- Wire strippers: If you find any frayed wires, you might need to strip them back to connect properly.
- Screwdriver: Depending on your setup, you might need to remove some panels or screws.
- Safety goggles: Always good to protect your eyes when working with electrical components.
Having everything ready before you start will make the process smoother and save you from unnecessary trips to the toolbox.
Locating the Sensors
Knowing where the sensors are is crucial. They’re usually located on either side of the garage door, about 6 inches above the floor, facing each other. Look for small rectangular boxes—these are your sensors. If you’re not sure, just follow the wires from the sensors back to the opener.
Once you find them, take a moment to inspect their condition. Look for signs of wear, loose connections, or dirt covering the lens. Believe it or not, something as simple as dirt can hinder operation, so give them a gentle wipe with a damp cloth.
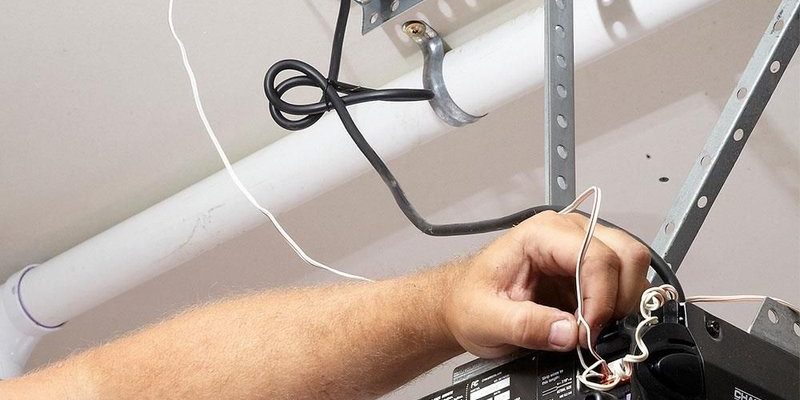
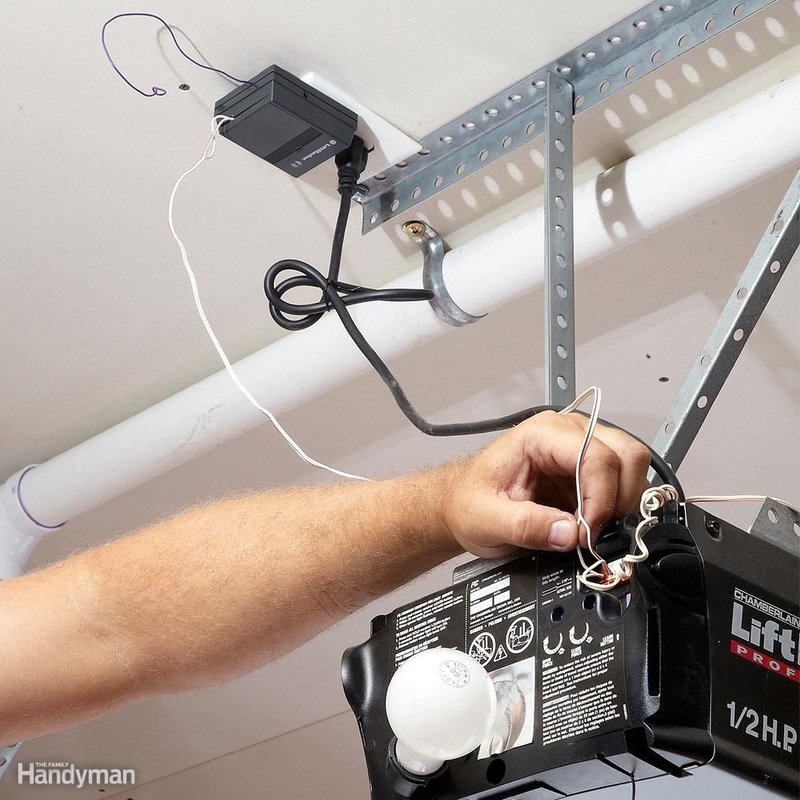
Inspecting the Wiring
Now, let’s dive into the wiring itself. Check for frays, breaks, or pinched areas. If you see any obvious damage, you’ll want to address that first. Gently pull the wires to determine if they’re loose or if they hold firm.
If you can’t see any visible damage, use your *multimeter*. Set it to continuity mode. Attach one probe to one end of the wire and the other probe to the opposing end. If the multimeter beeps or shows a reading of zero, congratulations, your wire is intact. If not, it’s time for a repair.
Fixing Damaged Wiring
If you’ve found an issue with the wiring, here’s how to fix it:
1. Turn off power to the garage door opener. Safety first!
2. Cut out the damaged section of wire if it’s visibly frayed or broken.
3. Use your wire strippers to strip about half an inch of insulation from both ends of the wire.
4. Twist the ends together and cover them securely with electrical tape. A wire connector can also be used for added safety.
5. Restore power and test to see if the garage door functions properly.
If you’re uncomfortable doing this yourself, don’t hesitate to call a professional. It’s always better to be safe than sorry!
Reconnecting the Sensors
After you’ve repaired or replaced the wiring, the next step is to ensure your sensors are properly connected. Double-check all connections, ensuring they’re tight and secure. Make sure the sensors are aligned. They should face each other directly, without any obstruction in between.
Once you’ve checked everything, it’s time to test. Try using the remote or wall switch to open the door. Pay attention to any flashing lights. If it works, great! If not, you may need to dig a bit deeper.
When to Consult a Professional
Sometimes, DIY fixes just aren’t enough, and that’s totally okay. If you’ve followed all these steps and your garage door is still misbehaving, it might be time to call in the pros. They can tackle more complex issues that you might not feel equipped to handle, such as problems within the main control board.
Professionals can also provide more extensive diagnostics, possibly saving you time and potential extra costs. Sometimes it’s worth the peace of mind knowing an expert is handling it!
Regular Maintenance Tips
To prevent future issues with your garage door opener, regular maintenance is key. Here are a few tips:
– Inspect monthly: Check the wiring and sensors monthly for any signs of wear.
– Clean the sensors: Keep them free of dust or obstructions.
– Test the door: Make sure it opens and closes properly every couple of months.
– Check the remote battery: A weak battery can cause interference, preventing the door from responding.
Regular upkeep can save you a lot of headaches down the line.
Dealing with a malfunctioning garage door can feel frustrating, but understanding how to check for damaged sensor wiring will make the process smoother. With a few tools and a little patience, you can get to the bottom of any issues and get your garage door working like new again.
Remember, if at any point you’re feeling uncertain, it’s perfectly okay to reach out for professional help. Keeping your garage door in good health not only protects your belongings but also enhances your home’s overall security. So, roll up those sleeves, and let’s keep that door working!