This article will guide you step-by-step through changing the battery in your garage door opener remote. We’ll keep things straightforward, breaking down the steps so you can tackle this task confidently. So, grab your tools—singular tool, really—and let’s get into it!
Understanding Your Garage Door Opener Remote
Before you lift off the battery cover, it’s important to understand your remote’s components. Garage door remotes come in different shapes and sizes, but they generally have the same core pieces: the outer casing, buttons, and electronics inside that respond to the signal you send.
Most remotes use CR2032 batteries. These are small, circular batteries you might also see in watches and other gadgets. Over time, even the best batteries lose their charge. Knowing your remote type helps you pick the right battery. So, check your manual or look up your model online if you’re unsure.
Now, you might be wondering why it matters. A fresh battery ensures a stronger signal. Dealing with a weak signal can be annoying—it might work sometimes and leave you covered in rain at other times.
Gather Your Supplies
Changing the battery is a breeze with the right supplies. Here’s what you’ll need:
- A flathead screwdriver or small coin (to pry the remote open)
- The right battery (usually a CR2032, but check yours)
- A clean, flat surface to work on
Having these items handy streamlines the process. Don’t underestimate the power of having everything ready; it can save you time, especially when the rain decides to pour! So, take a moment to gather your tools.
Opening Your Garage Door Opener Remote
Once you have your supplies, the next step is to open your remote. Depending on your model, the remote might have a small notch or seam where you can insert your screwdriver or coin.
Let’s break it down:
1. Locate the seam — Examine the remote for where it joins. This is usually on one side, often with a noticeable crack.
2. Insert your tool — Gently press the screwdriver or coin into the seam. Apply a little pressure, and the case should pop open.
Be careful not to apply too much force; you don’t want to break your remote. If it doesn’t budge, look closely for hidden clips. Patience is key here!
Removing the Old Battery
With the remote now open, it’s time to remove the old battery. This step can be simple, but take your time here to avoid misplacing any parts.
Here’s how:
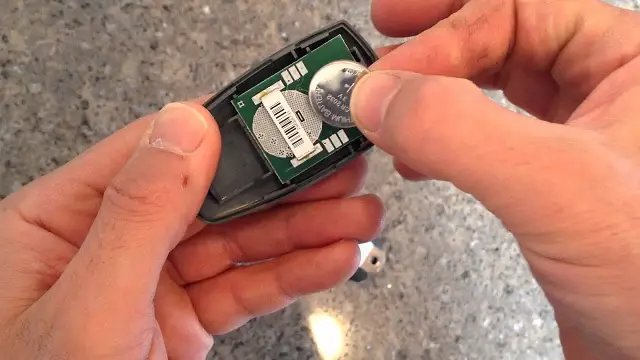
– Identify the battery’s orientation. You’ll see a plus (+) and minus (-) side. Make a mental note of how it’s positioned; you’ll need to insert the new battery in the same way.
– Carefully lift it out using your fingers, or if it’s stuck, use the screwdriver edge lightly.
If it’s been in there for a while, it might be a bit stubborn. Just be gentle.
Inserting the New Battery
Now comes the exciting part—putting in the new battery! Follow these clear steps:
1. Check the battery — Make sure your new battery is the same as the old one and that the protective seal is removed.
2. Insert the battery — Align the new battery in the same orientation as the old one. The positive side should face the same way.
3. Press down firmly — Ensure it’s snugly fit. If it’s not in correctly, the remote won’t work.
You might feel a slight resistance when inserting it, and that’s okay. Just make sure it sits properly and securely.
Closing the Remote
With the new battery in place, it’s time to put the remote back together. This is usually straightforward, but again, take care to avoid damaging any clips or buttons.
1. Align the casing — Make sure both halves of the remote are properly aligned.
2. Press them together — Firmly press the two halves back together until you hear a little click. That’s the sound of a job well done!
If the casing isn’t closing completely, double-check if the battery is seated right or if any clips are interfering.
Testing Your Remote
Now that your remote is closed up, it’s testing time! This is the moment to see if all your efforts paid off.
1. Step to the garage door — Get within a few feet of your garage door.
2. Press the button — Give it a good click. You should see the garage door respond.
If it opens or closes smoothly, congratulations! You’ve successfully changed the battery. But if nothing happens, don’t panic just yet.
Troubleshooting Common Issues
Sometimes, things don’t go as smoothly as planned. If your remote doesn’t work after the battery change, here are a few things to check:
– Orientation — Double-check that the battery is installed in the correct direction.
– Battery quality — Ensure you’re using a good brand. Sometimes cheap batteries don’t hold a charge well.
– Pairing issues — If your remote won’t pair with your garage door, you might need to re-sync it.
To sync, consult your remote’s manual for specific instructions. It usually involves holding down a button while pressing another on the garage opener.
Maintaining Your Garage Door Opener Remote
Once you’ve changed the battery, keeping your remote in top shape is a good idea. Here are a few tips:
- Store it away from extreme temperatures—heat and cold can damage the electronics.
- Check the battery twice a year—this helps avoid you getting stuck outside.
- Clean the remote regularly—dust and dirt can interfere with its signal.
Taking a few extra steps can prolong the life of your remote and keep everything running smoothly.
Changing the battery in your garage door opener remote is a simple task that can save you hassle down the road. With just a few basic tools and some patience, you can tackle it confidently.
If your remote isn’t working after a battery change, don’t stress—you know how to troubleshoot now! Regular maintenance goes a long way in keeping your life running smoothly, and trust me, it’s worth it to avoid standing outside in the rain. Happy opening!