Think of the close limit switch like a coach. It decides when to stop the door, just like a coach decides when to blow the whistle during practice. Understandably, you want a solid performance from your door every time, right? Whether you have a Chamberlain, LiftMaster, or Genie opener, it’s a straightforward process that doesn’t require a tech degree, just a little bit of patience and common sense.
Now, let’s dig into the nitty-gritty of how to get your garage door back to working just the way you want it.
What Is a Garage Door Opener’s Close Limit Switch?
The close limit switch is a tiny but mighty component of your garage door opener system. Essentially, it tells the door when to stop closing. If the switch is out of whack, your door might land too hard or not close fully, which could create safety issues or lead to damage.
You’re probably wondering how this little switch works. It uses a mechanism that senses the door’s position. When the door reaches the set point, the switch activates and signals the opener to stop. Simple, right?
Most garage door openers have adjustable limits that can be tweaked to suit your preferences. This is why it’s important to get comfortable adjusting your close limit switch when needed.
Why Adjust the Close Limit Switch?
There are a few scenarios where adjusting your close limit switch makes sense:
1. Overhead Clearance: Maybe you’ve added storage overhead or a new car, and you want to ensure the door doesn’t hit anything as it closes.
2. Safety Concerns: A door that doesn’t close all the way can be a safety hazard. If it’s leaving a gap, someone (or something) could get hurt trying to slip under.
3. Weather Protection: A door that doesn’t seal completely can let drafts, rain, or pests into your garage. Ensuring it closes correctly helps protect your space from the elements.
Adjusting this setting can be a quick fix that saves you headaches later on.
Gather Your Tools
Before we dive into the adjustments, let’s get your tools in order. You won’t need a toolbox full of gear, just the basics:
- Screwdriver – Typically a flat-head or Phillips, depending on the model.
- Smartphone or Camera – For recording your settings, if necessary.
- Tape Measure – To ensure accurate measurements.
Having these handy will make the entire process smoother. And trust me, you don’t want to be running back and forth looking for tools when you could be adjusting your garage door!
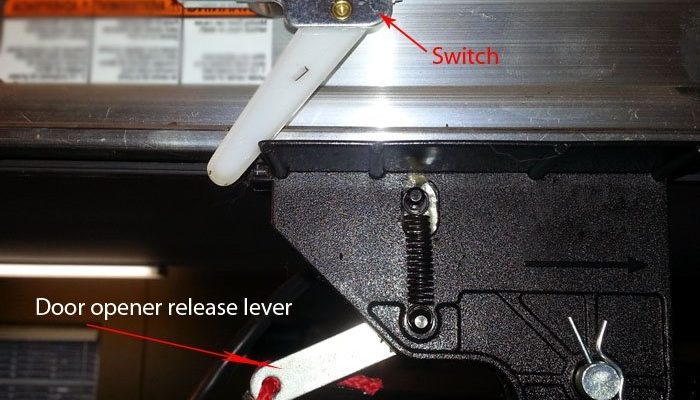
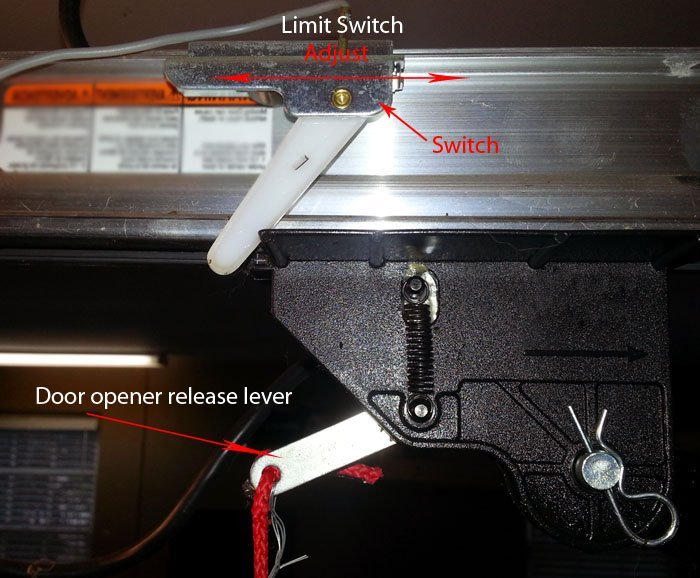
Locate the Close Limit Switch on Your Opener
Finding the close limit switch isn’t like searching for Waldo in a crowd. Most models have the switch conveniently located on the motor unit of the opener.
Here’s how to spot it:
– Look for a series of dials, buttons, or knobs.
– The close limit switch might be labeled “Close” or marked with “C” somewhere on the unit.
Once you locate it, take a moment to familiarize yourself with the settings available.
Adjusting the Close Limit Switch
Now we’re getting to the good stuff—adjustment time! Whether your door closes too slowly, too fast, or stops short, you can correct that with a few simple steps.
1. Disconnect the Opener: Safety first! Unplug the garage door opener or disconnect it from the power source to avoid any accidental activation.
2. Make Small Adjustments: Turn the limit switch clockwise to make the door close lower, or counterclockwise for a higher closure. Start with small turns—about a quarter rotation.
3. Test the Door: Plug the opener back in and test the door. Watch it close to see if it hits the desired spot. If it does, great! If not, make another small adjustment.
4. Repeat: Don’t hesitate to repeat this process until you achieve the perfect close.
This step-by-step approach ensures you get it just right without risking damage or safety concerns.
Common Issues When Adjusting
Even the best plans can hit a hiccup or two. Here are some common challenges you might face while adjusting your close limit switch:
– Switch Doesn’t Rotate: Sometimes, the mechanism can feel stuck. If this happens, try gently pulling on any buildup or pushing the dial firmly.
– Door Still Won’t Close: If you’ve adjusted the switch right but the door won’t close correctly, check the tracks for obstructions or ensure the sensors are aligned.
– Inconsistent Behavior: If your door is still misbehaving, it could signal a more serious issue, like a broken sensor or motor problem.
Understanding these potential issues helps you troubleshoot effectively.
Safety Features of Your Garage Door Opener
Your garage door opener is packed with safety features designed to protect you. For instance, many openers come with photo-eye sensors that detect objects in the door’s path. If something is in the way, the door will reverse, preventing accidents.
Additionally, if your door has been modified recently, like adding insulation or a heavier door, you might need to revisit some adjustments to maintain safety features. Always read your opener’s manual covering safety guidelines for your specific model.
When to Call a Professional
While adjusting your garage door opener’s close limit switch can be a straightforward task, sometimes it’s best to call in a professional. If you notice:
– Ongoing issues after adjustments,
– Strange noises during operation,
– Software or electrical problems.
These might indicate an underlying issue best left to the experts. It’s always better to be safe than sorry, especially when it comes to garage doors!
Regular Maintenance Tips for Your Garage Door
Once you’ve adjusted the close limit switch, take a moment for some maintenance to keep your garage door functioning smoothly:
– Lubricate Moving Parts: Use a silicone spray on the rollers and hinges to ensure they move freely.
– Inspect Sensors: Regularly check that the sensors are clean and aligned. Dust or misalignment can cause closing issues.
– Test Safety Features: Make it a habit to test your automatic reverse features. Place an object in the door’s path to see if it reverses as it should.
These small acts of care go a long way in prolonging the life of your garage door system.
Adjusting your garage door opener’s close limit switch may seem daunting at first, but with a little confidence and these steps in hand, you’re ready to tackle it. It’s all about ensuring your door closes safely and smoothly, designed just the way you need it.
Take your time, follow the steps, and embrace the process! You’ll have a well-adjusted garage door satisfying your safety and convenience needs in no time. Remember, maintaining your garage door isn’t just about utility; it’s about peace of mind in running a safe and reliable home. Happy adjusting!