When diving into this DIY project, you might come across various brands and types of insulating materials, such as foam board, reflective foil, or fiberglass. While it may seem daunting, it’s easier than you think! With the right tools and materials, you can quickly transform your garage door into a more energy-efficient barrier.
Let’s get into the details of Diy Garage Door Insulation Kit Installation. Here’s a handy guide to walk you through each step, making sure you feel empowered to tackle this project head-on.
Understanding the Need for Garage Door Insulation
Before we get into the nitty-gritty of insulation installation, it’s essential to understand why you should bother in the first place. Insulating your garage door can lead to notable benefits.
First off, it helps regulate the temperature inside your garage. During those brutal winter months, an insulated garage can prevent pipes from freezing, while in summer, it keeps the heat at bay, making for a more comfortable workspace. Additionally, if you use your garage as a workshop or a play area, temperature control is a must.
Secondly, well-insulated garage doors can lower your energy bills. By reducing the amount of cold or hot air that seeps through the door, your heating and cooling system won’t have to work as hard, ultimately leading to savings on those pesky utility bills. Long-term, you’ll feel good about making your home more energy-efficient.
Choosing the Right Insulation Kits
There are different types of insulation kits available on the market, so how do you choose the right one? You’ll primarily want to consider the material, thickness, and R-value.
- Foam Board Insulation: This type provides excellent thermal resistance and is relatively easy to install. Plus, it comes in various thicknesses, giving you choices based on your garage’s needs.
- Reflective Foil: This option reflects heat away, which can be beneficial in warmer climates. It’s lightweight and straightforward to apply, often coming in rolls.
- Fiberglass Insulation: While this may be a great insulator, it requires more effort to handle and install. Also, ensure you wear protective gear if you choose this option.
Additionally, consider the R-value, which indicates how well the insulation resists heat flow. The higher the R-value, the better the insulation. For most garages, an R-value of at least 10 to 13 is ideal.
Gathering Tools and Materials
Now that you’ve got an understanding of insulation types, it’s time to gather your tools and materials. Here’s a list to make sure you’re fully equipped before starting your DIY project:
- Garage door insulation kit (of your choice)
- Utility knife or scissors
- Measuring tape
- Cleaning supplies (like soap and water, or a degreaser)
- Safety goggles and gloves (especially if using fiberglass)
- Adhesive or double-sided tape (if required by your insulation kit)
Having everything on hand saves you time and reduces the chances of coming across unwanted roadblocks during installation.
Preparing Your Garage Door for Insulation
Before you dive into installing the insulation, you need to prep your garage door. Treat this step as if you’re preparing a canvas for a painter—it sets the stage for a successful job.
Start by cleaning the surface of the garage door. Use soap and water or a degreaser to remove dirt and grime. Make sure to dry it well, as any moisture could affect adhesive properties.
Next, inspect the door for any damages, like cracks or holes. If you find any, take the time to repair those first. Otherwise, any insulation you apply might not work as effectively, allowing outside air to seep through.
Measuring Your Garage Door
Once your garage door is clean and ready, it’s time to measure for the insulation. You’ll want to take accurate measurements to ensure you cut the insulation material correctly.
Use a measuring tape to assess the height and width of each panel of the garage door. If your door consists of multiple sections, measure each individually. Don’t forget to account for any windows or hardware that may affect the fit of your insulation.
Tip: It’s better to measure twice and cut once—trust me! Accuracy will save you time and hassle down the line.
Cutting the Insulation Material
Now that you have precise measurements, it’s time to cut the insulation. Depending on the material type, follow the guidelines that come with your insulation kit. If you’re using foam board or reflective foil, a utility knife works well for straight cuts.
Be cautious while cutting, especially with fiberglass insulation, as tiny particles can irritate your skin and lungs. Wear gloves and a mask if needed.
Once you’ve completed cutting the pieces, double-check them against your measurements to ensure they fit snugly in each section of the garage door.
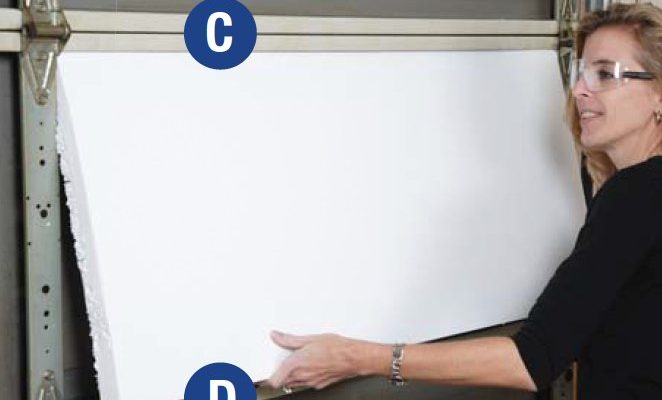
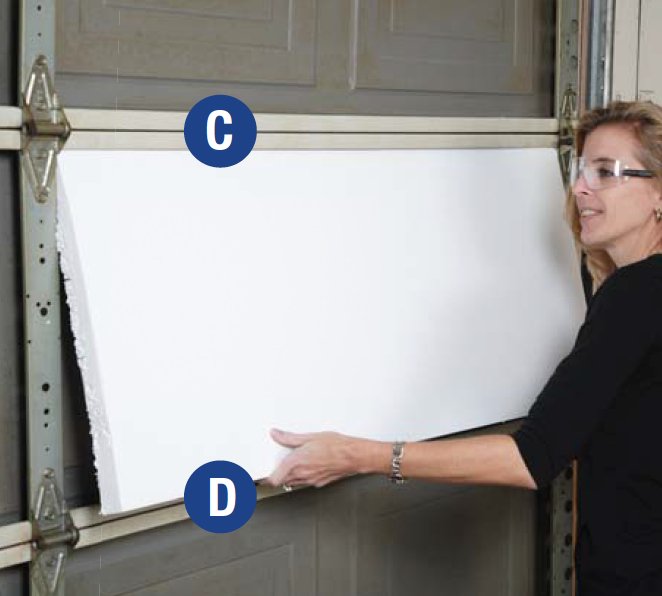
Installing the Insulation
The installation process can vary a bit based on the insulation type you chose. Here’s a general overview to help you along.
1. Foam Board Insulation: Simply place the cut pieces into your garage door sections and use adhesive to secure them in place. Ensure a snug fit, and seal any edges with tape to prevent air from escaping.
2. Reflective Foil: Lay out the cut pieces and use adhesive or double-sided tape to secure them into the sections of your garage door. Ensure that the shiny side faces inward to reflect heat effectively.
3. Fiberglass Insulation: If you chose this option, gently press the cut pieces into each garage door panel, maintaining a snug fit. Help secure them with any battens or straps as needed, following your insulation guide.
Remember to check for any assistance or specifications in your insulation kit—they often come with installation instructions tailored for that specific product.
Sealing Edges and Final Touches
After successfully installing your insulation, it’s time to seal everything properly. Go along the edges of the insulation with a good-quality tape or sealant to fill in any gaps.
Sealing edges is crucial; it not only enhances insulation but also prevents any critters or bugs from sneaking in. If you spot any holes or gaps in the door itself, consider sealing those as well.
Now, step back and admire your work! The effort you just put in is going to pay off big time in both comfort and energy savings.
Tips for Maintaining Your Insulated Garage Door
Once your garage door is insulated, a little maintenance goes a long way. Regularly check for any sagging or damaged areas in the insulation and repair them promptly.
You may also want to inspect the door seals periodically. These are often the first line of defense against drafts—keeping your garage cozy. Regularly clean the door as well, in case dust or dirt builds up over time.
Being proactive about small repairs can help extend the life of your insulation and your garage door overall.
Congratulations! You’ve now tackled a DIY garage door insulation kit installation like a pro. By insulating your garage door, you’re not just saving money on energy bills. You’re also creating a more comfortable space to work, play, or store items.
Honestly, it might seem like a small project, but it can make a big difference in how you experience your garage. Whether you’re tackling hobbies, parking your car, or simply using the garage for storage, you’re creating a cozier, quieter sanctuary.
Now, you can enjoy your well-insulated garage, knowing you put in the effort and got some valuable skills out of the process. So, grab that cozy sweater for your garage door and relish the benefits of your hard work!