Chamberlain garage door openers are designed with a user-friendly interface, including simple light indications that communicate specific issues. Whether it’s that remote control refusing to sync or the opener not responding, the blinking lights can provide vital clues to the problem at hand. Let’s dive in and take a closer look at how to make sense of those flashing lights.
Understanding Your Chamberlain Garage Door Opener
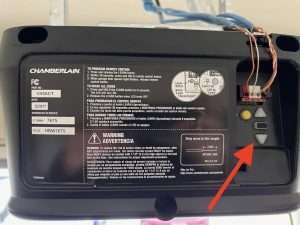
To effectively decode blinking lights, it’s essential to grasp how your Chamberlain garage door opener works. These openers use a remote control and radio frequency to communicate with the main unit. When everything’s functioning correctly, it’s like a seamless dance: you press a button, and the door glides up or down effortlessly. But when there’s an issue, the blinking lights become the only way your opener can communicate.
The lights on your Chamberlain opener aren’t just there for decoration—they serve a purpose. Each pattern of blinking is a code, conveying different messages about what might be wrong with your system. For example, a steady light often means all systems are go, while different blink patterns can indicate problems that need your attention.
Common Blink Patterns and Their Meanings
With Chamberlain garage door openers, each light pattern has a distinct meaning. Here are some of the most common ones you’ll encounter:
- Steady Light: Everything is functioning well. No issues detected.
- 1 Blink: Indicates a problem with the door sensor. It may be misaligned or obstructed.
- 2 Blinks: Often means the garage door is unable to open or close due to a mechanical issue.
- 3 Blinks: This usually points towards a remote control pairing problem.
If you see one of these patterns, don’t panic! Each one provides a nudge in the right direction on how to troubleshoot the issue.
Troubleshooting Sensor Issues: The 1 Blink Signal
If your Chamberlain opener blinks once, it’s time to check the door sensor. Think of these sensors as your garage door’s eyes—they help it know when to stop when it’s closing. If they can’t “see” properly, they’ll signal that something’s wrong.
Here’s how to address a 1 blink signal:
1. Inspect the Sensors: Look at the sensors located near the base of the door. Make sure there’s nothing blocking them, like dirt or cobwebs.
2. Align the Sensors: If they’re misaligned, gently adjust them until they point directly at each other. The lights on the sensors should be steady when aligned.
3. Test the Opener: Once you’ve made these adjustments, press the remote again. If the light remains steady, you’ve likely fixed the issue.
Resolving Mechanical Problems: The 2 Blinks Signal
Seeing two blinks? This indicates a mechanical problem that’s stopping your garage door from moving. Think of it as a traffic light stuck on red—the door simply can’t go anywhere.
To troubleshoot a 2 blinks signal, follow these steps:
1. Check for Obstructions: Make sure there’s nothing blocking the door’s path. Sometimes, leaves or even small toys can prevent smooth operation.
2. Inspect the Tracks: Look for dents or obstructions in the tracks. If anything appears out of place, use a hammer to gently realign the track or clear the debris.
3. Lubricate Moving Parts: If all seems fine visually, consider applying a bit of lubrication to the hinges and rollers. Sometimes, just a little oil can make everything work smoothly again.
Addressing Remote Control Pairing Problems: The 3 Blinks Signal
If your Chamberlain makes the mistake of blinking three times, it’s often related to your remote control. It’s like trying to call someone, but the line is busy. You need to establish a clear connection!
Here’s how to resolve a 3 blinks signal:
1. Check the Remote Batteries: Sometimes, dead batteries are the root of the issue. Replace them, and give it another go.
2. Reprogram the Remote: If the remote still doesn’t function properly, it may need to be reprogrammed. Most Chamberlain models have a “Learn” button on the opener’s main unit. Press this, then press the button on the remote until the lights blink. This should sync everything up again.
3. Test the Connection: Press the remote again after reprogramming. If the door responds, you’ve successfully tackled the issue.
Power Issues: When Nothing Works
If your garage door opener isn’t responding at all, it might not be a blinking light problem but rather a power issue. Think of it like running out of gas—you might want to go somewhere, but without fuel, you’re not going anywhere at all!
Here’s how to handle potential power issues:
1. Check the Power Source: Ensure the opener is plugged in. It sounds simple, but sometimes it can come loose if bumped.
2. Inspect the Circuit Breaker: If the plug is fine, peek inside your garage’s electrical panel. A tripped breaker or blown fuse could be the culprit.
3. Test the Opener: If your power source seems fine, test the opener by plugging it into another outlet to rule out issues with the outlet itself.
Resetting Your Chamberlain Garage Door Opener
An easy solution to many issues is a simple reset. Sometimes, your garage door opener just needs a breather, sort of like rebooting a computer when it acts sluggish. Resetting can clear minor glitches.
To reset your Chamberlain opener:
1. Unplug the Opener: Disconnect it from the power source for about 30 seconds.
2. Plug It Back In: Reconnect it and wait for the lights to stabilize.
3. Reprogram Remotes: Sometimes, a reset may require you to reprogram remote controls, so don’t forget to check if they’re working afterwards.
When to Call for Professional Help
Sometimes, despite your best efforts, the blinking lights may continue to signal a problem you can’t fix. Here’s the thing: knowing when to call in a professional is crucial.
If you’ve gone through all the troubleshooting steps and still can’t resolve the issues, it might be time to reach out to a technician. They have the tools and experience to identify underlying problems that a homeowner might miss.
You might want to consider this if:
- The opener continues to blink despite troubleshooting.
- You notice strange noises or the door operates slowly.
- There are signs of wear or damage to major components.
Understanding the Importance of Maintenance
Regular maintenance is key to ensuring your Chamberlain garage door opener runs smoothly. Just like you’d take care of your car by checking oil levels or tire pressure, your opener also deserves a little TLC.
Here are some tips to keep your system in top shape:
– Clean the Sensors Regularly: Dust and grime can impair performance, so wipe them down occasionally.
– Lubricate Parts: Regular lubrication can prevent sticking and grinding noises.
– Check for Loose Hardware: Periodically inspect the opener and rails for any loose screws or bolts that might impede function.
Investing a little time now can prevent larger problems down the road, saving you headaches and repair costs.
Decoding the blinking lights on your Chamberlain garage door opener might seem daunting, but with a little patience, it can become second nature. Each blink pattern shares a vital message, guiding you toward the right fix. By understanding these signals, you save time and money while keeping your garage door operating smoothly.
Remember, maintenance is your best friend! A little upkeep goes a long way in preventing issues. And when in doubt, don’t hesitate to reach out for professional help. After all, just like those blinking lights, clear communication is essential. Keep your garage door opener happy, and it will return the favor!