When you first approach a camera control panel, it can feel a little like learning to ride a bike. There are handles to hold, gears to shift, and adjustments to make. You might feel overwhelmed, but don’t worry! Just like riding a bike gets easier with practice, mastering camera control panels becomes second nature the more you familiarize yourself with them. Let’s dive into the essential components and functions of these panels, using examples from brands like Canon and Nikon to guide you.
What Are Camera Control Panels?
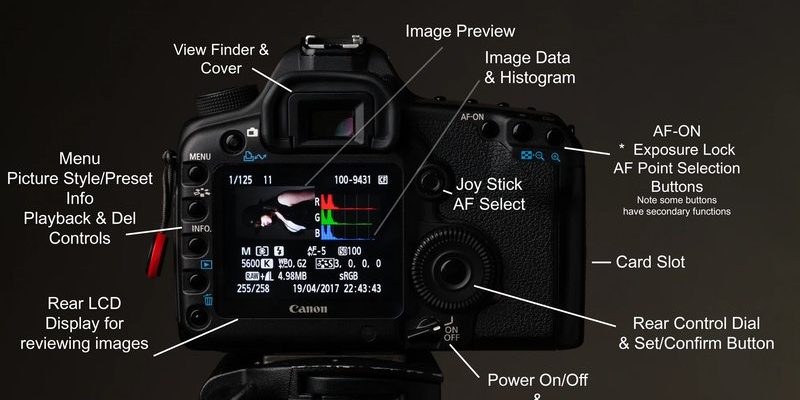
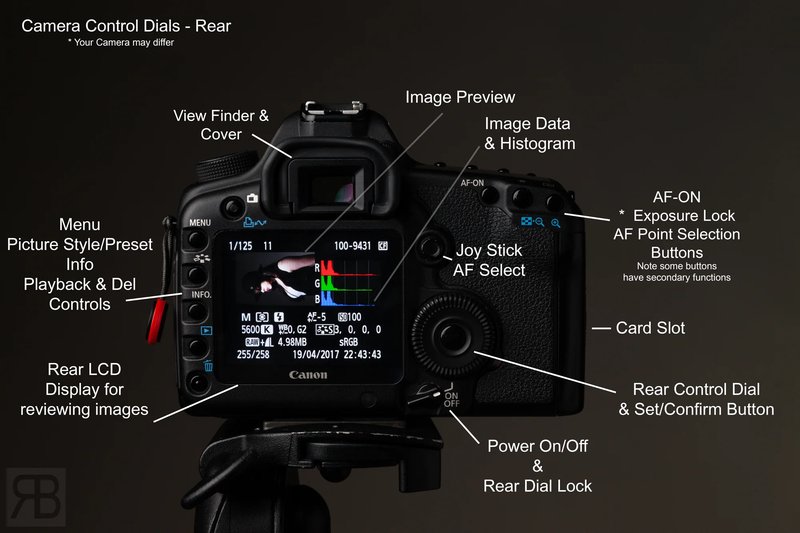
Camera control panels are dedicated interfaces designed for operating cameras, whether it’s for photography or videography. Instead of fiddling with buttons on the camera itself, control panels give you the luxury of adjusting settings from a single location. This setup is especially useful for professional setups, where cameras may be placed in hard-to-reach spots.
These panels can either be integrated into the camera body or exist as external units. For example, Canon’s DSLRs allow control panel access directly, while external devices like Blackmagic’s ATEM Mini give extensive remote capabilities. Picturing a control panel might remind you of a spaceship cockpit—with various buttons, switches, and displays helping get you to your destination (or perfect shot).
Understanding the Different Types of Controls
The heart of any camera control panel revolves around various controls that regulate functions:
- Shutter Speed: Adjusts how long your camera’s sensor is exposed to light.
- Aperture: Controls the amount of light that enters the lens, impacting depth of field.
- ISO: Increases the sensor’s sensitivity to light, useful in low-light environments.
- White Balance: Corrects colors to appear more natural under different lighting conditions.
In simpler terms, adjusting these controls allows you to manipulate the final image’s exposure, clarity, and color. Imagine baking a cake; these controls help mix the right ingredients in just the right amount to create that delicious finished product you’re aiming for.
Pairing Your Camera with a Control Panel
So, how do you actually use a camera control panel? First, you’ll need to pair it with your camera. Most modern panels use a simple syncing process, often via Wi-Fi or Bluetooth.
Here’s a quick step-by-step to help you through the pairing process:
1. Turn on your camera and control panel.
2. Access the settings menu on both devices.
3. Enable the connection feature (look for terms like “sync” or “pair”).
4. Follow the on-screen prompts to complete the connection.
Once paired, your control panel should give you real-time access to your camera functions. This is a game changer, especially when shooting from awkward angles or distances. Imagine capturing that perfect sunset shot without climbing a ladder!
Common Troubleshooting Tips
Even the best setups can run into hiccups. Don’t worry; troubleshooting most camera control panel issues is easier than it sounds.
Here are a few common problems and solutions:
- Issue: Control panel won’t connect to the camera.
- Solution: Check that both devices are turned on and within range. Restarting both devices might also help.
- Issue: Settings won’t adjust.
- Solution: Ensure that the control panel is still properly paired; sometimes, reconnection is necessary.
By addressing these common issues, you can ensure smooth functioning when it counts, like during that big event or shoot you’ve been planning.
Exploring Advanced Features
Once you’re comfortable with the basics, it’s time to explore advanced features offered by camera control panels. Many models come packed with functionality that enhances your workflow:
- Live View Monitoring: See what’s being captured in real-time, allowing for precise adjustments.
- Custom Settings: Save your favorite configurations so you can switch between them easily during shoots.
- Remote Focus Control: Adjust focus without touching the camera, which is perfect for video shoots.
These features can feel a bit like bonus levels in a video game; once you unlock them, they can vastly improve your shooting experience and creativity.
The Benefits of Using a Control Panel
You might be wondering why you’d even want to use a control panel at all. The truth is, they offer several advantages:
- Efficiency: Quickly adjust settings with a single interface instead of navigating the camera’s menu.
- Precision: Fine-tune settings in challenging shooting conditions where split-second decisions matter.
- Comfort: Save your energy by controlling everything wirelessly, especially during long shoots.
There’s a reason professionals rely on these panels. They’re designed to enhance your shooting experience, making the craft more enjoyable and less stressful.
Final Thoughts
Mastering camera control panels can feel like learning a new language, but once you get the hang of it, it opens a whole new world for your photography or videography. Remember to start slow and practice adjusting the basic settings first. Gradually, you’ll become more comfortable using advanced features, and your creativity will likely soar.
With dedication and practice, your skills will improve, and you’ll be creating images that speak volumes. So, grab that control panel, fire up your camera, and start capturing the world your way!