You might wonder why you’d bother with these advanced settings. Honestly, they can transform a standard opener into something tailored just for you. Whether it’s adjusting how sensitive the door is to obstacles or modifying the remote control settings, getting into the nitty-gritty can help avoid headaches down the line. So, let’s take a moment to explore these handy settings in your Sears garage door opener and see how they can make your experience smoother.
Understanding Your Garage Door Opener’s Basic Functions
Before diving into advanced settings, it’s smart to grasp the basics of how your Sears garage door opener operates. Most models come with features designed to enhance usability. The standard functions usually include a remote control for operation, wall-mounted controls, and safety sensors that prevent the door from closing if an object is detected in its path.
The garage door opener communicates with the remote through codes—think of them as secret passwords. When you press the button on your remote, it sends a specific code to the opener, telling it to do its job. If you ever notice your door acting strangely—like not responding or triggering erratically—this is often linked to these code settings.
Understanding this basic structure lays the groundwork for customizing advanced features. You might be surprised by how minor changes can make a significant impact on operation!
Adjusting the Force Settings
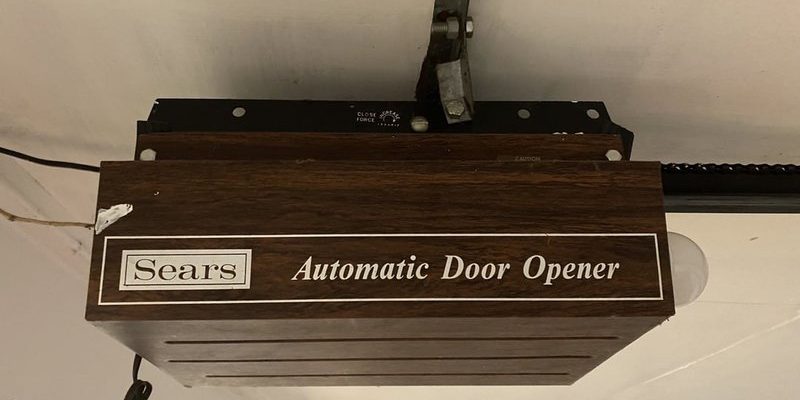
One of the standout advanced settings on many Sears garage door openers is the force setting. This configuration determines how much effort your opener uses to lift and lower the door. Here’s the thing: too much force can lead to damage, and too little can prevent the door from moving at all.
To adjust the force settings:
- Start by locating the adjustment knobs, usually labeled on the opener unit.
- Turn the up force knob clockwise to increase lifting power and counter-clockwise to decrease it.
- Repeat the process for the down force knob to adjust how firmly the door closes.
Remember, test the door after making adjustments. You want it to move smoothly without unnecessary strain. The goal is a balance where the door responds efficiently without jamming or slamming down.
Exploring Safety Sensor Settings
Safety sensors are crucial for preventing your garage door from closing on anything—like your car, pets, or kids. These sensors create an invisible beam across the door’s path. If something interrupts that beam, the door will automatically stop or reverse.
Sometimes, the sensors can become misaligned or lose sensitivity over time. To check and adjust:
- Look for the sensors located near the floor, one on each side of the door.
- Ensure they’re clean and facing each other directly. You might need to gently move them back into alignment.
- If needed, adjust their sensitivity settings through the opener’s control panel, if available.
If misalignment or dirt is the issue, you should see immediate improvements. Everything should quit stuttering, and your door will perform smoothly.
Pairing New Remotes to Your Opener
Adding a new remote to your Sears garage door opener might seem daunting, but it’s pretty straightforward. The joy of being able to open your garage from your driveway or even your pocket is totally worth it!
To pair a new remote, follow these steps:
- Locate the learn button on your garage door opener’s motor unit (usually found near the antenna).
- Press and release the learn button—it typically lights up to indicate it’s ready.
- Within about 30 seconds, press the button on the new remote you want to pair.
Once paired, your opener should respond to the new remote. If it doesn’t, repeat the process to make sure no steps were missed. It can be a little like a game of telephone, but when it takes, you’ve got instant access!
Resetting Your Garage Door Opener
If problems arise or if you’ve recently moved or changed your remote, a reset might be in order. Resetting your opener can wipe the slate clean and often resolves erratic behavior.
To reset your Sears garage door opener:
- Locate the learn button once more and hold it down for about 10 seconds until the indicator light goes off.
- This process clears any paired remotes.
- After resetting, you’ll need to re-pair your remotes as described earlier.
A reset can do wonders, almost like giving your opener a fresh start. If only we could reset things in life that easily!
Connecting to Smart Home Systems
For those who embrace technology, connecting your garage door opener to a smart home system can enhance security and convenience. Many modern models can integrate with services like Amazon Alexa or Google Home to allow voice commands.
To get started:
- Check if your model has Wi-Fi capability. Consult the user manual to find the setup instructions, as specifics vary.
- Download the manufacturer’s app and follow the prompts to connect your opener to your home Wi-Fi.
- Once connected, link your opener to your smart home ecosystem.
After setting this up, you’ll be able to open and close your garage door with just your voice or via a smartphone app. Imagine walking up to your house with your arms full of groceries, and with just a simple command, the door swings open!
Fine-Tuning Light Settings
Many Sears garage door openers come equipped with lights that illuminate your garage as you open the door. These can be especially handy at night, but you may want to adjust how long they stay on or what triggers them.
To adjust the light settings:
- Check your model’s manual to find the light duration settings.
- Experiment with changing the time duration your lights remain on after activating the opener.
- If your model has a motion sensor option, ensure it’s appropriately set up to trigger the lights when you approach.
Having better control over your lights not only adds practicality, but it also enhances security by keeping your garage bright when it matters most.
Understanding the advanced settings for your Sears garage door opener can really up your home convenience game. From fine-tuning force settings to ensuring your safety sensors are functioning, you have control over numerous features that make your life easier. Even something as simple as pairing a new remote or connecting to a smart home system adds versatility.
By taking the time to adjust these settings, you’re setting the stage for a seamless garage experience. You invest a little time now, and it pays off in the form of increased ease of use and peace of mind later. So, take a moment to explore and enjoy the customized control over your haven. Your garage, after all, is more than just a space—it’s an extension of your home.
Originally posted 2025-01-29 15:37:47.