You might have a Linear Motor Unit from a brand like LiftMaster or Chamberlain, and you’re probably wondering how to configure all those settings to suit your needs. These units are more than just simple openers; they can offer impressive flexibility when equipped with the right settings. Let’s dive into those advanced settings and explore how they can elevate your experience.
What Are Linear Motor Units?
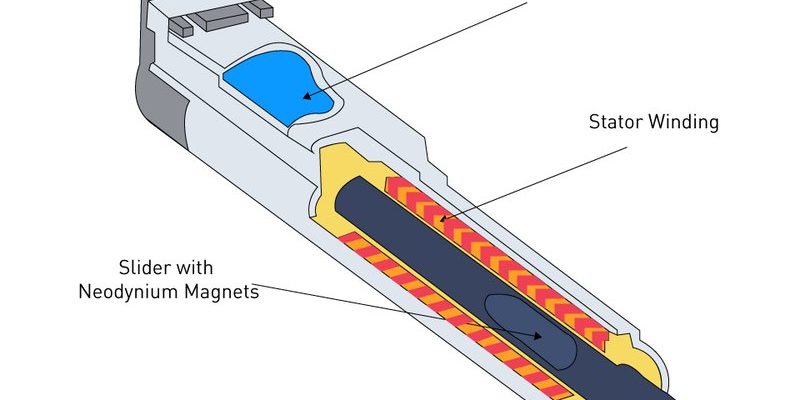
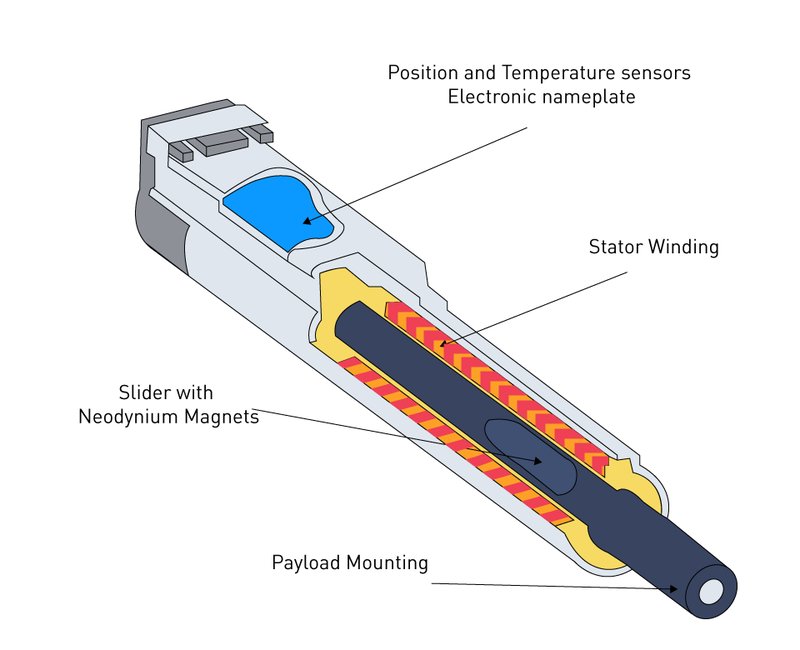
Linear motor units are essentially devices that convert electrical energy directly into linear motion. Think of them as the sophisticated cousin of the classic rotary motors. Instead of spinning a shaft, they create straight motion, which is particularly useful in applications requiring precise and direct movements.
These systems often come with a control system, allowing you to modify how they operate. This leads to a performance that’s tailored to your specific needs. You’ll find these units in various settings, from home garages to large manufacturing plants. So, whether you’re dealing with a sleek LiftMaster linear opener or a heavy-duty Chamberlain unit, understanding your options is essential.
Understanding Advanced Settings
Advanced settings allow you to customize how your linear motor unit operates. Just like adjusting the settings on your phone can make it more user-friendly, fine-tuning these options can lead to smoother operation and increased efficiency. Here are some key features you may encounter:
- Force Adjustment: This setting can control how much power the motor uses to move. More force can mean quicker operation but at a cost to energy efficiency.
- Speed Control: Adjust how quickly the motor runs. Slower speeds may be safer for larger doors, while faster speeds might suit smaller ones.
- Location Programming: Define specific stopping points along the track, which is particularly useful for doors with unique layouts.
By diving into these settings, you’ll gain better insight into how your unit works and how to maximize its capabilities.
How to Access Advanced Settings
Accessing the advanced settings may differ among manufacturers, but the process is generally straightforward. Here’s how you can get started:
1. Locate the Control Panel: This is usually found on the motor unit or a remote.
2. Enter the Programming Mode: Typically, you’ll need to press a combination of buttons (like a “Learn” button). This process can vary, so it’s wise to check your user manual.
3. Navigate to Settings: Use the arrow buttons or the corresponding functions to scroll through the menu.
For example, on a LiftMaster model, you might hold the “Learn” button until the lights flash, then press the “Settings” button to cycle through options. With a bit of patience, you can explore all the configurations available.
Force Adjustment: What You Need to Know
One of the most critical advanced settings is the force adjustment. This feature dictates how much power the motor uses when lifting or lowering your garage door. Here’s how you can effectively manage this setting:
– Increase Force for Heavier Loads: If your door is heavy or has hard stops, boost the force. Just remember, too much force can lead to strain on the opener and increased wear over time.
– Decrease Force for Lightweight Doors: For lighter doors, reduce the force. This adjustment not only protects your unit but can also save energy.
Finding the right balance can take a bit of trial and error. Monitor how easily your door opens and closes by tweaking this setting slightly each time.
Speed Control Settings for Smooth Operation
The speed control setting is another vital option that can make a world of difference. Here’s how you can navigate it:
– Faster Isn’t Always Better: Quick actions might seem advantageous, but you don’t want a garage door flying open. If you have kids or pets around, safety is paramount.
– Gradual Changes: Start by making small adjustments. It’s often recommended to set the speed to just above a crawl and gradually increase it until you find an optimal rate.
Remember, if you notice any strange sounds or jerky motions, it might be a sign to decrease the speed before proceeding with any further changes.
Location Programming for Custom Stops
Another advanced feature is location programming, which is especially helpful if your garage door or machinery has unique stopping points. Here’s how to set it up:
1. Enter Programming Mode: Follow the same process as before.
2. Define Start Position: Close the door to the desired lower position.
3. Set the Stop Position: Adjust to where you want the door to stop when opened.
This process varies by model, but it can be a phenomenal way to ensure that your garage door functions precisely as intended. Think of it like creating custom presets on your favorite coffee machine — tailored just for you!
Troubleshooting Common Issues with Advanced Settings
Even with the right settings, you might encounter some hiccups. Here’s a rundown of common problems and quick fixes you can try:
- Unresponsive Motor: If your motor suddenly stops responding, check the power supply and connections. Sometimes, it’s just a loose wire.
- Door Doesn’t Reach Desired Positions: Revisit your location programming settings. It may need recalibrating.
- Strange Noises: Noises might indicate resistance. In such cases, inspect for any obstructions along the door’s path.
Understanding and addressing these issues early can save you time and money down the line.
Importance of Regular Maintenance
Finally, it’s crucial to remember that regular maintenance can keep your advanced settings functioning seamlessly. Just as you’d take care to tune your car or clean your guitar, your linear motor unit deserves that attention, too. Here’s how to stay on track:
– Check and Lubricate Regularly: Ensure all moving parts are well-lubricated to avoid wear and tear.
– Inspect Settings Periodically: Every few months, review your advanced settings to confirm they’re still in line with your needs. Sometimes, needs change, and so should settings!
– Keep the Control System Updated: If your manufacturer releases firmware updates, install them. These updates often improve performance and fix bugs.
Taking these steps can help keep your linear motor unit running smoothly for years, maximizing performance while minimizing headaches.
In conclusion, getting acquainted with the advanced settings of linear motor units is essential for anyone looking to optimize functionality. By understanding how to access these settings and what adjustments to make, you’ll ensure a safer, smoother, and more efficient operation. So, whether it’s for home convenience or industrial applications, knowing how to fine-tune these settings can make a significant difference in your daily life.
Originally posted 2025-01-31 23:27:23.