In this guide, we’ll talk about what travel limits are, why they’re important, and how to adjust them specifically for your Chamberlain garage door opener. Even if you haven’t tackled a DIY project before, we’ll walk you through it step-by-step to ensure your door behaves just the way you want it to.
Understanding Garage Door Opener Travel Limits
To grasp the adjustments, let’s break down what “travel limits” actually mean. Simply put, travel limits are the distances the garage door travels when it opens or closes. Think of it like the floor of your home: if the door doesn’t know where the floor is, it might stop too high or too low.
For Chamberlain models, understanding your door’s travel limits is crucial. If your opener is programmed with incorrect limits, it can lead to issues like the door reversing unexpectedly or not opening completely. These problems can stem from wear and tear, changes in your garage’s environment, or just a simple miscalibration over time.
By knowing how to adjust these limits, you can help ensure a smooth operation and increase the lifespan of your garage door opener.
Tools You’ll Need
Before diving into the adjustments, let’s gather the necessary tools. You don’t need a full workshop; most likely, you’ll just need a few items from around your home. Here’s what you should have on hand:
- Flathead screwdriver: This is often used to make the adjustments.
- Owner’s manual: It’s helpful to have this on hand, as it provides specific details for your Chamberlain model.
- Step ladder: If your opener is mounted high, you’ll need a ladder to reach it safely.
- Measuring tape: This can be beneficial for confirming the heights of the door position.
You might wonder why a simple screwdriver is on this list. For many Chamberlain models, the travel limit adjustments can be made right on the motor unit with this tool.
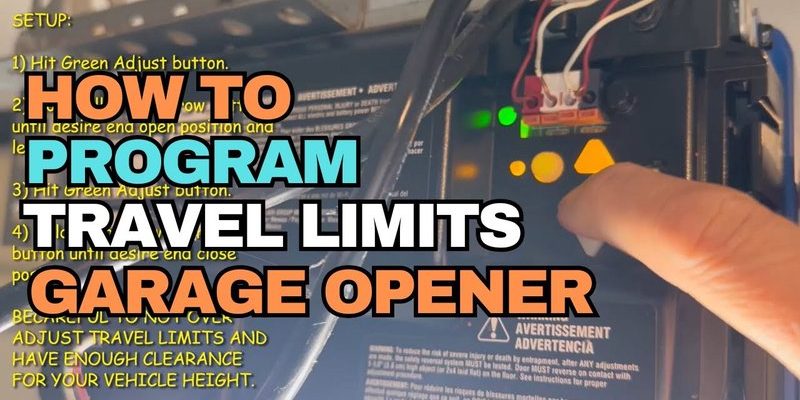
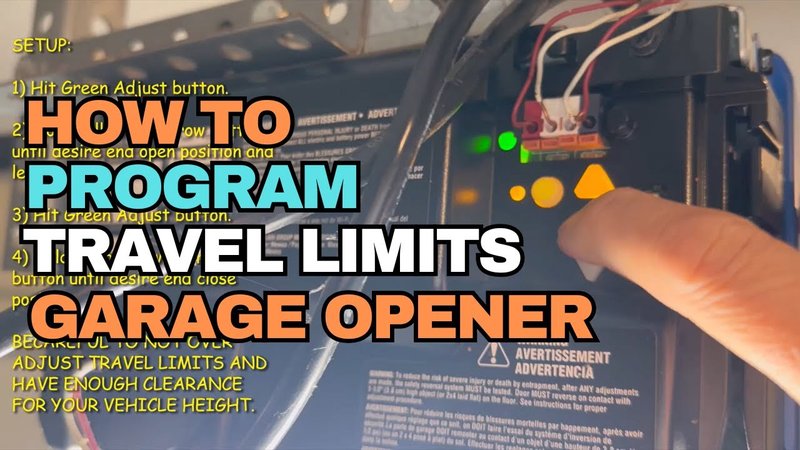
Locating the Travel Limit Adjustments
Now that you have your tools, let’s find where these adjustments are located on your Chamberlain opener. The travel limit adjustment screws are typically on the back or side of the motor unit. They’re labeled “up” and “down” for ease of identification.
Take a good look at your opener. If you’re having trouble finding it, consult your owner’s manual; it will have specific images or diagrams that show you exactly where to look.
Here’s the thing: don’t rush this step. Make sure you know exactly where you’re working. It could save you a lot of headaches later!
Adjusting the Open Travel Limit
Once you’ve located the adjustment screws, it’s time for the fun part—actually making the adjustments! Start with the open travel limit. To do this:
1. Press and hold the remote to open the door fully.
2. Observe where the door stops. If it doesn’t reach the top, you’ll need to adjust the up limit.
3. Using your flathead screwdriver, turn the up limit screw clockwise to increase the travel distance or counterclockwise to decrease it.
Keep in mind that small rotations can lead to noticeable changes. As you’re adjusting, press the remote to see how the door responds. It may take a bit of back and forth, but it’s worth it to get it just right.
Adjusting the Close Travel Limit
Next up is the close travel limit. Here’s how to tackle that:
1. Press and hold the remote to close the door completely.
2. Once it’s closed, see if it’s resting on the ground properly. If it doesn’t shut entirely or slams down, it’s time to adjust.
3. Just like before, use your screwdriver to turn the down limit screw. Adjust it clockwise to increase the closing distance, or counterclockwise to decrease it.
Periodically press the remote to see if your adjustments are hitting the mark. This process may require a couple of tries, but take your time—patience is key here!
Testing Your Adjustments
Once you feel that you’ve made sufficient adjustments to both the open and close limits, it’s time to put your handiwork to the test. Make sure to:
– Open and close the garage door a few times to watch how it behaves.
– Check for any stuttering or jerking motions.
– Ensure that the door stops fully in both directions.
If something doesn’t feel right, don’t hesitate to make small tweaks as needed.
Troubleshooting Common Issues
Sometimes, even after making adjustments, things can still go awry. Let’s address some common issues that might pop up:
– Door Reversing on Closing: If the door goes down and then immediately rises back, it might be interpreting a blockage. Make sure there’s nothing in its path and check the safety sensors.
– Door Not Opening or Closing All the Way: This may indicate that your travel limits need further adjustment. It could also signal that something is obstructing the tracks.
– Noise or Sluggish Movement: This could be due to a lack of lubrication or wear on the door components. Check to ensure everything is running smoothly.
If these fixes don’t help, your user manual may have more specific troubleshooting steps.
Resetting Your Garage Door Opener
In some cases, a simple adjustment isn’t enough. You might need to reset your garage door opener. Here’s how to do that:
1. Locate the learn button on the opener. This is usually a colored button on the motor unit.
2. Press and hold the learn button until the indicator light turns off. This usually takes about 6 seconds.
3. After resetting, you may need to reprogram your remote and set the travel limits again.
This process can help resolve any lingering issues that adjustments didn’t fix.
Final Thoughts on Maintaining Your Chamberlain Opener
Adjusting the travel limits on your Chamberlain garage door opener is a valuable skill to have. Not only does it keep your door functioning smoothly, but it can also prolong the life of the opener itself. Regular maintenance checks and adjustments can help avoid bigger issues down the road.
Taking a little time to learn about your garage door opener can make you feel more confident when it comes to home repairs. Remember, you can always refer back to this guide whenever you need a refresher.
Ultimately, understanding how to adjust your garage door opener offers peace of mind, knowing that everything is working as it should—and you’ll be ready to roll whenever you are!