Imagine that each wall button is like a multi-tool; it might look straightforward at first glance, but give it a little love and attention, and you’ll find all sorts of nifty functions. Brands like Linear offer wall-mounted buttons with capabilities that go beyond just opening and closing your door. They can improve your overall experience if you know how to tweak their settings just right. So, let’s dive into what these advanced settings are and how you can use them to your advantage.
Understanding Linear Wall Buttons
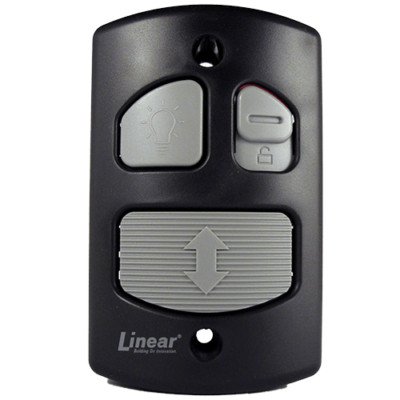
Before we get into the nitty-gritty settings, it’s important to know what Linear wall buttons are and how they work. Linear is known for their robust and reliable garage door openers, and the wall buttons are a key part of that system. These buttons allow you to operate your garage door with the press of a finger, replacing those bulky remotes or making accessing the garage a breeze.
Typically, the wall button connects to the garage door opener via a wired or wireless signal. Picture this setup as your personal doorbell—it communicates with your home’s system to either let you in or keep you out. However, it also has a treasure trove of advanced features that can enhance your garage experience.
What differentiates Linear’s wall buttons from simpler models? They often come equipped with additional functions like light controls, security codes, and even battery backup options. So let’s unpack these features one by one and see what settings can really transform your interactions.
Setting Up and Pairing Your Linear Wall Button
Getting started with your Linear wall button requires a little setup, but once it’s done, you’ll be up and running. Firstly, ensure your wall button is properly mounted in a convenient location, ideally near your garage entrance. After you’ve done this, it’s time to pair it with your garage door opener.
To pair your wall button, follow these simple steps:
- *Power on* the garage door opener by plugging it into a power outlet.
- *Locate the learn button* on the opener unit; this is often found on the back or side.
- Once you press the learn button, you’ll have about 30 seconds to activate the wall button.
- *Press and hold* the button on the wall until you see the opener’s lights blink—that means it’s paired!
You might be wondering, “What if it doesn’t work?” Well, sometimes it helps to reset the system. You can do this by pressing the learn button again and then holding it until the light goes out, clearing any previous pairings. After that, you’re all set to try pairing it again.
Navigating the Advanced Settings
Once your wall button is paired, the fun really begins! Linear wall buttons often come with settings that allow you to customize how the system operates. Each of these settings can enhance your garage experience, making it more efficient and secure.
Here are a few advanced settings you might discover:
– Safety Features: Many models allow you to adjust safety sensors that prevent the door from closing on objects (like your car). You can recalibrate these sensors for better performance.
– Code Settings: Some wall buttons offer the ability to set and reset entry codes, ensuring that only you and those you trust can operate your garage door. This can be particularly handy if you have service personnel coming by or need to share access temporarily.
– Light Control: If your wall button controls the garage lights, you might be able to set timers or control how long the lights stay on. This not only offers convenience but also increases security when you come home at night.
These settings make your Linear wall button much more than just an opener! Let me explain how to adjust these settings in detail.
Adjusting Safety Sensor Settings
The safety sensors are pretty crucial; they ensure no one—or nothing—gets hurt when the garage door closes. If you notice your garage door isn’t stopping when it encounters an object, it might be time to adjust your sensor settings.
To recalibrate the safety sensors:
1. Locate the Sensors: Usually found on either side of the garage door, these small units ensure that the door stops if they detect something in the way.
2. Check Alignment: Sometimes, a simple misalignment can cause malfunctions. Make sure both sensors are facing each other and are mounted at the same height.
3. Test Functionality: After checking the alignment, press the wall button and see how the door reacts. If it still doesn’t stop or reverses, it may be possible to adjust the sensitivity settings in the wall button’s menu.
If you’re not sure, consult your Linear wall button manual for troubleshooting tips. Keeping these sensors in good working order is key to ensuring safe operation.
Customizing Entry and Security Codes
One of the coolest features of your Linear wall button is the ability to customize entry codes. You might use this feature when handing out access to friends or family. Here’s how to customize those codes:
– Access the Code Menu: Press and hold the “Program” button on the wall control until the light blinks.
– Input Your Desired Code: Enter a new code—make sure it’s something memorable, but not too obvious!
– Finalize the Changes: Press the “Program” button again to save your new code. You’ll see the light blink again—time to celebrate!
If at any point things don’t seem to work, remember—you can always reset to factory settings and start fresh. This flexibility is a great feature that keeps your garage secure.
Controlling Light Functions
If your Linear wall button has the added feature of controlling garage lights, you’re in for a treat. You can set the lights to come on automatically or manually, depending on your preference. Here’s how to play around with those settings:
– Manual Control: Simply press the light button on your wall control. This is great for when you’re entering the garage and need some light without opening the door.
– Automatic Timer Settings: Some models allow you to choose how long the lights stay on after activation. You can usually set this in the settings menu by selecting the “Light Duration” option.
– Syncing with Motion Sensors: If your garage lights includes motion sensors, toggle these settings to determine how responsive they are. This adds an extra layer of convenience and security.
These light functions can elevate your garage experience, turning it into a well-lit space that responds to your needs.
Common Troubleshooting Tips
Like any tech, you might run into issues with your Linear wall button. But don’t panic; troubleshooting is usually straightforward. Here are some common issues and their solutions:
– Wall Button Not Responding: Check the battery level if it’s wireless. For wired buttons, ensure the connections are secure and check the wiring for damage.
– Garage Door Won’t Open or Close: If the door doesn’t respond to the wall button, consider resetting the system. You can hold the learn button until the light goes out to clear the previous settings.
– Lights Won’t Turn On: If the lights aren’t responding, check to ensure they’re not burnt out. You can also reset the light settings in the wall button menu to start fresh.
With a little patience and care, you can resolve most issues without needing to call a service technician.
Final Thoughts on Advanced Settings
Your Linear wall button is much more than just a door opener—it’s a versatile tool that can enhance your garage experience. From managing safety sensors to customizing codes and light controls, these advanced settings make your interaction smoother and safer.
Taking the time to explore and set up these features can truly make your garage feel more like home. So don’t shy away from diving into those settings! You’ll not only improve your convenience and safety but also empower yourself to fully maximize the potential of your garage door system. Now that you have the keys to these advanced settings, it’s time to unlock all the possibilities your Linear wall button has to offer!