Reprogramming your Skylink Smart Hub is like recalibrating a compass before a hike. You want to ensure your navigation system is accurate so you can get to where you need to go without a hitch. Just as you’d check your gear before an adventure, ensuring your Smart Hub is synced correctly is essential for smooth operation. Let’s break down the process step-by-step so you can get everything working together seamlessly.
Understanding the Skylink Smart Hub
Before you jump into reprogramming, it’s good to grasp what the Skylink Smart Hub actually is. Picture it as the bridge that connects your smart devices, like garage door openers, lights, and security cameras, allowing them to communicate. Designed with user-friendliness in mind, this hub simplifies the control of multiple devices from one app or remote.
Why Reprogram? There are several reasons why you might find yourself needing to reprogram your hub. Maybe you’ve added a new device, or perhaps you’ve reset your hub for troubleshooting. In any case, ensuring everything is working perfectly together is crucial for a seamless smart home experience.
Gathering Your Tools
Before diving into the actual reprogramming steps, you’ll want to gather a few important tools. Don’t worry, you won’t need a toolbox—just the basics. Here’s what you’ll need:
- Skylink Smart Hub: Ensure you have it plugged in and functioning.
- Smart Devices: The devices you’re pairing or reprogramming.
- A Smartphone or Computer: This will be your communication device for programming through the Skylink app or website.
- Access to your Wi-Fi: A stable internet connection is vital for the hub to function and communicate with your devices.
Having these ready will streamline the process. If something’s missing, you may hit a snag when you want smooth sailing.
Resetting the Skylink Smart Hub
You might be wondering, “Why reset?” Sometimes, if your hub isn’t syncing correctly or is experiencing glitches, a reset can provide a fresh start. Here’s how to do it:
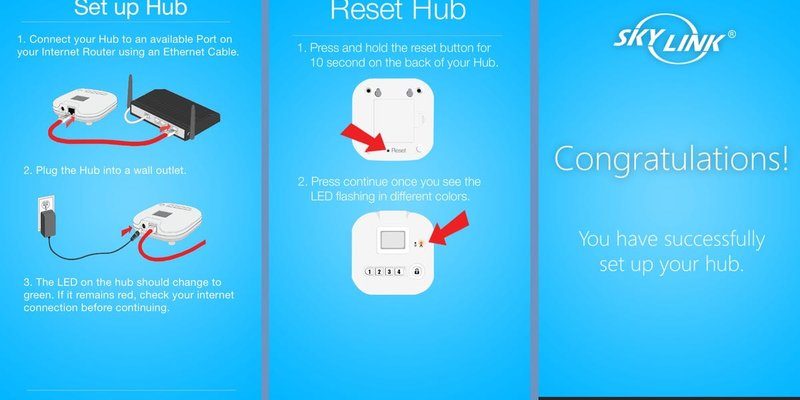
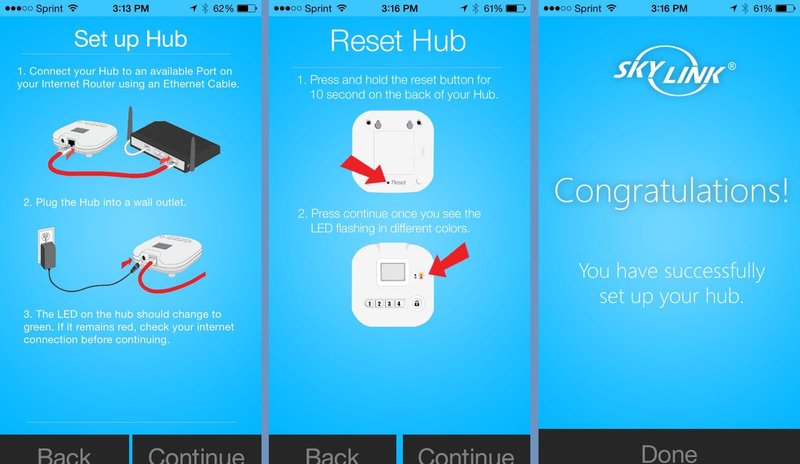
1. Locate the Reset Button: This is usually found on the back or bottom of the hub.
2. Press and Hold: Use a pointed object like a pen to press the reset button. Hold it for about 10 seconds.
3. Wait for the LED Light: The light should flash, indicating that the hub has been reset. This process will disconnect any paired devices, so it’s like wiping the slate clean.
Taking a moment to reset can often solve a lot of issues, much like clearing your browser cache when a webpage won’t load. You’ll find it helps improve communication with your smart devices.
Reprogramming the Skylink Hub
Now, let’s roll into the actual reprogramming part. Don’t worry; it’s simpler than trying to launch a rocket. Here’s how to get your hub set up again from scratch:
1. Download the Skylink App: Start by downloading the Skylink app on your smartphone if you haven’t already done so.
2. Create or Log into Your Account: If you’re using the app for the first time, create an account. If you’ve used it before, just log in.
3. Add Devices: Once you’re inside, look for the option to add devices. Follow the prompts to include your garage door opener or any other smart devices you want to connect.
It’s like adding contacts to your phone; you’re just giving your hub a list of the devices it needs to communicate with. The app will guide you every step of the way.
Pairing Devices with Your Skylink Hub
After you’ve reset and reprogrammed the hub, the next step is to pair your devices. Think of this as teaching your hub how to recognize the members of its “family.” Here’s how to do it effectively:
1. Enter Pairing Mode: Specify the device you want to pair, and find the pairing button or option in the app.
2. Activate the Device: For a garage door opener, you might need to press a specific button to activate its pairing mode. This will send a signal to the hub.
3. Confirm Connection: Once your device connects, you’ll usually receive an on-screen confirmation that it’s successfully paired.
Following these steps closely ensures smooth communication between your hub and the devices. Just as a university student might meet their classmates for the first time to form a study group, your hub and devices are forming a connection that will allow them to work together.
Troubleshooting Common Issues
Sometimes, despite your best efforts, things don’t go as planned. If you hit a wall during reprogramming, don’t sweat it—here are possible solutions to common issues:
– Device Not Pairing: Double-check that your device’s battery is functioning and it’s in pairing mode. Often, low power can be the culprit.
– Hub Not Responding: If the hub doesn’t recognize your devices, try resetting it again or ensure your Wi-Fi is running smoothly. A simple reboot of your router can often fix connection hiccups.
– App Glitches: If the Skylink app isn’t working correctly, uninstalling and reinstalling it may resolve any bugs or glitches.
Think of troubleshooting like detours on your road trip. Usually, it’s just a temporary delay to get you back on track.
Final Thoughts
Reprogramming your Skylink Smart Hub doesn’t have to be an intimidating task. By taking it step-by-step, gathering the right tools, and troubleshooting common issues, you’re well on your way to creating a harmonious smart home environment. Just remember: it’s all about connection, communication, and a little patience.
With your Skylink Smart Hub up and running, you’ll be able to enjoy the convenience of automated tasks and cohesive control over your smart devices. Soon, adjusting your garage door or setting up lights might just become second nature. We’re talking about a significant upgrade to daily living! Happy programming!