Whether you’ve just changed batteries or perhaps you’ve purchased a new Liftmaster remote, knowing how to reprogram the control panel is a handy skill. With a bit of patience and a few simple steps, you’ll be back in business, zipping in and out of your garage like nothing ever happened. Let’s get started!
Understanding Your Liftmaster System
Before diving into the nitty-gritty of reprogramming, it’s crucial to understand how your **Liftmaster* system operates. This smart technology isn’t just a simple push-button mechanism; it’s equipped with advanced security features and a radio frequency that communicates with your remote control. Think of it as a secret handshake between your garage door and the remote.
Your Liftmaster system can typically work with multiple remotes, which is pretty handy if you have several drivers in the family. Usually, these systems utilize a coded signal that enables only authorized remotes to open the door. When you reprogram the control panel, you’re essentially updating this secret code, ensuring that it syncs correctly with your remote.
In many systems, malfunctioning remotes or changing batteries can disrupt this code. If your garage door isn’t responding to your remote, it might be a sign that you need to reset the settings. Fortunately, it’s straightforward!
Gathering What You Need
Before you get into the reprogramming process, it’s essential to gather the necessary tools. Don’t worry; you won’t need anything fancy or complicated. Just a few basic items will do the trick:
- Your Liftmaster garage door opener – This is the unit mounted in your garage, typically near the ceiling.
- A working Liftmaster remote control – Make sure the batteries are fresh.
- A step ladder – If your opener is mounted high, you’ll need to reach it safely.
- A user manual – If you’ve kept it, great! If not, you can usually find a digital version online.
Having these items on hand will make the process quick and seamless. It’s a straightforward fix, and you’ll be amazed at how little time it takes to get your garage door functioning again.
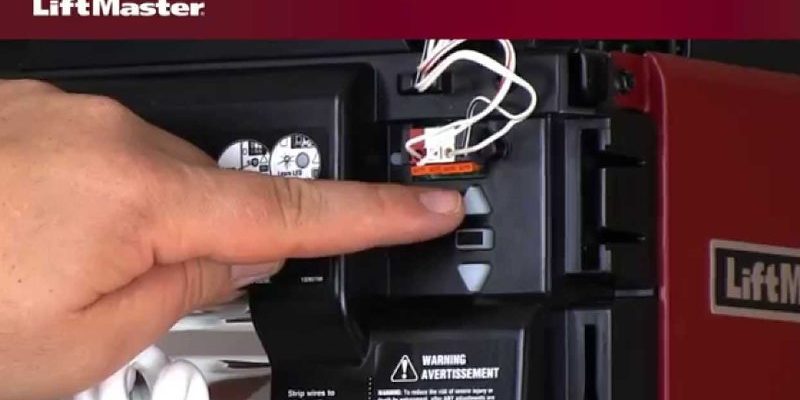
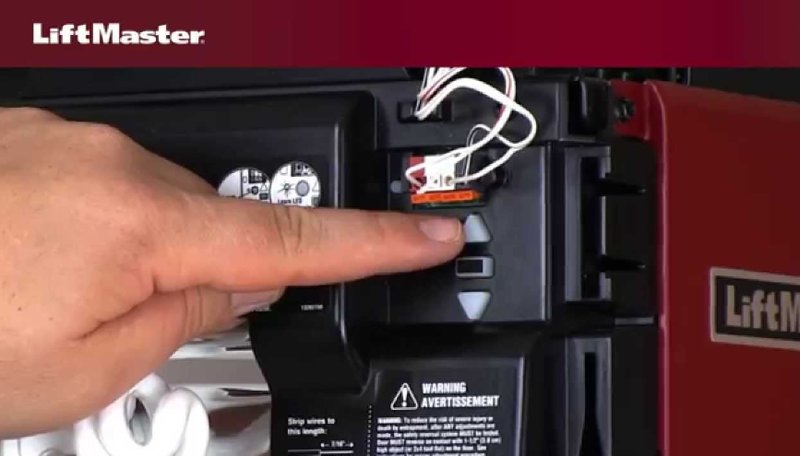
Locating the Learn Button
Next, you’ll want to locate the Learn button on your Liftmaster control panel. This is typically a small, colored button on the back or side of the motor unit. Depending on your model, it may be yellow, red, or green. If you’re having trouble finding it, use your step ladder to get a closer look.
Now, here’s the thing: this is where the magic happens. Pressing the Learn button sets the opener in a mode where it can accept signals from new remotes. Think of it as inviting your new remote into the family.
Make sure your remote is nearby because you’ll need to press its button shortly after activating the Learn button. If you don’t see your Learn button, check your user manual because sometimes it might be in an unexpected spot.
How to Reprogram Your Remote Control
Now onto the exciting part! Reprogramming your remote is straightforward. Follow these steps:
1. Press the Learn button: Tap the Learn button on your Liftmaster control panel. You’ll likely see an indicator light that will illuminate. This tells you that the system is ready to pair.
2. Activate the remote: Within 30 seconds of pressing the Learn button, press and hold the button on your remote that you wish to program. This is usually the main button that opens the garage door.
3. Wait for confirmation: The indicator light on the Liftmaster will blink or turn off, confirming it has successfully accepted the remote’s signal. If it doesn’t, you might want to try again, making sure to press the Learn button first.
4. Test the remote: Step out of the garage and give your remote a test. If your garage door opens and closes smoothly, congratulations, you’ve successfully reprogrammed your Liftmaster remote!
If the door doesn’t respond, you might want to check the battery in your remote or repeat the process from the beginning.
Troubleshooting Common Problems
Sometimes, even after following the steps to reprogram your Liftmaster control panel, things can go awry. You might find that the remote still doesn’t do anything. If that’s the case, here are a few common issues and their solutions:
- Batteries: Ensure the batteries in your remote are fresh. Sometimes, it’s the simplest fix!
- Distance issues: Are you standing too far from the garage door? Try getting closer when you press the remote.
- Interference: Check for any electronic devices around that are causing interference. Appliances or other radio devices might be messing with your signal.
- Multiple remotes: If you have other remotes programmed, make sure none of them are interfering with the new one you’re trying to pair.
If you’ve tried all the above and still can’t get it working, you might want to consult your user manual or contact customer support for additional help. Sometimes a deeper issue might be at play.
Considerations for Universal Remotes
Now, if you’re contemplating using a universal remote with your Liftmaster control panel, you should be aware of a few differences. While it might seem convenient, these remotes can be tricky to program due to varying compatibility.
For example, while a Liftmaster remote is specifically designed to work seamlessly with your system, universal remotes often come with generic features that may not fully integrate with your existing technology. If you’re thinking about it for cost-saving reasons, make sure it specifies compatibility with Liftmaster systems.
If you choose to go this route, follow the instructions that come with the universal remote carefully. Setting it up can take a bit more patience, but many users find it’s worth the effort for added flexibility.
Maintaining Your Liftmaster System
Reprogramming your Liftmaster control panel isn’t just about fixing an immediate problem; it’s also a great opportunity to perform some regular maintenance.
- Check the batteries: Replace the batteries in your remotes on a regular basis. Low battery levels can cause communication issues.
- Inspect the hardware: Take a moment to inspect the garage door and the opener hardware. Look for anything that seems worn out or misaligned.
- Keep the area clear: Ensure the sensors on both sides of the garage door are clean and unobstructed.
Doing these simple things can help prevent issues down the line. It’s always easier to maintain what you have than to fix things when they break down completely.
Wrapping Up Your Reprogramming Journey
Reprogramming your Liftmaster control panel might seem intimidating initially, but with clear instructions, you’ll discover it’s quite straightforward. Remember, everything in technology needs a reset or update now and then, just like how we all need a little refresher from time to time.
Whether you’re dealing with a fresh remote or just troubleshooting an existing one, taking the time to understand your system makes all the difference. Now that you know how to reprogram your Liftmaster control panel, you can handle any minor hiccups that come your way with confidence.
So go ahead, enjoy the convenience of your automatic garage door, and don’t hesitate to revisit this guide whenever you need!