If you’re dealing with a malfunctioning electric garage door, understanding how to disable the circuit board can be really helpful. Maybe your Raynor opener is stuck in a loop, or perhaps you need to reset it completely. Whatever the reason, this is like hitting the refresh button on your device. Let’s dive into how you can do this safely and effectively, making sure your garage door remains a trusty sidekick, rather than a frustrating foe.
Understanding the Basics of Raynor Circuit Boards
The circuit board is the beating heart of your Raynor garage door opener. It’s where all the electrical signals come together to perform functions like opening and closing the door. Picture it as the conductor of an orchestra; if it’s off-key, the music won’t sound right. Circuit boards can experience issues—from small glitches to full breakdowns—which is why knowing how to disable them is essential for any DIY enthusiast.
To understand why you might want to disable the circuit board, consider a few scenarios. Maybe you’re facing intermittent issues with your remote not syncing, or the garage door is responding erratically. Here, disabling the circuit board allows you to troubleshoot effectively without getting bogged down in other potential issues. It’s your first line of defense against unwanted surprises!
Profound yet simple, the functionality of a circuit board in a garage door opener supports numerous components, from sensors to the motor itself. This makes understanding its operations all the more critical, especially when dealing with a Raynor opener. Let’s now explore the process of how to disable it step by step.
Step-by-Step: How to Disable Your Raynor Circuit Board
Disabling your Raynor circuit board is a straightforward process, but it’s important to take the necessary precautions. Here’s how you can do it safely:
1. Gather Your Tools
Before you jump into the task, make sure you have everything you need within reach. You’ll typically require:
- Screwdriver (usually Phillips or flat-head)
- Insulated gloves for protection
- A work light to see clearly inside your garage
Having these tools ready will streamline the process and help prevent any unnecessary delays. You wouldn’t want to get halfway through and realize you’ve forgotten something essential!
2. Power Down Your Garage Door Opener
First things first, safety is key. Disconnect the power supply to your Raynor garage door opener. This could mean unplugging it from the outlet or turning off the circuit breaker. Just think of it as putting the remote down before you get into the nitty-gritty. It’s a simple step, but one that keeps you and your equipment safe while you work.
3. Access the Circuit Board
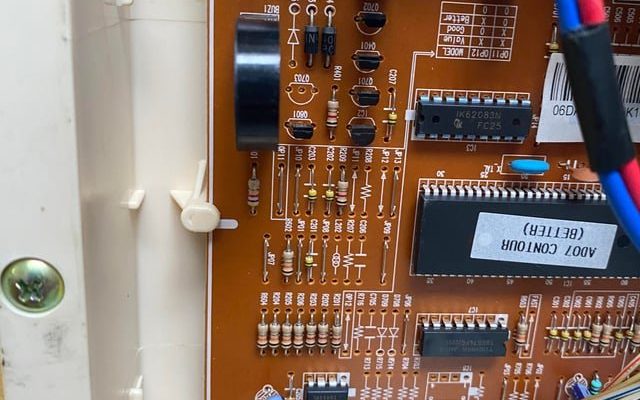
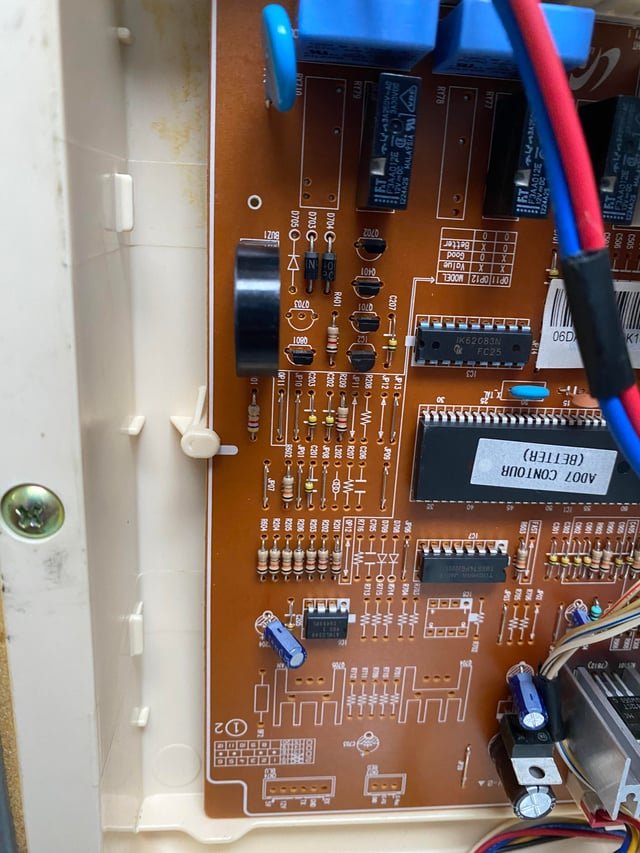
Most Raynor openers have a cover that shields the circuit board. Often, you’ll need to remove screws to gain access. Use your screwdriver to gently take off the cover. Keep these screws in a safe spot; you’ll want to put them back when you’re done. Once you have the cover off, you’ll actually see the circuit board itself, which might look a little overwhelming if you’re not used to seeing electronics.
4. Disable the Circuit Board
Now that you have access, locate the disconnect switch or the wires leading into the circuit board. In many cases, you can simply pull out the wiring harnesses. This action effectively disables the circuit board without causing permanent damage. If you’re not sure which wires to disconnect, consult the owner’s manual for detailed guidance. It’s always better to be safe rather than sorry!
Why Disabling Your Circuit Board Matters
You might be wondering, why go through all this trouble to disable the circuit board? Well, think of it like regularly servicing a car. Just as you’d want to inspect components now and then, doing the same with your garage door opener can help prevent bigger problems down the line. Disabling the circuit board allows you to carry out routine checks or repairs without interference.
Once disabled, you can troubleshoot issues more easily. For example, are there any signs of corrosion? Are connections snug and free from dust? Taking this proactive approach can save you time and money in the long run. Nobody wants to deal with unexpected repairs, especially when they can be prevented with a little attention.
Common Issues That May Require Disabling the Circuit Board
While many people might not think twice about their garage door opener until something goes wrong, it’s good to be aware of common issues that might necessitate disabling the circuit board. Here are a few examples:
- Remote Sync Problems: Sometimes, your remote just won’t sync up with the garage door opener. Disabling the circuit board can reset the system and allow you to start fresh.
- Electrical Short Circuits: If you notice flickering lights or erratic door movements, there might be a short circuit. Disabling the board helps you diagnose and fix the issue.
- Software Glitches: Just like any tech device, software glitches can occur. Disabling the circuit board can reset the system settings, allowing them to function correctly.
By recognizing these issues, you can know when disabling the circuit board is the right move. The goal is to keep your system running smoothly and reliably.
What to Do After Disabling the Circuit Board
Okay, so you’ve disabled the circuit board. What’s next? Well, here’s where the real detective work begins. You’ll want to take a moment to inspect the circuit board closely. Are there any issues that jump out at you?
1. Inspect for Damage
Look for any visible signs of damage. This could be broken components, burning, or corrosion on the circuit board itself. If you notice something amiss, you’ll need to investigate further. Sometimes, a simple clean-up can do wonders; other times, you may need to replace the board entirely.
2. Perform a Reset
Once you’ve checked for issues, a reset can sometimes work wonders. Follow the reset steps in your Raynor manual to ensure you’re doing it correctly. This often involves pressing a specific button sequence or flipping certain switches.
3. Test Your Garage Door Opener
After everything is checked and possibly reset, it’s time for the moment of truth. Reconnect the power source, close up the garage door opener, and test its functionality. Does it respond to the remote? Are the operations smoother? If the door still experiences issues, it might be time to consult a professional for further help.
Disabling the circuit board on your Raynor garage door opener doesn’t have to be a daunting task. Once you know the steps and understand the why behind it, you’ll feel more confident tackling this issue. Always start by ensuring safety with power disconnections, approach each phase methodically, and don’t hesitate to consult your manual when needed.
By taking proactive steps in maintaining your garage door opener, you can avoid many common pitfalls and keep your garage functioning productively. The garage door isn’t just a barrier; it’s a major contributor to your home’s security and convenience. So taking the time to understand its inner workings and how to troubleshoot issues is invaluable. Happy tinkering!