
In this guide, we’ll walk you through the steps to disable your Craftsman garage door opener. Whether you’re using a remote or a keypad, I’ll break it down for you in a simple, clear manner. By the end of this article, you’ll feel confident in your ability to turn off your garage door opener when needed.
Understanding Your Craftsman Garage Door Opener
Before we jump into the actual steps, let’s take a moment to understand how a Craftsman garage door opener works. You have a remote control that sends a signal to the opener, which then activates the door mechanism. It’s pretty straightforward, but knowing this basic function will help you grasp why you might want to disable it.
Now, disabling the opener can refer to different things. For instance, you might want to stop your remote from working for a bit, or perhaps you want to reset it entirely. Whatever your reason, this guide will address the different methods you’ll use based on your needs.
How to Disable Your Craftsman Garage Door Remote
If your goal is to simply disable your Craftsman garage door remote, follow these steps:
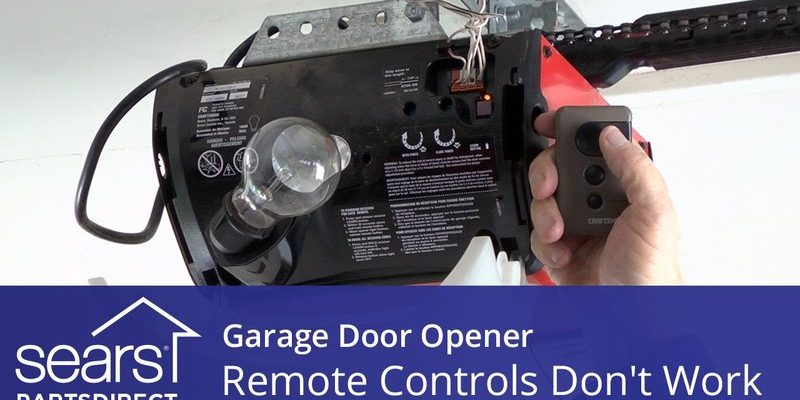
1. Locate the Power Source: Start by unplugging the power cord of the garage door opener. This often involves going to where the unit hangs from the ceiling and finding the cord connected to a wall outlet.
2. Remove the Battery: If you want to ensure that the remote doesn’t send signals, you can remove the battery from the remote. Most Craftsman remotes have a sliding cover on the back—pop it off and take out the battery.
3. Resetting the Remote: Sometimes, people just want to reset the remote. To do this, press and hold the button for a few seconds. This is often enough to cut the connection temporarily.
By following these steps, you’ll effectively disable your Craftsman remote. It’s just like putting a bookmark in a book—you can always come back to it later.
How to Disable the Keypad
If you rely on a keypad for access, disabling it is another straightforward task. Here’s what you need to do:
1. Locate the Keypad: Start by identifying where your keypad is. It’s usually placed on the outside wall of your garage.
2. Input the Disable Command: Most Craftsman keypads have a simple command. You’ll often need to press the “*” and ”
3. Test the Keypad: After entering the command, test the keypad to ensure it no longer opens the door. If it still works, double-check that you entered the command correctly.
Disabling the keypad can give you peace of mind, especially if you’ve had concerns about security.
Disabling Both the Remote and Keypad Temporarily
You may want to disable both the remote and the keypad at the same time, particularly if you’re going away for a while. Here’s how you can do that:
1. Use the Lock Mode: Many Craftsman models include a “lock” mode. Refer to your user manual for specifics, but usually, it involves holding down the lock button on your remote or wall console.
2. Testing: Just like before, test both the keypad and the remote afterwards. This way, you’ll make sure they don’t function while you’re away.
Using the lock mode is handy! It saves you from having to remove batteries or unplug wires in the opener unit.
Why You Might Need to Disable Your Garage Door Opener
You might be wondering, “Why would I want to disable my garage door opener anyhow?” There are a few common reasons people choose to do this:
– Security Concerns: If you’ve lost your remote or believe someone may have unauthorized access, disabling the opener is the first step in securing your home.
– Maintenance: Sometimes, your garage door system needs maintenance or repairs. Disabling the opener is essential before performing any work.
– Traveling: Planning a trip? It can be a wise choice to disable your opener while you’re away, giving you an extra layer of security.
Each of these scenarios calls for different methods of disabling your Craftsman garage door opener. Knowing how to do this can ultimately provide you with control and peace of mind.
Common Troubleshooting Tips
Sometimes, even after disabling your Craftsman garage door opener, you might face unexpected issues. Here are a few troubleshooting tips to keep handy:
1. Remote Not Working: If your remote isn’t responding after you’ve tried disabling it, check if the battery is dead. Replacing the battery might just do the trick.
2. Keypad Issues: If the keypad isn’t functioning even after re-entering commands, try resetting it again or checking for obstructions that might interfere with the signal.
3. Interference from Other Devices: Electronic devices can sometimes interfere with the signals. Make sure your opener isn’t battling with any nearby electronics.
Learning these troubleshooting tips can save you time and effort when dealing with your Craftsman garage door opener.
Re-enabling Your Craftsman Garage Door Opener
Once you’re ready to use your garage door opener again, you’ll need to reverse the disabling process:
1. Reinsert the Battery: If you removed the battery from the remote, put it back in and test if it functions as expected.
2. Turn on Power Source: If you unplugged your unit, plug it back into the wall outlet.
3. Unlock the Keypad: Using the same command you entered to disable the keypad, simply enter it again to restore its functionality.
Restoring access is usually just as easy as disabling it, making it convenient when you’re ready to resume normal usage.
Disabling your Craftsman garage door opener is a simple but important task to master. Whether you’re doing it for security, maintenance, or peace of mind while traveling, understanding the steps can make all the difference. Remember, it’s always about control—when you disable it, you’re taking an active role in protecting your home.
With this guide, you now have the knowledge to confidently disable and re-enable your Craftsman garage door opener as needed. And if you encounter any hiccups, refer back to the troubleshooting tips for solutions. Enjoy the security and ease of your garage door with a newfound sense of mastery!