Connecting the Sears safety sensor doesn’t have to be daunting. Imagine you’re assembling a simple piece of furniture—once you know where each piece goes, it starts to make sense. Here, we will guide you through the complete process to get your garage door operating smoothly again. This is not just for the tech-savvy among us; even if you’ve never done anything like this before, you can totally do it!
Understanding Your Safety Sensor
Before diving into the installation, it’s essential to understand what a Sears safety sensor is and how it works. Think of it as a protective shield for your garage door. These sensors emit beams of infrared light, creating an invisible barrier. If something—or someone—interrupts this beam while the door is closing, the sensors trigger the door to reverse direction. This feature is especially vital for keeping children and pets safe from harm.
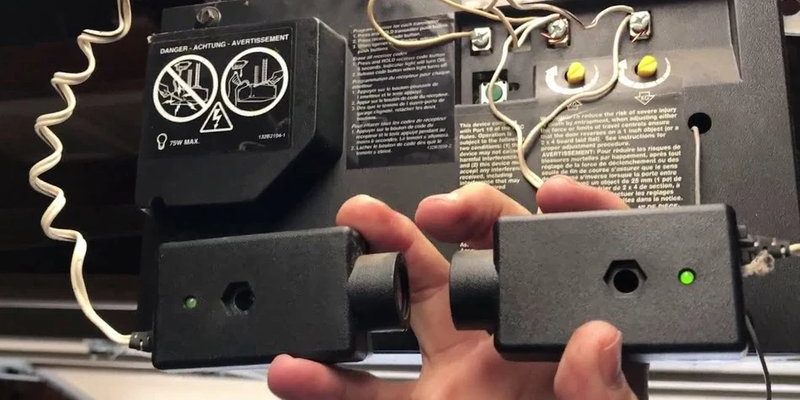
Each safety sensor has two main parts: the sending unit and the receiving unit. The sending unit emits the infrared beam, while the receiving unit picks up the signal. If these units aren’t correctly aligned, the system won’t function properly, which is where many homeowners run into trouble.
Gathering Your Tools
Before you jump into connecting your Sears safety sensor, it’s best to gather everything you need. Consider it like preparing for a mini home improvement project. Ensuring you have the right tools can make your life easier and save you time. Here’s a quick checklist of what to have on hand:
- Phillips screwdriver
- Level (optional, but handy for alignment)
- Measuring tape (to ensure proper distance)
- Wire strippers (if needed)
- Safety goggles (better safe than sorry!)
With these items gathered, you’re one step closer to connecting your safety sensor. This prep work can keep you from running back and forth, ensuring the process goes smoothly.
Connecting the Wires
Now it’s time to dive into the actual connection process. If you can’t visualize it, don’t fret! Think of it as just connecting the dots. First, ensure your garage door opener is unplugged—safety first! This prevents any accidental closes while you’re working.
1. Locate the terminals on your garage door opener. Usually, they’re clearly marked for the safety sensors.
2. Strip the wire ends to make a solid connection. It’s like peeling a banana—it ensures you get to the good part without any fuss!
3. Connect the wires to the corresponding terminals. Typically, one wire goes to the “sensor” terminal, and the other goes to “common.” Double-check your opener’s manual, as it will specify which wire goes where.
4. Secure the wires tightly, ensuring they’re not loose. This is like tying your shoelaces—don’t leave them draggling!
Once everything is connected, it’s a good idea to give it a visual check. Use your level to ensure they’re aligned correctly.
Aligning the Safety Sensors
Alignment is crucial! If your sensors aren’t lined up correctly, they won’t detect that invisible beam, and your garage door won’t operate as intended. Here’s how to make sure they’re in perfect sync:
1. Position the sensors approximately 6 inches above the ground. This height is ideal as it’s low enough to detect obstacles but high enough to prevent regular garage clutter from obstructing them.
2. Adjust the sensors so that they face each other directly. One way to do this is to loosen the screws holding them in place, make your adjustments, and then re-tighten the screws.
3. Check the LED lights. Most sensors have an LED that will indicate if they’re aligned. A solid green light usually means they’re functioning correctly, while a blinking light can indicate misalignment.
Seeing those lights glow green feels like victory—now you’re so close to testing everything out!
Testing the Connection
With everything connected and aligned, it’s time to put your hard work to the test! Testing ensures that the safety sensors respond as they should—a crucial step in the process.
1. Plug in your garage door opener and wait a moment to see if the sensors light up.
2. Manually block the infrared beam by waving your hand in front of the sensors. The door should reverse if it’s functioning correctly. Alternatively, you could place an object in the path of the beam for a more hands-free test.
3. Observe the sensor lights during this testing. If they flash or behave oddly, you might have to recheck your wiring or alignment. It’s like being a detective—sometimes you have to retrace your steps to find the culprit!
If everything is running smoothly, give yourself a pat on the back! You’ve just connected your Sears safety sensor and ensured your garage door now has a second set of eyes.
Troubleshooting Common Issues
Even with the best intentions, things sometimes go awry. If you find your Sears safety sensor isn’t functioning as expected, here are common issues and how to fix them.
– Misalignment: If the LED lights keep blinking, try adjusting the sensors again. Sometimes they just need a little nudge to get them facing each other correctly.
– Wiring issues: If your garage door doesn’t react when the beam is interrupted, double-check all wire connections. Make sure they are stripped well and secured tightly.
– Obstructions: Sometimes, objects under the door or dirt on the sensors can cause issues. Make sure the area is clean and free of debris.
– Power issues: If nothing is working at all, check the garage door opener’s power supply. Sometimes it’s as simple as resetting the whole system by unplugging it briefly.
Getting to the bottom of these issues can feel rewarding. Imagine you’re solving a puzzle—every solved problem just brings you closer to the big picture of a fully functioning garage door.
A Final Word on Safety Sensors
Connecting your Sears safety sensor might take a bit of time and patience, but the rewards are definitely worth the effort! Not only do you gain the peace of mind that comes from knowing your garage door is safe and functional, but you’ve also gained a valuable skill in the process.
If you ever find yourself struggling with tech, remember that troubleshooting can always work! Don’t hesitate to revisit the steps we’ve gone through today or even reach out for help if needed. After all, a helping hand can sometimes make even the most daunting tasks feel manageable.
We hope this guide has illuminated the path to successful connection and repair of your safety sensor. You’ve got this, and your garage door—and everyone around it—now has an extra layer of safety thanks to your efforts!