If you’ve got a specific remote in mind—maybe from brands like Linear or LiftMaster—you’ll want to make sure everything is connected correctly. These remotes can control various devices, from garage doors to gates. Let’s break down the steps together so that you feel confident tackling this project with ease.
Understanding Your Linear Motor Unit
The linear motor unit is a fascinating device that converts energy into motion. Think of it as a trusty friend that helps pull or push things along a straight path. You’ll often find this unit in applications like garage doors or automated curtains. But how does it work, you might ask? It uses electromagnetic forces to create linear motion. This means that instead of spinning like a traditional motor, it goes back and forth.
Knowing your specific linear motor unit’s specs—like the model number and brand—can save you a lot of time. Different units may have different functions, so take a few moments to read the manufacturer’s instructions. This step is crucial because sometimes, the connection process can vary based on the specific features of the motor unit you have.
Another important aspect is power. Before you start, ensure that the battery in the remote is fresh. A weak battery can lead to frustrating moments where you think something is wrong, when in fact, it’s just time to change the battery.
Gathering Your Tools and Equipment
To successfully connect your linear motor unit, you’ll need a few essential tools and equipment on hand. Here’s a quick checklist to make sure you’re prepared:
- A compatible remote control
- Power source for the linear motor unit
- Wire strippers (if required)
- Drill with a proper bit (for mounting)
It’s important to have everything ready before diving in. Imagine trying to build a piece of furniture without the screws. It’s just not going to work out well. You’ll want to follow each step carefully, so having your tools organized will keep things running smoothly.
Don’t forget about the manual that came with your linear motor unit! Sometimes those pesky little details—like voltage requirements—are tucked away in there, saving you from a headache later.
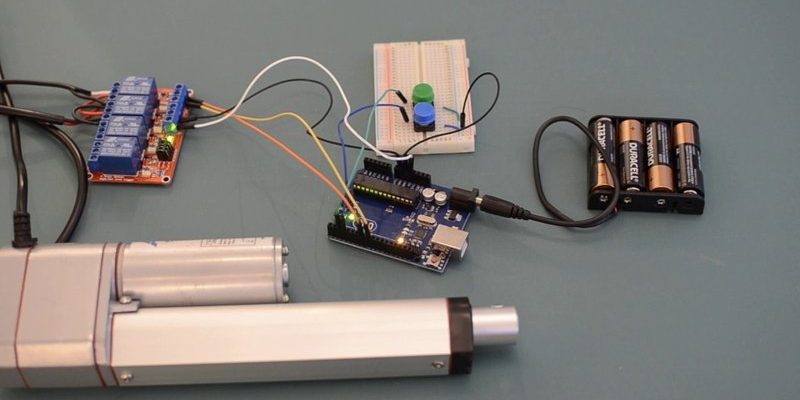
Connecting the Motor to the Power Source
Once you have your tools ready, it’s time to connect your linear motor unit to the power source. This isn’t as intimidating as it sounds. Here’s the thing: every unit is a bit different, but most follow a similar pattern.
First, you’ll want to identify the power connections. Typically, you press down on a tab or unscrew a cover to bring your wiring into view. Then, follow these steps:
1. Connect the power wires to the designated terminals. You’ll usually find labels indicating where to connect the positive and negative wires. Make sure they’re snugly in place; loose connections can create problems later on.
2. If your unit has multiple power levels or modes, make sure to configure it according to its needs. Again, refer to the user manual for guidance.
3. After establishing the connections, if your unit has a reset button, now’s the time to press it. Resetting helps the unit recognize new connections.
Keep in mind that the power setup is essential for the overall performance of your linear motor. If something seems off during the setup, don’t hesitate to troubleshoot. It could be as simple as a loose wire connection that needs tightening.
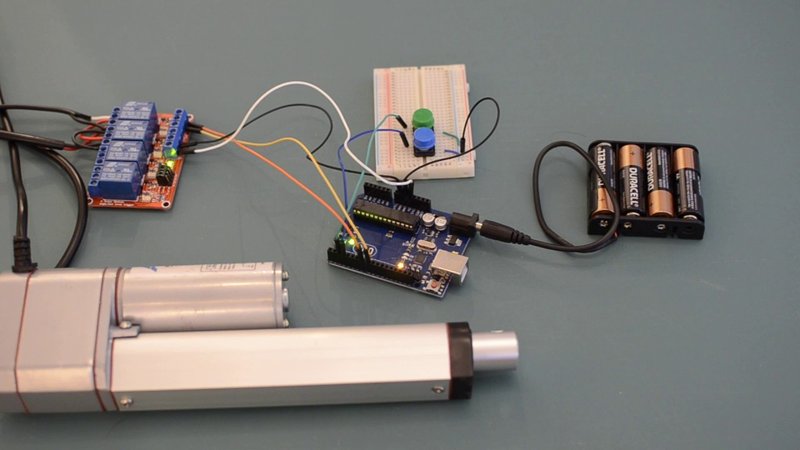
Pairing Your Remote with the Linear Motor Unit
Now that your motor is all powered up, let’s get to the fun part—pairing your remote control. Many people get confused during this step, so let’s break it down clearly.
Start by locating the pairing button on both the remote and the linear motor unit. This button is usually small and sometimes hidden under a cover. Here’s how to pair them step-by-step:
1. Press and hold the pairing button on the motor unit. This activates the pairing mode.
2. Within a few seconds, press the corresponding button on your remote. You’ll often see lights flashing on both devices, indicating that they are trying to communicate.
3. Once you see the light stabilize or turn solid on both the remote and motor, they’ve successfully paired.
This step is crucial because, without proper pairing, neither device will understand what the other is trying to do. If you face challenges during this process, try again by resetting both devices and repeating the steps carefully.
Testing the Connection
After setting everything up, it’s time for the moment of truth: testing your connection. This part feels a bit like that dramatic countdown before a rocket launch. You just can’t wait to see if everything works seamlessly.
To test the connection, follow these simple steps:
1. Press the button on your remote designed to operate the linear motor. Watch closely to see if it responds as expected.
2. If it’s a garage door opener, does it move smoothly? If it’s for curtains, do they slide open and shut easily?
3. In case the unit doesn’t respond, don’t panic. Double-check the connections. Make sure the power is turned on, and you’ve properly paired the devices.
Remember, troubleshooting is part of the process. If you don’t get it right the first time, just walk back through your steps. Checking where you might have gone wrong can often lead to quick fixes.
Troubleshooting Common Issues
Even the best laid plans can go awry sometimes. If you find that your linear motor unit isn’t behaving quite as expected, don’t sweat it. Troubleshooting common issues is normal in this kind of setup. Here are some typical problems and how to address them:
– Remote Not Responding: First, check the battery and replace it if it’s dead. If it still doesn’t work, try the pairing process again.
– Motor Isn’t Moving: Ensure that the power source is connected properly. If it’s a garage door unit, check if there are any obstructions in the way.
– Unstable Connection: If the motor engages occasionally but not consistently, examine all your wiring. Look for frayed wires or loose connections that might interfere with operations.
By popping the hood and taking a closer look, you can usually pin down the issue. If all else fails, reaching out to customer support for your specific device can provide helpful guidance.
Final Thoughts
Connecting a linear motor unit may seem daunting at first, but by following the steps laid out in this guide, you can figure it out with confidence. Think of it as a recipe: gather your ingredients, measure twice, and follow each step carefully. As you connect and pair your devices, you’re not just setting up a system; you’re creating an essential part of your daily environment.
Whether it’s adding automation to your home or setting up a workspace with improved efficiency, understanding how to connect these units opens the door to countless possibilities. Take your time, work through the details, and soon you’ll have a beautifully functioning linear motor unit that operates just the way you want. Happy connecting!